
Brass Sheet: 9 Essential Points To Specify, Fabricate, And Source

Brass Sheet Basics Made Clear
When you’re specifying materials for your next project, the difference between a brass sheet, a brass plate, and brass foil might seem subtle—but it’s absolutely critical. Imagine selecting a material that’s too thin for a sturdy panel, or too thick to form into a decorative curve. To get it right, let’s start by defining exactly what a sheet of brass is, how it stands apart from other forms, and why these distinctions matter for engineers, buyers, and makers alike.
What Is Brass Sheet?
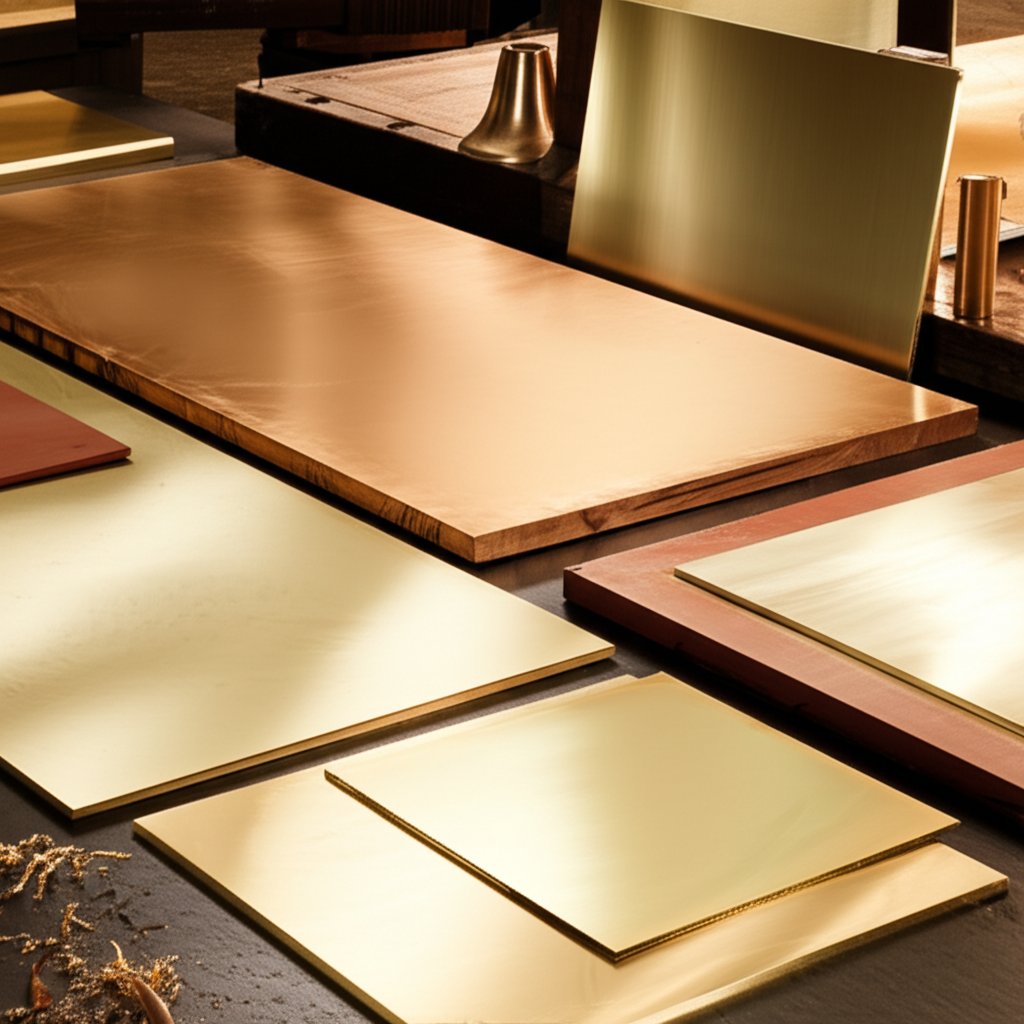
Brass sheet is a flat product made from a copper-zinc alloy, typically supplied in rectangular or square panels. It’s valued for its workability, attractive gold-like appearance, and resistance to corrosion. You’ll find brass sheet metal at the heart of many projects—from architectural accents and instrument faces to shields, signage, and custom hardware. The most common grade for general-purpose use is brass alloy 260, but other grades are available for specific needs.
Sheet Versus Plate Versus Foil
- Brass Foil: The thinnest form, typically less than 0.2mm thick. Used for decorative overlays, shielding, or intricate crafts.
- Brass Sheet: Medium thickness, ranging from 0.5mm up to 6mm. This is the most versatile form, balancing strength and formability. Ideal for panels, enclosures, and deep-drawn parts.
- Brass Plate: The thickest option, generally 6mm or thicker. Chosen for structural or heavy-duty applications where rigidity is key.
You’ll notice that US-based suppliers often measure these categories in millimeters, and decimal thickness is preferred over gauge for accuracy. Gauge numbers can be confusing and are best avoided for engineering precision.
| Type | Typical Thickness Range | Formability | Machinability | Common Applications |
|---|---|---|---|---|
| Brass Foil | < 0.2mm | Excellent—can be folded, embossed, or cut with scissors | Not suited for machining | Decorative overlays, crafts, shielding |
| Brass Sheet | 0.5mm – 6mm | Good—can be bent, stamped, or deep drawn | Can be drilled, cut, or lightly machined | Panels, instrument faces, shields, custom hardware |
| Brass Plate | >= 6mm | Limited—best for flat parts | Excellent for heavy machining | Structural supports, bases, heavy-duty fixtures |
For deep-drawn or formed parts, prioritize brass sheeting for its superior formability; reserve brass plate for flat panels or where maximum stiffness is required.
Where Brass Sheet Excels
Why choose brass sheet over other forms? It strikes a balance between strength and flexibility that’s hard to match. Sheets of brass are commonly used for:
- Decorative wall panels and architectural trim
- Protective shields and covers
- Instrument faces and control panels
- Custom signage, nameplates, and hardware
- Kitchen backsplashes and tabletops
Because metal brass sheet is easy to cut, bend, and finish, it’s also a favorite for both prototyping and production runs. When you need a material that can be shaped without cracking, but still holds its form, a sheet of brass is a top pick. For projects requiring more rigidity or heavy machining, a brass plate is the better choice.
Remember, brass sheets come in a variety of tempers and finishes—details that can further tailor your selection to the needs of your application. If your project calls for intricate forming, or you need a surface that will accept a high polish, brass sheeting offers the flexibility and appearance you need.
Alloy Selection Made Practical
Ever wondered why some brass sheets are a breeze to machine, while others bend effortlessly into complex shapes? The answer lies in the alloy. Choosing between 260 brass, 360 brass, and naval brass sheet isn’t just about picking what’s in stock—it’s about matching each alloy’s strengths to your project’s needs. Let’s break down the differences so you can make a confident, cost-effective choice.
Choosing Between 260 and 360 Brass
Imagine you’re designing a custom instrument face or a decorative panel. If you need to deep-draw or form the brass into intricate shapes, 260 brass (also known as cartridge brass or brass 260) is your go-to. Its high copper content delivers impressive ductility and allows for extensive forming without cracking. On the flip side, if your project calls for detailed machining—think precise holes, threads, or cutouts—a 360 brass plate (brass 360) will save you time and tooling costs. This alloy’s added lead content makes it the “free-machining” champion, producing clean chips and smooth finishes with minimal burrs.
| Alloy | Machinability | Bendability / Formability | Corrosion Resistance | Typical Applications |
|---|---|---|---|---|
| 260 Brass (Cartridge) | Good (not as high as 360 brass) | Excellent—ideal for deep drawing and forming | Very good, especially in moist/atmospheric conditions | Instrument faces, architectural trim, ammunition casings, musical instruments |
| 360 Brass (Free-Machining) | Excellent—best for high-speed machining, minimal tool wear | Moderate—less ductile, not suited for deep forming | Good, but lead content may limit use in potable water or food applications | Precision mechanical parts, connectors, gears, detailed hardware |
| Naval Brass (C464) | Good—can be machined, but not as easily as 360 brass | Good—suitable for moderate forming and hot working | Excellent—resistant to seawater and dezincification | Marine hardware, bushings, ship propellers, moderate marine environments |
When Naval Brass Makes Sense
Need your brass sheet to stand up to saltwater or harsh environments? That’s where naval brass sheet shines. Thanks to a touch of tin in its composition, it resists dezincification—a form of corrosion that can plague standard brasses in marine or high-humidity settings. While not as easy to machine as 360 brass, naval brass is a reliable choice for bushings, marine fittings, or architectural elements exposed to the elements.
Application-Driven Alloy Picks
- Choose 260 brass for parts that require extensive bending, stamping, or drawing—think musical instruments or intricate trim.
- Opt for 360 brass plate when machining speed, accuracy, and tool longevity are critical, such as for threaded inserts or custom connectors.
- Select naval brass sheet for marine, outdoor, or high-moisture applications where corrosion resistance is paramount.
Still unsure? If your project requires both good machinability and reasonable formability, consider a compromise: alloys like 353 brass offer improved machinability over 260 brass while retaining better formability than 360 brass, making them a flexible choice for mixed fabrication tasks.
Rule of thumb: For deep forming, go with 260 brass; for extensive machining, 360 brass is your best bet.
Understanding these trade-offs ensures you won’t waste time or money on a material that’s hard to work or won’t last in its intended environment. Next, we’ll look at the mechanical properties and standards you should specify to guarantee quality and compliance for your chosen alloy.
Properties, Standards, and Specs That Matter
When you’re sourcing a brass sheet for your project, it’s not just about picking the right alloy—it’s about ensuring the material will perform as expected, meet regulatory requirements, and pass every quality check. Sounds complex? It doesn’t have to be. By focusing on a handful of key mechanical properties and following recognized standards, you can specify, verify, and receive exactly what you need—whether that’s a brass sheet 2mm thick, a delicate 1/16 brass sheet, or heavy-duty unlacquered brass sheets for architectural use.
Key Properties to Specify
| Property | Why It Matters | Typical Values/Standards | Test Method |
|---|---|---|---|
| Tensile Strength | Indicates how much force the sheet can withstand before breaking—crucial for structural or load-bearing parts. | Ranges from 285–715 MPa depending on alloy and temper (see ASTM B36/B36M tables) | ASTM E8/E8M |
| Yield Strength | Shows the stress at which the sheet begins to permanently deform—important for formed or bent parts. | Not always specified; consult supplier or refer to ASTM B36/B36M | ASTM E8/E8M |
| Elongation | Measures ductility—how far the brass can stretch before breaking. Higher values mean better formability. | Varies by temper; generally higher in annealed grades | ASTM E8/E8M |
| Hardness | Correlates with wear resistance and ease of machining. Useful for quick checks on temper. | Rockwell B/30T scales; refer to ASTM B36/B36M Table 2–7 | ASTM E18 |
| Temper | Defines the degree of hardness or softness, affecting both strength and formability. | H01 (quarter-hard), H02 (half-hard), H04 (hard), O (annealed), etc. | ASTM B601 |
| Thickness & Tolerance | Ensures your part fits and functions as designed—critical for precision work. | e.g., 1/8 brass sheet (3.18mm), 2mm, or 1/16 brass sheet (1.59mm), with tolerance per ASTM B248/B248M | Calipers, micrometers |
Understanding Tempers and Testing
Imagine you’re forming a brass sheet roll into a decorative panel: the temper (hardness) will decide how easily it bends and whether it springs back or cracks. ASTM B36/B36M defines standard tempers—like H01 (quarter hard), H02 (half hard), H04 (hard), and O (annealed)—each with its own mechanical property range. For example, a half-hard temper offers a balance between strength and formability, while full-hard is chosen for maximum stiffness in flat panels.
- Check the mill test report for actual values of tensile strength and hardness for your batch.
- For critical applications, request independent verification using ASTM E8/E8M (tensile) or E18 (hardness) methods.
- Always confirm thickness and flatness—especially for thin brass sheet or when using a brass roll or brass sheet roll for continuous fabrication.
Always verify temper and thickness tolerance upon receiving your brass sheet—these are the most common sources of quality issues in fabrication and fit.
Compliance and Traceability
Quality doesn’t stop with mechanical properties. Compliance and traceability are essential, especially for regulated industries or projects with strict documentation needs. Here’s what to look for:
- Material Certification: Request mill test reports or certificates of compliance to confirm the alloy, temper, and mechanical properties meet ASTM B36/B36M or other relevant standards.
- Traceability: Ensure each shipment is traceable to a specific heat or lot number—this is especially important when ordering brass sheet roll or large quantities of unlacquered brass sheets.
- RoHS/Lead Content: For electronics, architectural, or food-contact applications, confirm the product meets RoHS and low-lead requirements as specified in the purchase order.
- Inspection and Testing: Independent inspections and dimensional checks (using calipers, micrometers, or CMMs) help verify that your brass sheet 2mm thick or other specified dimensions are correct.
| Spec Sheet Template: Brass Sheet | Details to Include |
|---|---|
| Alloy/UNS Number | (e.g., C26000, C46400) |
| Temper | H01, H02, H04, O, etc. |
| Thickness & Tolerance | e.g., 1/16 brass sheet ±0.1mm, per ASTM B248/B248M |
| Width & Length | Specify in mm or inches, plus tolerance |
| Surface Finish | Mill, polished, or unlacquered |
| Edge Condition | Square, rounded, or custom |
| Certifications Required | ASTM B36/B36M, RoHS, etc. |
| Traceability/Heat Number | Required for each shipment |
By specifying these details up front, you reduce the risk of rework, delays, or compliance headaches. Next, we’ll move from the world of specs and standards to hands-on fabrication—showing you how to cut, bend, and shape brass sheet metal for your unique application.
How to Cut, Drill, and Bend Brass Sheet
Ever wondered why some thin brass sheet metal projects turn out crisp and professional, while others end up with rough edges or warped panels? The secret isn’t just in the material—it’s in the method. Whether you’re prepping a decorative panel, a shield, or a custom bracket, mastering the basics of how to cut brass sheet, drill clean holes, and form tidy bends will save you scrap and frustration. Let’s break down the essentials, step by step.
Clean Cutting for Accurate Edges
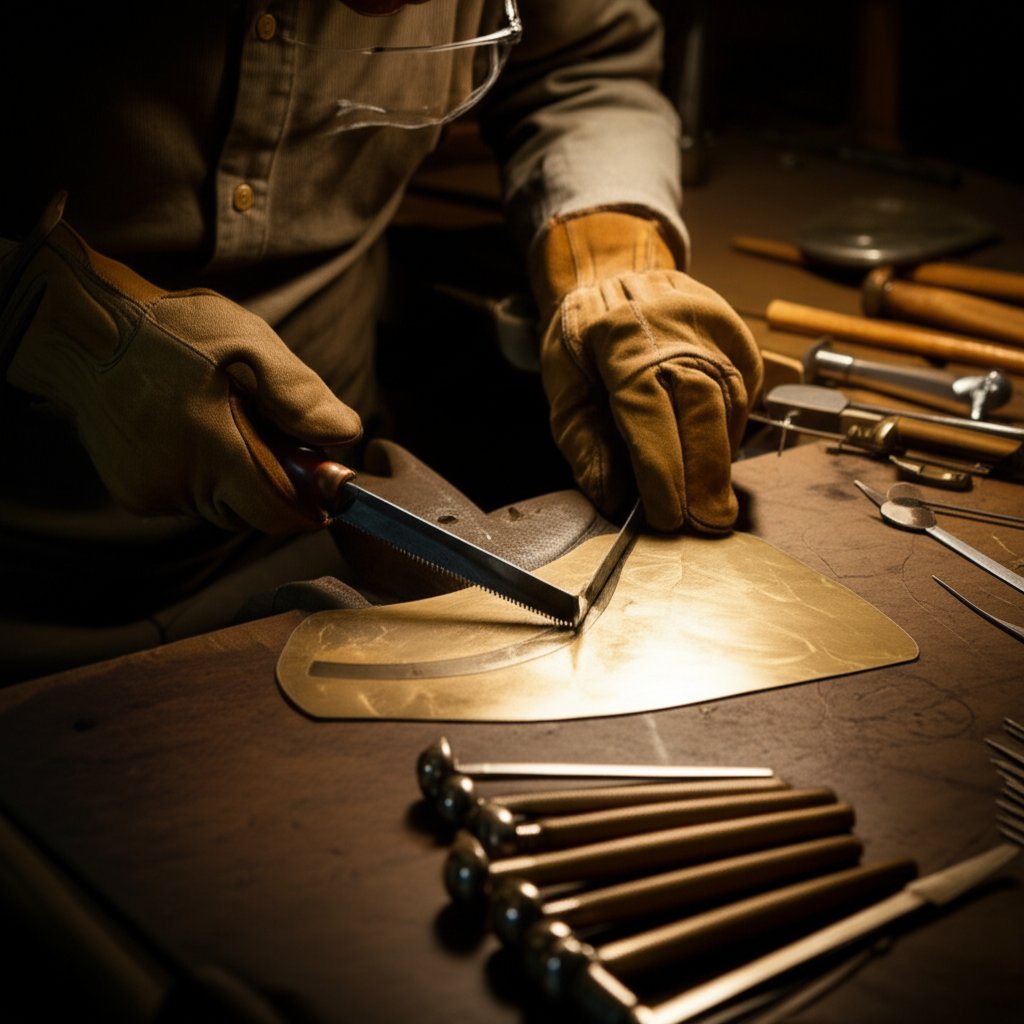
When you set out to cut brass, tool choice and setup matter as much as the sheet itself. Here’s how to cut brass sheet metal for sharp, accurate results:
- Layout and Marking: Use a fine-tip marker or scribe for your cut lines. For curves, consider trimming corners first, then refining the shape.
- Clamping and Support: Sandwich the brass sheet between two pieces of scrap plywood and clamp firmly in a vise. This prevents vibration and supports the edge during the cut.
-
Tool Selection:
- Aviation snips: Best for thin brass sheeting and gentle curves. Choose right, left, or straight-cutting snips for your path.
- Hacksaw: Ideal for straight cuts in thicker sheet. Always cut on the push stroke and keep downward pressure steady.
- Jeweler’s saw: For intricate shapes, use a lubricated fine blade and a bench pin for support.
- Rotary tool: For small, detailed cuts—always clamp securely and wear eye protection.
- Feed and Speed: Go slower than you would for steel. Brass heats quickly, so avoid forcing the tool—let the blade do the work. For power tools, use lower speeds and apply more frequent cooling.
- Edge Finishing: After you cut brass, file or sand the edge to remove burrs. For precision, cut just outside your line and finish to size with a file or belt sander.
Pro tip: Always wear safety glasses, and keep your hands clear of the blade path. For thin brass sheet, a sharp tool and firm support are your best friends.
Drilling and Hole Quality
When adding holes to brass sheet, the right setup prevents ragged edges and distortion:
- Use sharp, high-quality drill bits—dull tools can grab or tear the metal.
- Support the workpiece with a wood or sacrificial backing to minimize burrs and prevent the sheet from flexing.
- Go slow and steady: Use moderate speed and light pressure. Brass is softer than steel but can grab if rushed.
- Deburr both sides: After drilling, use a countersink or deburring tool to clean up the hole. This is especially important for thin brass sheet metal.
- Spacing and Size: Avoid very small holes (smaller than the sheet thickness), and keep holes at least 1.5 times the material thickness from edges to prevent distortion (Five Flute).
Bending Radii and Annealing
Bending brass sheet is where things get tricky—push it too far, and you risk cracking or permanent warping. Here’s how to keep bends clean and consistent:
| Brass Sheet Thickness | Temper | Recommended Minimum Inside Bend Radius | Notes |
|---|---|---|---|
| 0.5–1.0mm | Annealed (O) | Equal to thickness | Excellent for tight bends and deep drawing |
| 1.0–2.0mm | Half-hard (H02) | 1.5–2x thickness | Increase radius for cleaner bends |
| 2.0–3.0mm | Full-hard (H04) | 2–3x thickness | Annealing between bends helps prevent cracking |
General guidance: Softer tempers (annealed) allow for tighter bends; harder tempers require a larger inside radius to avoid cracking. Always plan bends perpendicular to the material’s grain direction for best results.
If you’re working with thin brass sheeting and notice resistance or hear cracking, stop and consider annealing. Briefly heating the bend area with a torch and allowing it to cool can restore ductility. Just be sure to heat evenly to avoid warping.
Troubleshooting Common Fabrication Issues
- Burrs on cut edges: Sharpen tools, reduce feed rate, and always deburr after cutting.
- Work-hardening during forming: Anneal between forming passes, especially for full-hard tempers.
- Cracking at bends: Increase bend radius, anneal material, or add relief notches at corners.
- Heat tint or discoloration: Use proper cooling and avoid overheating during cutting or annealing.
- Surface scratches: Use clean, dedicated tools and avoid dragging the sheet across hard surfaces.
Careful attention to tool sharpness, fixturing, and gradual forming is the key to minimizing scrap and achieving consistent, professional results when you cut brass or form thin brass sheet metal.
With these hands-on tips, you’ll be ready to take on even complex shapes in thin brass sheet metal. Next, we’ll explore joining methods that keep your assemblies strong and reliable, whether you’re soldering, brazing, or tackling more advanced connections.
Joining Methods That Hold Under Stress
When you’re assembling thin brass sheet, the right joining technique can make or break your project—literally. Will your decorative panel, shield, or brass sheet metal for crafts hold up to handling and time? Or will joints crack, discolor, or fail under stress? Let’s walk through proven methods for joining brass sheet, from soft soldering for delicate work to silver brazing for strength, and even specialty welding for advanced brass fabrication tasks.
Soldering for Low-Temperature Assembly
Picture crafting a miniature railing from brass foil or assembling a custom frame for brass sheet metal for crafts. Soldering is often the method of choice for joining thin brass sheet or small components. Why? It uses a low-melting-point alloy—typically tin-lead or lead-free solder—so your base metal isn’t overheated or distorted. Here’s a practical step-by-step process for reliable soldered joints:
- Surface Prep: Clean all joint areas with fine steel wool or emery paper to remove oxides and oils. Even new brass metal sheet often has a protective coating that can interfere with adhesion (David Neat).
- Flux Application: Apply a thin layer of flux paste to the joint. Flux prevents oxidation and helps the solder flow.
- Assembly and Fixturing: Secure the pieces in position using masking tape or a jig. Ensure tight, direct contact at the joint for efficient heat transfer.
- Controlled Heating: Use a 30–40W soldering iron with a clean, chisel tip. Heat the joint—not the solder—until the flux smokes and the metal is hot.
- Solder Introduction: Touch the solder wire to the joint (not the iron). The metal’s heat should melt the solder, allowing it to flow and fill the joint.
- Post-Cleaning: Once cool, remove flux residue with warm water and detergent to prevent long-term corrosion.
- Poor wetting: Ensure the joint is clean and fluxed; increase iron wattage if needed.
- Porosity: Remove all surface oils and oxides before soldering.
- Joint embrittlement: Avoid overheating and use the minimum amount of solder for strength.
Silver Brazing for Strength
When your brass fabrication requires a stronger, more heat-resistant joint—such as for mechanical assemblies or load-bearing parts—silver brazing is the answer. This process uses a silver-based filler alloy and higher temperatures (typically 1,100–2,000°F) to create robust, leak-proof bonds without melting the base brass. Follow these steps:
- Thorough Cleaning: Scrub the joint area with an abrasive pad and solvent to remove contaminants.
- Flux Application: Brush on a borax- or boric acid-based flux just before brazing.
- Assembly: Clamp or fixture parts with a tight gap (ideally less than 0.002 inches).
- Heating: Use an oxy-fuel torch to heat the assembly evenly until the flux melts and flows.
- Filler Introduction: Touch the silver brazing rod to the joint; capillary action draws the filler into the gap.
- Cooling and Cleaning: Allow to cool naturally, then remove flux residue with water and a brush.
- Poor wetting: Re-clean surfaces and use fresh flux.
- Porosity or voids: Maintain even heat and avoid overheating, which can vaporize zinc.
- Embrittlement: Use the correct filler for your brass alloy; avoid excessive heat.
Even heat and capillary action are the keys to strong, clean lap joints—take your time and let the filler flow naturally.
Managing Heat and Dezincification: Welding Brass Sheet
Welding thin brass sheet or brass foil is challenging due to brass’s high thermal conductivity and the risk of zinc evaporation (dezincification). If welding is unavoidable, such as for structural repairs or joining brass plated metal elements, keep these principles in mind:
- Preparation: Clean all surfaces thoroughly to prevent porosity and cracking.
- Fit-Up: Ensure tight, gap-free joints for better weld quality and heat control.
- Heat Input: Use the lowest effective current and shortest arc; consider TIG or MIG welding with inert gas shielding.
- Ventilation: Always weld in a well-ventilated area to avoid exposure to zinc fumes.
- Cooling: Allow the joint to cool slowly to reduce stress and prevent cracking.
For most craft and light-duty projects, soldering and brazing remain the best options for joining thin brass sheet and brass metal sheet components. Welding is best reserved for specialized applications or thicker sections where other methods are not feasible.
Mastering these joining techniques will help ensure your brass assemblies—whether for crafts, custom hardware, or decorative panels—stand up to both stress and time. Up next, we’ll explore how finishing and decorative treatments can further elevate the look and durability of your brass projects.
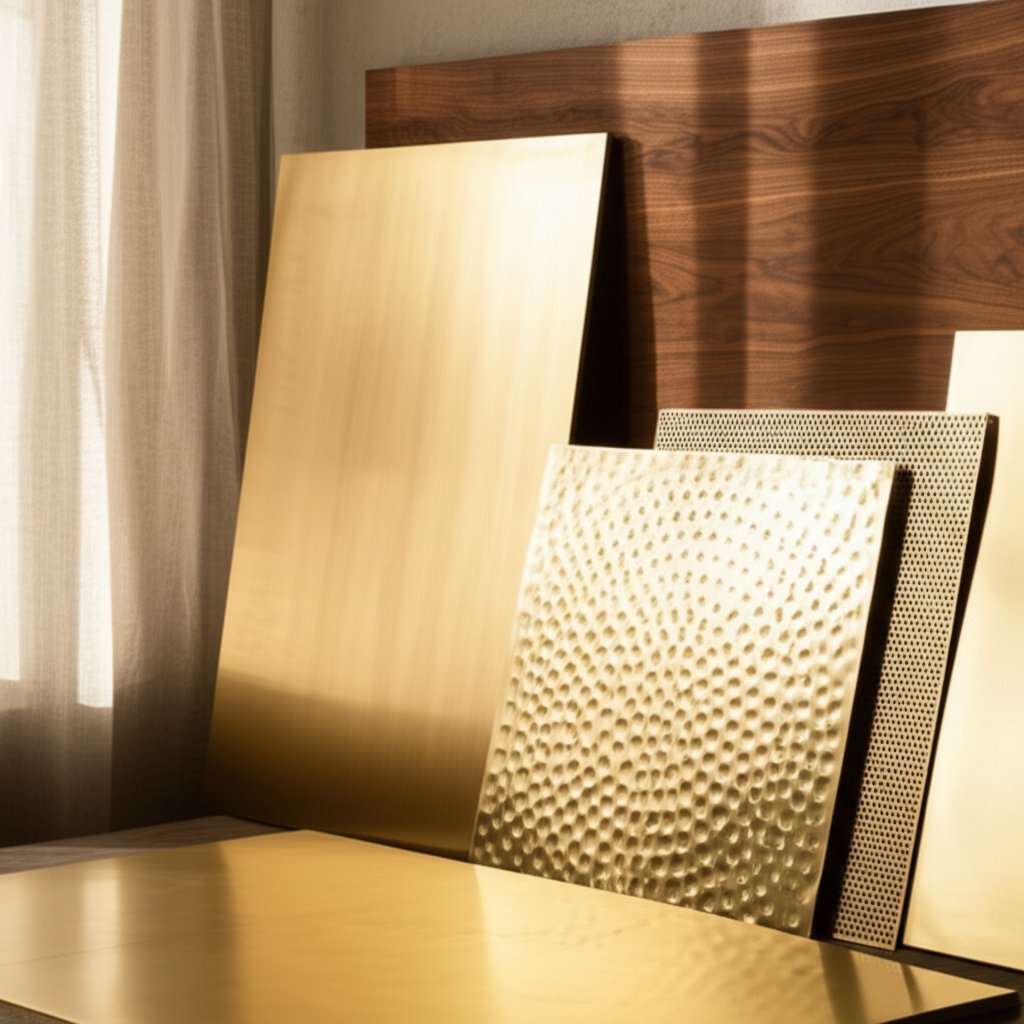
Finishes, Textures, and Decorative Choices for Brass Sheet
Ever wondered how a simple brass sheet transforms from a plain panel into a show-stopping focal point or a subtle architectural accent? The secret lies in the finishing process. Whether you’re aiming for a mirror shine, a soft satin glow, a vintage patina, or a dynamic perforated pattern, the right finish can make all the difference in both appearance and performance. Let’s explore the most popular options for decorative brass sheet finishes—and how to keep them looking their best.
Finish Options and Visual Impact
| Finish Type | Process Notes | Glare/Reflection | Fingerprint Resistance | Typical Applications | Care Tips |
|---|---|---|---|---|---|
| Polished Brass Sheet Metal | Buffed with fine abrasives and polishing compounds for a mirror-like finish | High—very reflective, bright | Low—shows fingerprints easily | Decorative trim, signage, luxury accents | Clean with soft cloth; avoid abrasives; wax or lacquer to slow tarnish |
| Brushed Brass Sheet Metal | Brushed or abraded with fine-grain belts for a satin, directional texture | Medium—diffuses light, reduces glare | Medium—better at hiding fingerprints | Backsplashes, door hardware, high-touch surfaces | Wipe with damp cloth; polish along grain; wax for added protection |
| Hammered Brass Sheet | Hand- or machine-hammered for a dimpled, textured surface | Low—scatters light, rich visual depth | High—conceals smudges and handling marks | Decorative panels, furniture, custom art | Dust regularly; occasional gentle polish |
| Perforated Brass Sheet Metal | Punched with regular or custom patterns for airflow, sound control, or design | Varies—pattern breaks up reflections | High—depends on pattern and finish | Screens, facades, privacy panels, acoustic panels | Vacuum or dust; avoid moisture in open areas |
| Patinated/Antiqued | Chemically or naturally oxidized for aged or colored look | Low—matte, absorbs light | High—hides wear and aging | Vintage decor, restoration, custom art | Do not polish; seal with wax or lacquer to lock in patina |
Texture and Pattern Choices
When you want to add depth or break up a flat surface, texture is your friend. Hammered brass sheet brings a handcrafted, artisanal vibe—each dimple catches the light differently, making it a favorite for decorative brass sheet panels or custom furniture. Brushed brass sheet metal offers a modern, understated look, perfect for high-traffic areas where fingerprints might otherwise be a hassle. Perforated brass sheet metal isn’t just about looks: the size and spacing of holes can control airflow and light, making it ideal for screens, guards, or acoustic panels. Remember, the perforation ratio (open area vs. solid) impacts not only the design but also the stiffness and strength of the panel.
- Polished brass sheet metal—Dramatic shine, but requires regular cleaning.
- Brushed brass sheet metal—Soft, directional texture that hides small scratches.
- Hammered brass sheet—Unique, tactile, and forgiving of wear.
- Perforated brass sheet metal—Functional and highly customizable for both form and function.
- Patinated finishes—Great for vintage or artistic effects, and low maintenance once sealed.
Pair brushed finishes with high-touch surfaces—like handles or backsplashes—to minimize visible fingerprints and keep your project looking fresh.
Maintenance and Patina Planning
Keeping your decorative brass sheet looking its best isn’t complicated, but it does take a little planning. For polished brass sheet metal, regular dusting and gentle wiping with a soft cloth will maintain its luster. If tarnish develops, use a non-abrasive polish or a homemade solution of lemon and baking soda, but always test in an inconspicuous area first. For brushed or hammered finishes, follow the grain or texture when cleaning, and avoid harsh chemicals that could dull the surface.
If you prefer a natural patina, let the brass age gracefully—just be sure to clean it gently to avoid uneven spots. For a consistent look over time, consider sealing with a microcrystalline wax or a clear lacquer. This is especially helpful for panels exposed to moisture or frequent handling.
Pros and Cons of Popular Brass Sheet Finishes
-
Polished Finish
- Pros: Striking visual impact, enhances color, easy to clean initially.
- Cons: Shows fingerprints and scratches, requires regular upkeep.
-
Brushed Finish
- Pros: Hides minor blemishes, modern look, lower glare.
- Cons: Directional grain may show deep scratches, needs cleaning along the grain.
-
Hammered Finish
- Pros: Unique texture, disguises wear, adds artisan feel.
- Cons: Harder to clean, may trap dust in dimples.
-
Perforated Finish
- Pros: Customizable patterns, functional for airflow/light, resists fingerprints.
- Cons: Can be less rigid; open areas may collect dust.
-
Patinated Finish
- Pros: Low maintenance, hides aging, rich color options.
- Cons: Irreversible once sealed, can be unpredictable if done naturally.
By understanding your options—from brushed brass sheet metal to perforated brass sheet metal and beyond—you can match the perfect finish to your project’s style, function, and maintenance needs. Next, we’ll cover how to estimate material needs, specify to suppliers, and ensure you get the right brass sheet for your application.
Sourcing, Estimating, and Supplier Templates
Ever found yourself wondering, “How much brass sheet do I really need—and how do I make sure I’m getting the best value?” Whether you’re ordering a single panel or stocking up on brass sheet metal 4x8 for a production run, sourcing the right amount at the right price can make or break your project’s budget and timeline. Let’s break down the essentials of estimating, specifying, and receiving brass sheet stock—so you can buy smart and avoid surprises.
Estimating Weight and Cost
Before you request a quote or search for brass sheet metal for sale, it pays to calculate the weight and area you need. Most suppliers price brass metal sheets for sale by weight or by sheet size, so knowing these numbers helps you compare offers and control costs.
Key formulas:
- Area (sq ft or sq m): Length × Width
- Volume (cubic inches or cm): Area × Thickness
- Theoretical Weight: Volume × Density of Brass (Density ≈ 0.307 lb/in³ or 8.5 g/cm³ for most common alloys)
For example, a brass sheet metal 4x8 (48" × 96") at 1/8" thick:
- Area = 48 × 96 = 4,608 in² (or 32 sq ft)
- Volume = 4,608 × 0.125 = 576 in³
- Weight ≈ 576 × 0.307 = 176.8 lbs
Use these calculations to estimate total weight for your order. Many suppliers, like Mead Metals, offer online calculators to simplify this process. Once you know the weight, you can compare brass sheet price and brass sheet metal prices across different vendors. Remember to account for offcuts, scrap, and test coupons in your total.
Always order a bit extra—typically 5–10%—to cover mistakes, setup pieces, and future repairs.
Specifying to Suppliers
Clarity is key when ordering sheet brass for sale. A well-prepared specification prevents costly errors and delays. Here’s what most suppliers need:
| Order Template | Example Entry |
|---|---|
| Alloy/UNS Number | C26000 (Cartridge Brass) |
| Temper | H02 (Half-hard) |
| Thickness & Tolerance | 1.5mm ±0.1mm |
| Dimensions | 4' × 8' sheets |
| Finish | Brushed, Polished, or Mill |
| Edge Condition | Square, Rounded, or Custom |
| Quantity | 10 sheets |
| Certifications | ASTM B36/B36M, RoHS compliance |
- Be specific about tolerances, finish, and edge type—especially for visible or fit-critical parts.
- Request material test reports and traceability if your application is regulated or requires documentation.
- For large or recurring orders, ask about price breaks, lead times, and stock availability.
Distributor vs. Mill: Distributors stock standard sizes and offer faster delivery, while mills can produce custom dimensions or alloys but may require larger minimum orders and longer lead times. Lead-time drivers include thickness, temper, and special finishes—so plan ahead if your project is time-sensitive.
Receiving and Inspection
Once your brass sheet stock arrives, a quick inspection helps catch issues before they impact your project. Use this checklist to stay on track:
- Dimensions: Measure thickness, width, and length against your order.
- Flatness: Check for warping or bowing, especially on thinner sheets.
- Surface Quality: Inspect for scratches, dents, or finish defects.
- Edge Condition: Confirm edges match your requirements.
- Certifications: Review mill test reports, RoHS compliance, and traceability details.
If anything is out of spec, contact your supplier immediately—most will work with you to resolve issues quickly, especially when you’ve documented discrepancies at delivery.
Ready-to-Use Templates for Brass Sheet Sourcing
- Cut-to-Size Order Template: Alloy, temper, thickness, width, length, tolerance, finish, edge, quantity, certs.
- Material Spec Sheet: Alloy/UNS, temper, dimensions, finish, edge, standards, RoHS, traceability, test reports.
- Receiving Inspection Checklist: Dimensions, flatness, surface, edge, certs, and lot numbers.
By following these steps, you’ll source brass sheet metal for sale with confidence—knowing you’ve covered every detail from estimate to inspection. Next, we’ll explore when to consider CNC machining for precision brass components and how to choose the right fabrication path for your needs.
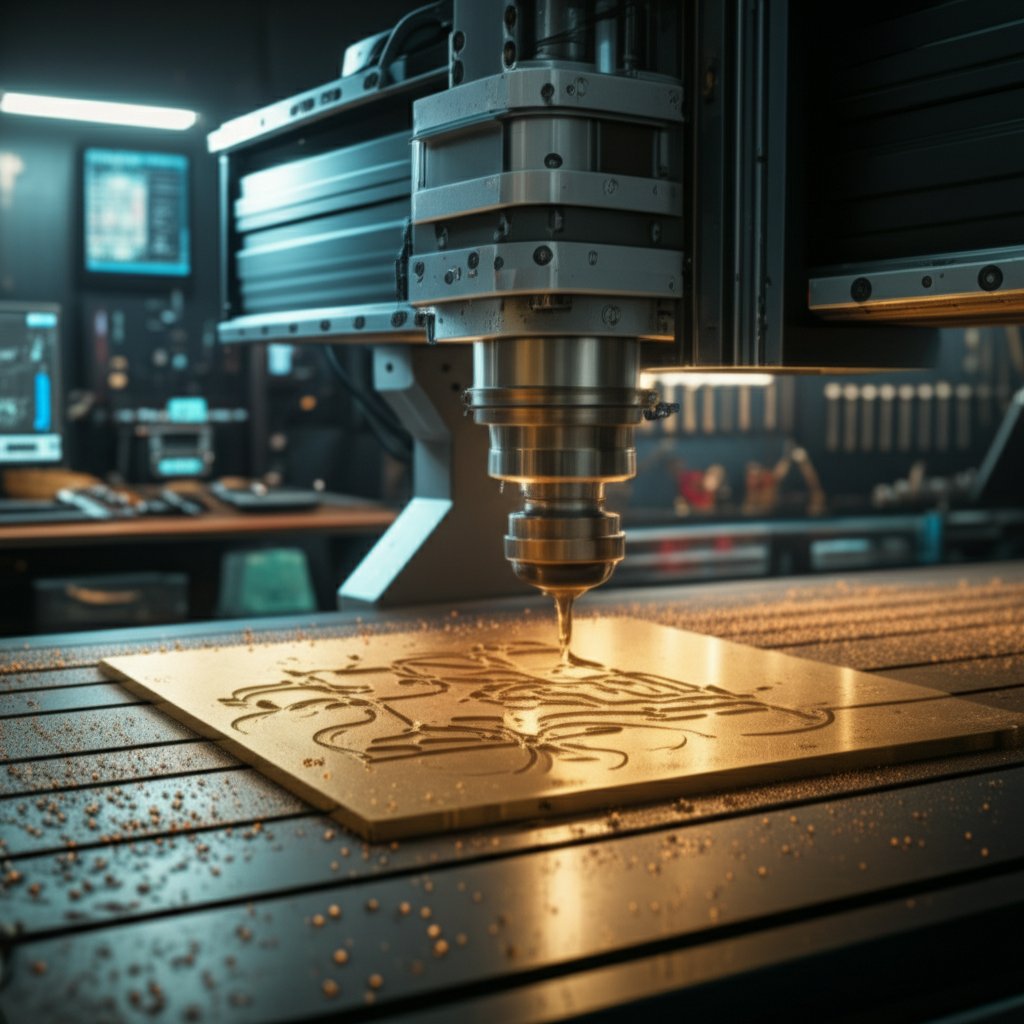
CNC Paths for Precision Brass Components
Ever tried cutting a complex pattern in brass sheet by hand, only to end up with jagged edges or parts that just don’t fit? That’s where CNC precision steps in. Whether you’re crafting custom brass panels for an instrument, producing intricate bezels, or need a laser cut brass sheet for architectural details, CNC machining can transform your ideas into reality—down to the finest detail. But is it always the right approach? Let’s break down when to go CNC, what to expect, and how to choose the best path for your project.
When to Choose CNC for Brass Sheet
Picture this: you need a brass panel with hundreds of tiny, perfectly spaced holes, or a logo that’s both sharp and repeatable across dozens of parts. Manual brass cutting can only get you so far—especially with tight tolerances or complex shapes. CNC machining shines when:
- You require high repeatability for production runs of brass panels or components.
- The design includes intricate profiles, pocketing, or embossed features that would be impractical to cut by hand.
- Ultra-tight tolerances are needed—think ±0.005mm for connectors, bezels, or custom brass work in electronics or aerospace.
- You’re working with hybrid assemblies—combining sheet of brass with square brass stock or machined blocks for multi-material or multi-thickness designs.
- Speed and consistency are essential, such as rapid prototyping or scaling up to production volumes.
For many, the leap to CNC is about more than just accuracy—it’s about unlocking complex geometries and surface finishes that elevate both function and appearance.
Tolerance and Geometry Considerations
Not all fabrication paths are created equal. Here’s a side-by-side look at what you can expect from in-house methods versus outsourced CNC machining, especially when working with 360 brass sheet or other common alloys:
| Service/Path | Achievable Tolerances | Surface Finish | Geometric Complexity | Lead Time | Quality Assurance (QA) |
|---|---|---|---|---|---|
| XTJ CNC Machining Services | ±0.005mm (ultra-tight) | Mirror polish, brushed, custom textures | 4/5-axis: complex pockets, cutouts, hybrid sheet/block assemblies | 3+ days (rapid prototype), scalable to full runs | ISO 9001 & IATF 16949 certified, full inspection, documentation |
| In-House Manual Fabrication | ±0.1mm (typical) | Depends on skill; basic polish or brushed | Limited—simple shapes, basic bends | Immediate (if tools/staff available) | Visual inspection, basic gauges |
| Local Job Shop (Standard CNC) | ±0.01mm–0.05mm | Good, but may require additional finishing | 2/3-axis: moderate complexity | 1–2 weeks (varies by queue) | Usually ISO 9001 or equivalent |
When your project demands precise hole patterns, cutouts for electronics, or decorative brass panels with consistent quality, CNC machining—especially with advanced 4/5-axis capability—stands out. For simple, flat shapes or prototypes, in-house fabrication may suffice, but for tight profiles or high-end custom brass work, outsourcing to a precision CNC provider is often the better investment.
From Prototype to Production: Making the Right CNC Choice
How do you know if your design is a fit for CNC? Here’s a quick checklist:
- Does your part require laser cut brass sheet with minimal kerf and heat distortion?
- Are there pockets, slots, or features that can’t be made with standard shears or punches?
- Do you need multiple identical brass panels—each with crisp, repeatable detail?
- Is your assembly a hybrid, using both sheet and square brass stock or machined blocks?
- Are surface finish and edge quality critical for your application?
If you answered yes to any of these, CNC machining is likely the most efficient and reliable path. Providers like XTJ offer rapid turnaround (as little as three days for prototypes), ISO-certified quality, and the flexibility to scale from single custom brass work pieces to full production runs—all while delivering the tight tolerances and finishes demanded by modern industries.
For precision brass panels, intricate cutouts, or hybrid assemblies, CNC machining unlocks geometries and finishes beyond the reach of manual fabrication.
As you move from concept to finished part, consider your priorities: Is it speed, cost, or complexity? CNC is the go-to for intricate, critical, or high-volume work—especially when working with 360 brass sheet or combining brass sheet with square brass stock. Ready to take your design further? In the next section, we’ll wrap up with a practical checklist for moving from specification to fabrication, and how to ensure your brass project is set up for success.
Final Recommendations and Next Steps for Your Brass Sheet Project
When you reach the final stage of planning your brass sheet project, it’s easy to feel overwhelmed by all the choices—brass plates or strip, finish options, fabrication paths, and a sea of brass supplies. So, how do you move from concept to a finished part with confidence? Let’s break it down into a practical decision flow and checklist, so you know exactly where to get brass, how to specify it, and when to consider expert help.
Quick Decision Flow
Objective → Alloy → Temper → Thickness → Finish → Fabrication Path → QA
Start by clarifying your end goal: Are you making decorative brass plates, a functional shield, or a custom bracket? From there, select the alloy that matches your needs—260 for formability, 360 for machining, or naval brass for corrosion resistance. Next, pick the temper (soft for forming, hard for stiffness), then define the sheet thickness and finish. Choose your fabrication method—manual, CNC, or hybrid—and always plan for quality assurance at every step.
Spec and Quality Checklist
- Detailed drawings with all critical dimensions and tolerances
- Clear alloy and temper specification (e.g., C26000, half-hard)
- Thickness, width, and length (plus tolerance)
- Finish notes (e.g., polished, brushed, patinated)
- Bend radii and forming details (if applicable)
- Joining method (solder, braze, weld)
- Inspection and quality plan (dimensions, surface, certifications)
For complex features, ultra-tight tolerances, or high repeatability—such as intricate cutouts, multiple holes, or combining sheet with round brass plate or brass strip—CNC machining is often the most reliable route.
Moving From Concept to Parts
- XTJ CNC Machining Services: For advanced geometries, hybrid assemblies, or when tolerances exceed what’s possible by hand, consider a certified CNC provider. XTJ offers ISO 9001 & IATF 16949 certified facilities, ultra-tight tolerances, and rapid turnaround—ideal for both prototypes and production. Always review sample quality, certifications, and responsiveness before placing your order.
- Local fabrication shops: For simpler jobs or when you need quick, hands-on adjustments.
- Online metal suppliers: When you need standard brass plates, brass strip, or are searching for where to buy brass in standard sizes and finishes.
Still wondering where can you find brass that meets your specs? The answer depends on your project’s complexity, volume, and timeline—but following this structured approach will help you avoid costly mistakes and ensure your brass work stands the test of time.
From alloy selection to final inspection, a clear plan—and the right partners—are your best insurance for a successful brass sheet project.
Brass Sheet FAQs
1. What are brass sheets used for?
Brass sheets are commonly used for decorative panels, architectural accents, instrument faces, shields, custom hardware, and crafts. Their combination of workability, attractive appearance, and corrosion resistance makes them ideal for both functional and aesthetic applications in industries like architecture, electronics, and design.
2. How thick is a 20 gauge brass sheet?
A 20 gauge brass sheet is typically about 0.8mm thick. However, for precision projects, it's best to specify thickness in millimeters or inches rather than gauge, as suppliers often use decimal measurements for accuracy. Always confirm thickness and tolerance with your supplier to ensure a perfect fit.
3. Is brass the cheapest metal?
No, brass isn't the cheapest metal, but because its main component, zinc, is cheaper than copper, brass is generally less expensive than pure copper. It's more expensive than common metals like steel or aluminum, but its unique properties make it a cost-effective option in many applications.
4. How do I choose between brass sheet, plate, and foil?
Choose brass foil for very thin, flexible needs like overlays or crafts; brass sheet for applications requiring a balance of strength and formability such as panels or shields; and brass plate for heavy-duty, structural parts where rigidity is crucial. Thickness and intended use should guide your choice.
5. What should I specify when ordering brass sheet?
When ordering brass sheet, specify the alloy, temper, thickness, width, length, finish, edge condition, quantity, and any required certifications or standards. Including details like tolerance and surface finish ensures you receive material that matches your project's needs.
-
Posted in
brass fabrication, brass finishes, brass sheet, brass sheet metal


