
Brass Rod Profiles, Sizes, Tolerances: Pick The Right Stock

Brass Rod Basics and Everyday Uses
What Is a Brass Rod?
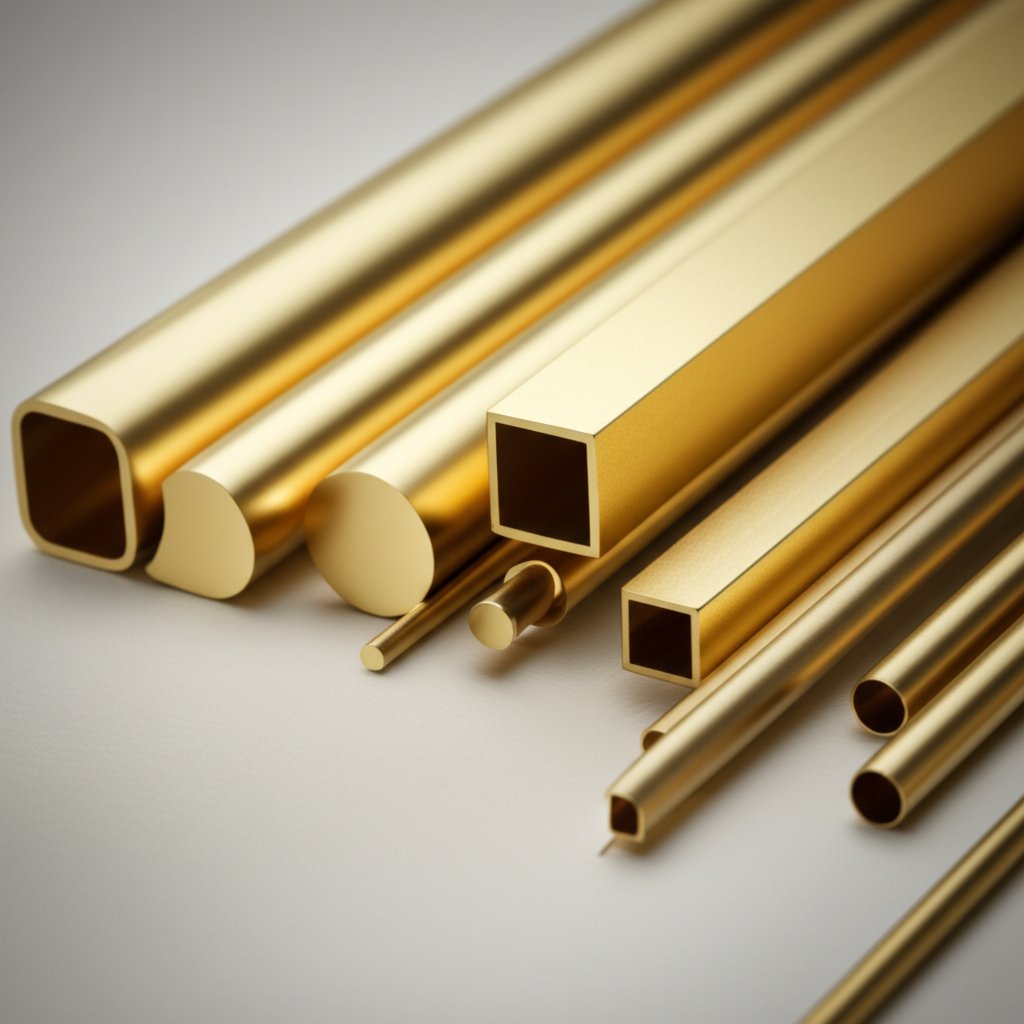
Ever wondered why you see brass rod in everything from decorative fixtures to precision electronics? Brass rods are long, solid pieces of metal produced by combining copper and zinc. This alloy is prized for its unique blend of strength, machinability, and corrosion resistance. Unlike some other metals, brass rods are easy to cut, shape, and polish, making them a go-to choice for both industrial and creative projects. You’ll often find them in round, square, or hollow profiles—each suited to specific needs.
Brass Rod vs Brass Bar
Sounds complex? Let’s clear up the common confusion between brass rods and brass bars. While both are made from the same copper-zinc alloy, their shape and intended use set them apart. Brass rods are typically round or square in cross-section and are supplied in long, continuous lengths. Brass bars, on the other hand, are generally rectangular or flat in shape and may come in shorter, cut-to-length pieces. This distinction matters when you’re sourcing material for a particular application—imagine trying to make a precision gear versus a structural support piece.
| Feature | Brass Rod | Brass Bar |
|---|---|---|
| Typical Shape | Round, Square, Hollow | Rectangular, Flat |
| Common Uses | Connectors, fasteners, shafts, decorative work | Structural supports, bus bars, flat components |
| Stock Availability | Long, continuous lengths | Cut-to-length, various widths and thicknesses |
| Machinability | Excellent | Good to Excellent |
Common Applications and Benefits
Brass rods aren’t just for one industry—they’re everywhere. Their popularity comes from a mix of durability, resistance to corrosion, and ease of fabrication. Here’s where you’ll typically find them in action:
- Electrical & Electronics: Connectors, terminals, switchgear, circuit boards, and precision instruments.
- Plumbing: Pipe fittings, valves, faucets, and water supply components.
- Automotive: Engine parts, radiator fittings, brake system components, and fuel connectors.
- Marine: Propeller shafts, pump housings, marine fasteners, and ship hardware.
- Architectural & Decorative: Railings, door handles, light fixtures, and trims.
- Machinery: Bushings, gears, bearings, and shafts for precision equipment.
- Musical Instruments: Tubing for trumpets, saxophones, and other wind instruments.
- Jewelry & Watches: Intricate components, casings, and decorative details.
- Fasteners: Nuts, bolts, screws, and threaded rods for secure assemblies.
Brass rods stand out for their excellent machinability and strong resistance to corrosion, making them a top choice for demanding applications.
When you’re planning your next project—whether it’s for an industrial machine or a custom piece of décor—knowing the differences between brass rods and brass bars helps you pick the right material. Up next, we’ll dive into profiles, sizes, and tolerances so you can match your selection to your exact needs.
Profiles, Sizes, and Tolerances
Round, Square, and Hollow Profiles
Choosing the right profile can make all the difference in your project’s efficiency and outcome. Ever wondered why some parts call for a round bar, while others need a square or hollow section? It’s all about matching the shape to your needs—strength, machinability, and material savings. Here’s how the most common brass rod profiles stack up:
| Profile | Typical Uses | Fabrication Notes | Best When... |
|---|---|---|---|
| Brass Round Bar | Shafts, pins, connectors, fasteners, musical instrument tubing | Easy to machine, ideal for turning and threading, widely available in sizes like 1 8 brass rod or 3 16 brass rod | Rotational parts are needed or when smooth, continuous surfaces are critical |
| Brass Square Bar / Square Brass Rod | Architectural trim, keys, brackets, decorative hardware | Stable for fixturing, easier to clamp, can be milled into flat-sided parts | Flat faces or precise alignment is required |
| Brass Hollow Bar | Bushings, spacers, light structural components, fluid passageways | Reduces weight, saves material, allows for internal features | Weight savings or internal flow is a priority |
Selecting Diameter and Length
How do you pick the right size? Start by considering the mechanical demands and the amount of material you’ll need for machining. For example, if you’re making a custom gear or a decorative spindle, a 1 8 brass rod might be perfect for fine work, while a 3 16 brass rod offers a bit more strength for load-bearing parts. Most suppliers offer a wide range of diameters and lengths, so you can minimize waste by selecting the closest stock size to your finished part.
- Choose a small diameter (like 1 8 brass rod): For pins, small connectors, or intricate craft projects.
- Opt for larger diameters: When strength, rigidity, or machining space for threads or holes is needed.
- Pick custom lengths: To reduce offcut waste and save on finishing time.
Tolerances, Straightness, and Surface Finish
Not all brass rods are created equal—especially when it comes to tolerances and surface quality. After extrusion, rods are often cold drawn to achieve tighter dimensional control and better surface finish. This process helps meet the needs of precision applications, such as electronics or high-quality fittings. Straightness is especially important for long shafts or when machining multiple parts from a single bar. Surface finish matters for both appearance and function, especially in decorative or low-friction applications.
- Round bar: Go for cold drawn if you need tight tolerances or a smooth surface.
- Square brass rod: Ideal when flatness and sharp corners are required for assembly or aesthetics.
- Brass hollow bar: Useful when you need precise internal diameters or reduced weight.
Matching your brass rod profile and tolerance to your project saves time, material, and finishing effort down the line.
Now that you know how to select the right brass rod profile and size, the next step is understanding how brass’s properties affect machining and design. Let’s break down what you need to know about mechanical and metallurgical characteristics in the following section.
Properties That Matter in Design and Machining
Machinability and Chip Formation
When you’re working with brass rod, have you ever noticed how smoothly it cuts or how crisp the threads come out? That’s no coincidence—brass, especially alloys like C36000, is engineered for exceptional machinability. This means you can achieve a fine surface finish with less tool wear and faster cycle times compared to many other metals. If you’re making precision brass components, such as gears, fittings, or even brass dowels, this property is a game-changer. The chips produced are typically short and break away easily, reducing the risk of tangling and making cleanup simpler. This is especially important for CNC machining and high-volume operations, where tool life and efficiency matter most.
| Property | Typical Range (C36000 Brass Rod) | Practical Impact |
|---|---|---|
| Yield Strength | 20–25 ksi (varies by diameter) | Supports moderate loads, suitable for fasteners, pins, and brass dowels |
| Hardness | 45–80 Rockwell B | Allows for clean threading and tapping without excessive wear |
| Electrical Conductivity | Good (relative to other copper alloys) | Ideal for terminals, connectors, and parts needing reliable current flow |
| Ductility (Elongation) | 7–20% | Enables forming, press fits, and swaging operations |
Strength, Conductivity, and Ductility in Practice
Imagine you’re designing a custom connector or a set of brass dowels for alignment in a mechanical assembly. The strength-to-weight ratio of solid brass means your parts will be robust without being overly heavy. In applications where electrical or thermal conductivity is critical—think of connectors or heat sinks—brass delivers reliable performance, though pure copper is still superior if conductivity is your only concern.
- Threading and Tapping: Brass’s machinability makes it ideal for creating precise threads, reducing the risk of galling or tool breakage.
- Press Fits: The balance of ductility and strength allows for secure, repeatable press fits—essential for brass dowels and alignment pins.
- Heat-Based Joining: Good thermal conductivity helps achieve strong, uniform solder or brazed joints, especially when working with solid brass or brass billet stock.
Choosing Stock for Tight Tolerances
When tolerance is critical—say, for a precision brass shaft or a set of matching brass dowels—material consistency becomes your best friend. Cold drawn rod offers tighter dimensional control and a finer surface finish, which translates into less post-machining work and better fit in assemblies. If your design calls for minimal play or high repeatability, always specify the tightest tolerance stock your supplier offers and consider the alloy’s mechanical properties to ensure your part won’t deform under load.
Balancing machinability with surface finish is the key to producing reliable, high-precision brass components—choose your alloy and finish with your end use in mind.
Understanding these core properties helps you move from design theory to real-world results. Next, we’ll walk through step-by-step fabrication workflows so you can confidently cut, drill, and finish your brass rod projects.
Step by Step Fabrication with Brass Rod
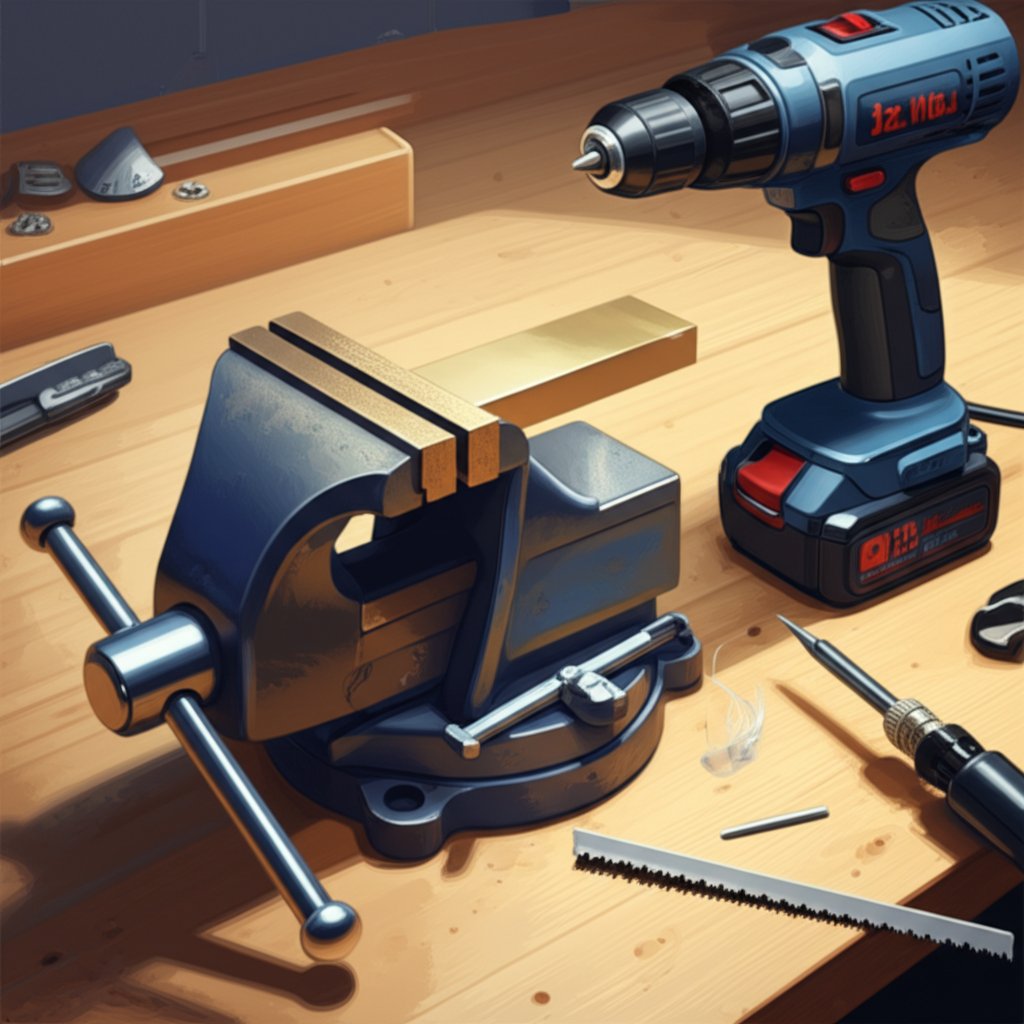
Cutting Brass Rod Cleanly
-
Secure the Workpiece: Place the brass rod in a vise, positioning the cut area close to the vise jaws for stability. Use a soft rag or padding to prevent marring the surface.
- Always wear safety glasses to protect your eyes from flying debris.
- Gloves and a dust mask can add extra protection.
-
Mark and Notch: Use a marker or scribe to indicate the cut line. Start with a light notch using a sharp hacksaw blade to guide the cut and prevent slipping.
- Ensure the hacksaw blade is sharp and tightly tensioned for best results.
- Saw with Care: Saw steadily along the notch, applying pressure only on the downward stroke. As you near the end, support the free end to prevent bending or snapping.
-
Deburr and Inspect: Smooth the cut edge with a metal file to remove any sharp ridges or burrs. Check for squareness and repeat filing if necessary.
- For crafts or decorative work, a fine file or abrasive pad can create a smooth finish.
Drilling and Tapping Without Burrs
-
Clamp Securely: Fix the brass rod firmly to prevent movement during drilling.
- Use soft jaws or padding to avoid surface marks.
-
Choose the Right Drill Bit: Select a high-speed steel (HSS) bit with a flat or modified tip (zero rake) to minimize grabbing.
- Straight-fluted bits work well for brass; avoid overly sharp points.
- Mark and Center: Mark the hole location and use a center punch or dimple to guide the drill.
-
Drill with Care: Drill slowly, applying gentle pressure. Use a suitable lubricant—avoid those with active sulfur or chloride.
- Peck drilling (lifting the bit periodically) helps clear chips and reduces heat.
-
Tap Threads (if needed): For creating a brass threaded rod, use a sharp tap and back it out regularly to clear chips.
- Check threads with a gauge to ensure fit and finish.
- Deburr: Lightly chamfer or file the hole edges to remove burrs.
Soldering and Brazing Joints
-
Prep and Clean: Clean the brass rod with steel wool or fine abrasive to remove tarnish and ensure good adhesion (source).
- For assembly, secure pieces in position with tape or a jig.
-
Apply Flux: Use a flux suitable for brass to prevent oxidation and help the solder flow.
- Apply just before heating; avoid excessive flux, which can leave residue.
-
Solder with the Right Iron: Use a 30–40W soldering iron with a chisel tip for best heat transfer. Touch the tip to both rods at the joint and feed in solder once hot.
- For larger joints or thicker rods, step up to a brass welding rod and torch if additional strength or heat is needed.
-
Cool and Clean: Allow the joint to cool, then clean off any remaining flux with water and detergent or steel wool.
- Remove any excess solder with a file or fine abrasive.
Polishing and Surface Finishing
-
Progressive Abrasives: Start with a medium grit (if needed) and progress to finer grits, always sanding in the direction of the rod for a uniform finish.
- For brass rods for crafts, a fine abrasive pad or steel wool is often sufficient.
-
Buffing: Use a soft cloth or buffing wheel with brass polish to bring out a high shine.
- Apply polish sparingly and buff until the surface is bright and clean.
-
Protect the Finish: To retain shine, consider applying a clear lacquer or wax, especially for decorative or exposed parts.
- Handle the finished piece with gloves to avoid fingerprints and tarnish.
Tool Choices for Brass Rod Fabrication
| Task | Tool | Pros | Cons |
|---|---|---|---|
| Cutting | Hacksaw, Fine-tooth saw | Accurate, affordable, easy to control | Manual effort, may need deburring |
| Drilling | Flat-tip HSS drill, straight-fluted bit | Reduces grabbing, clean holes | Requires careful selection, may dull on hard alloys |
| Tapping | Sharp tap, tap wrench | Creates precise brass threaded rod | Chips can clog threads if not cleared |
| Soldering | Soldering iron (30–40W), flux, solder | Reliable bonds for small assemblies | Requires careful cleaning and ventilation |
| Brazing/Welding | Brass welding rod, torch | Stronger joints, suited for thicker sections | More heat, advanced skill needed |
| Finishing | Files, abrasive pads, buffing wheel | Customizable finish, easy to source | Manual process, takes time for high polish |
Attention to detail at every step—clamping, marking, deburring, and finishing—ensures your brass rod projects look and perform their best.
With these workflows, you can confidently tackle fabrication tasks, whether you’re making brass rods for crafts, assembling custom hardware, or preparing precision parts. Next, we’ll explore machining parameters and troubleshooting tips to refine your process even further.
Machining Parameters, Tooling, and Troubleshooting for Brass Rod
Tooling Choices for Clean Chips
When you’re machining brass round stock, the right tooling makes all the difference between a smooth finish and a frustrating, time-consuming process. Ever noticed how some setups produce crisp, short chips while others leave you with stringy messes or rough edges? That’s usually down to tool selection and geometry. For best results with brass rod stock or brass stock bar, here’s what experienced machinists recommend:
- Sharp HSS or Carbide Tools: High-speed steel (HSS) and uncoated carbide tools with a positive rake angle reduce cutting forces and promote clean chip breakage.
- Deburring Tools: Essential for finishing edges after cutting or drilling, preventing burrs that can interfere with assembly or safety.
- Back Chamfer Tools: Handy for smoothing hole exits, especially when making through-holes in round brass stock.
- Tapping Aids: Use sharp, well-lubricated taps for threading brass rod stock to avoid galling and achieve clean threads.
Always inspect your tools for wear—dull edges increase friction, degrade the finish, and risk work hardening the brass.
Coolant and Lubrication Considerations
Think coolant is just for steel? Think again. Brass is more forgiving than many metals, but proper cooling and lubrication still play a critical role in preserving tool life and achieving a fine surface finish. Here’s what you should know:
- Use Ample Coolant: Water-based or semi-synthetic coolants are effective for most brass machining, helping to wash away chips and reduce heat.
- Apply Lubricant for Tapping: A light oil or tapping fluid helps prevent galling and ensures smooth, accurate threads.
- Chip Removal: Effective coolant flow also aids in chip evacuation, reducing the risk of chip packing around the tool or workpiece.
For small-scale or manual operations, even a light mist or occasional brush-on lubricant can make cutting easier and extend tool life. Just avoid coolants or oils with active sulfur or chlorine, which can tarnish brass.
Troubleshooting Common Shop Problems
Even with the best setup, issues can arise—surface roughness, tool wear, or dimensional inaccuracies can quickly derail your project. Imagine you’re machining a batch of round brass stock and notice chatter marks or inconsistent part sizes. What’s going wrong? Here’s a handy troubleshooting table to help you diagnose and correct the most frequent problems in brass rod machining, based on proven industry practices:
| Symptom | Probable Causes | Corrective Actions |
|---|---|---|
| Rough Surface Finish | Tool wear, incorrect cutting parameters, insufficient coolant | Replace or sharpen tool, optimize speed and feed, increase coolant flow |
| Burr Formation | Dull tool, excessive cutting force, improper tool geometry | Use sharp tool, reduce cutting force, select positive rake angle |
| Dimensional Inaccuracy | Machine/tool wear, improper clamping, thermal expansion | Maintain or calibrate machine, ensure secure clamping, allow cooling between passes |
| Tool Adhesion (Chip Build-Up) | Low cutting speed, incorrect tool material, inadequate coolant | Increase speed, use carbide tools, improve coolant application |
| Workpiece Deformation | Excessive cutting force, improper clamping, internal stress | Reduce cutting depth, adjust clamping, pre-treat material if needed |
| Chip Accumulation | Poor chip control, insufficient chip removal, long chips | Use chip breaker tools, clear chips frequently, adjust tool geometry |
| Surface Oxidation | Exposure to air, coolant residue | Clean immediately after machining, apply protective coating |
Consistent workholding and sharp tools matter more than aggressive parameters for precision brass outcomes.
Imagine you’re running a series of parts from brass round stock: if you notice a sudden drop in finish quality, don’t just push harder—pause to inspect your tool, check your coolant, and verify your clamping. Often, small adjustments in these basics can save hours of rework or tool replacement.
With these practical strategies, you’re ready to turn even challenging jobs into reliable, repeatable successes. Up next, we’ll look at how brass responds to different environments and the best finishing methods to keep your projects looking and performing their best.
Corrosion Behavior, Finishes, and Maintenance for Brass Rods
Outdoor Exposure and Dezincification Awareness
When you’re planning to use a solid brass rod or solid brass bar in your next project, have you ever wondered how it will hold up outside or in harsh environments? Brass is naturally resistant to many forms of corrosion, but it’s not immune—especially in situations where moisture, chlorides, or acidic conditions are present. One specific risk to be aware of is dezincification. This form of corrosion selectively removes zinc from the alloy, leaving behind a weakened, copper-rich layer that can appear pinkish or spongy. Dezincification is most common in stagnant or slightly acidic water, and is a real concern for plumbing, marine, or outdoor architectural applications (source).
How can you avoid this? For critical or long-term installations, choose dezincification-resistant (DZR) brass alloys or apply protective coatings. Regular inspection and maintenance are key in aggressive environments—if you spot color changes or surface flaking, it’s time to act.
Finishes, Plating, and Coatings
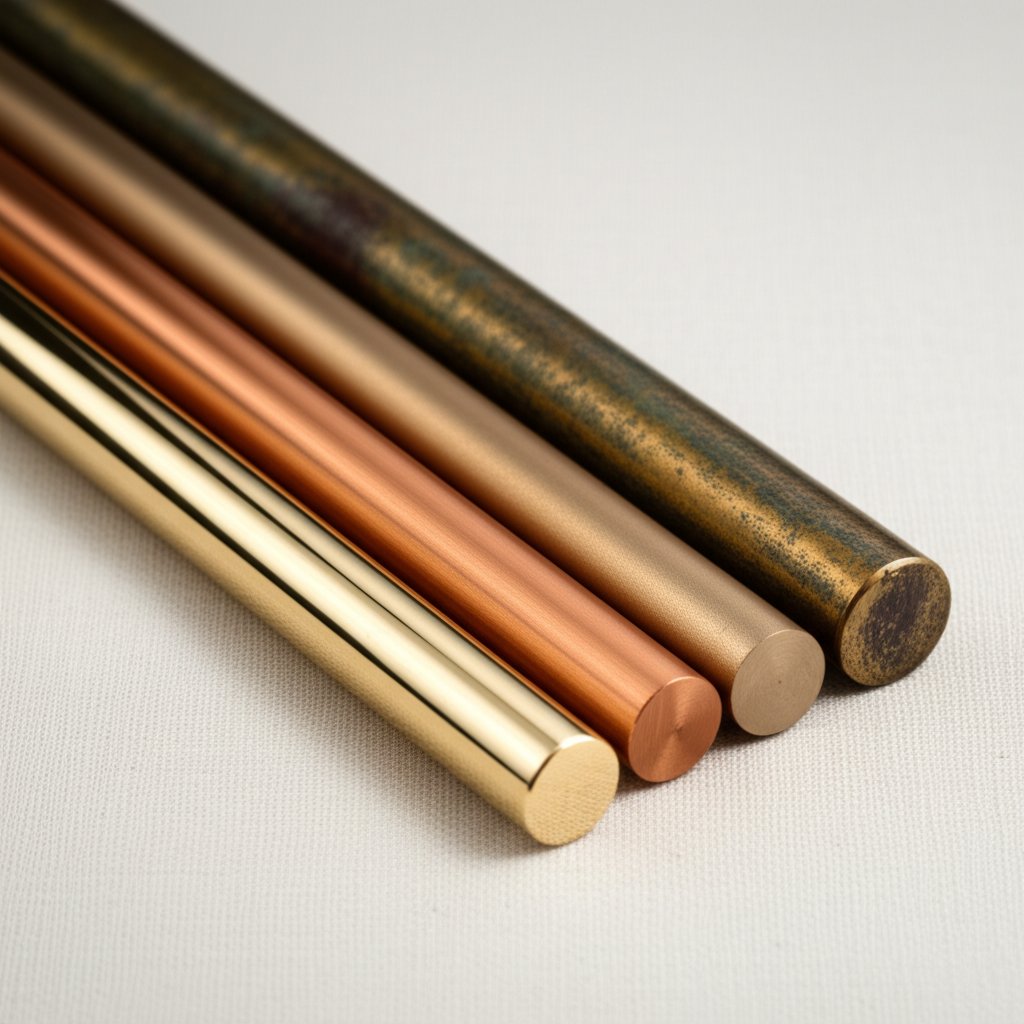
Brass rods can be finished in many ways to enhance both appearance and durability. Imagine you’re choosing between a bright, polished look or a vintage, antique brass rod finish—each option brings its own pros and cons. Here’s a quick overview of the most popular finishing choices for both solid and hollow brass profiles:
-
Lacquer: Forms a clear, protective layer that keeps brass shiny and prevents quick tarnishing.
Pros: Low maintenance, preserves luster.
Cons: Can chip or wear over time, requiring reapplication. -
Wax: Adds a subtle sheen and some protection against fingerprints and moisture.
Pros: Easy to apply, maintains a natural look.
Cons: Needs regular reapplication, less robust than lacquer. -
Clear Coats: Modern polymer or urethane coatings offer durable, invisible protection.
Pros: High resistance to abrasion and tarnish.
Cons: May alter the feel or color slightly. -
Nickel or Chrome Plating: Electroplated layers add a silvery or mirror finish and excellent corrosion resistance.
Pros: Great for wet or high-touch environments, minimal maintenance.
Cons: Harder to repair if scratched, changes the classic brass appearance. -
Antique Brass Finishes: Chemically aged to create a vintage patina, often sealed with lacquer.
Pros: Unique, low-gloss look that disguises fingerprints.
Cons: Patina can change over time, especially on unlacquered brass rod.
| Environment | Recommended Finish | Notes |
|---|---|---|
| Indoor, Dry | Lacquer, Wax, Polished or Antique Finish | Minimal risk; routine dusting keeps solid brass bar looking its best. |
| Coastal/Marine | Nickel/Chrome Plating, DZR Brass, Clear Polymer Coating | High humidity and salt require robust protection; inspect regularly for wear. |
| Industrial/Plumbing | DZR Brass, Lacquer, Clear Coats | Choose finishes or alloys designed for chemical and water exposure. |
Care and Maintenance Practices
Want your unlacquered brass rod or antique brass rod to age gracefully—or keep its shine? Maintenance depends on the finish:
- Unlacquered Brass: Wipe with a soft, dry cloth to remove dust. Avoid harsh cleaners. For a brighter look, use a gentle brass polish occasionally.
- Lacquered or Plated Brass: Clean with a damp, lint-free cloth and mild detergent. Dry thoroughly to prevent water spots or stains.
- Antique Finishes: Avoid abrasive pads or polishes that could remove the patina. Dust gently and spot clean as needed.
- General Tip: For all finishes, avoid prolonged exposure to moisture and chemicals. Regular inspection helps catch early signs of wear or corrosion.
Routine cleaning and protective coatings are essential for preserving the appearance and longevity of your unlacquered brass rod and polished components.
By matching your finish and care routine to the environment, you’ll ensure your solid brass rod or bar looks great and lasts for years. Next, we’ll cover how to estimate material needs and budget for your brass projects—so you can plan with confidence.
Sizing, Weight per Length, and Budgeting for Brass Rod Projects
Choosing Diameter and Length for Strength and Weight
Ever wondered how to pick between a 1 4 brass rod, a 3/8 brass rod, or maybe even a metric 6mm brass rod for your next project? The answer starts with understanding your strength, weight, and machining needs. Larger diameters like a 1 2 brass rod or a hefty 1 1 4 brass rod offer more rigidity and load capacity, while smaller sizes save material and weight—ideal for pins or decorative details. For each application, consider:
- Strength and Rigidity: Thicker rods (like 1 1 4 brass rod) are better for structural or load-bearing parts.
- Machinability: Choose a diameter closest to your finished size to minimize waste and reduce machining time.
- Compatibility: Match rod size to mating components—metric sizes like 6mm brass rod are common in imported or precision assemblies.
- Length: Standard lengths are often 12 feet (or 3–4 meters), but custom cuts can help reduce leftover scrap.
Before you buy, double-check your project’s requirements and available brass bar sizes to avoid unnecessary waste or the need for extra joins.
Weight per Foot or Meter Calculation
Sounds complex? It’s actually simple with the right formulas. Knowing the weight per length helps you estimate shipping, handling, and—most importantly—cost. Here’s how you can do it for the most common shapes:
| Shape | Formula (Imperial) | Formula (Metric) | Variables |
|---|---|---|---|
| Round Solid Rod | D² × 2.89 (weight in lbs/ft) | D2 × 0.00663 (weight in kg/m) | D = Diameter (in inches or mm) |
| Hollow Tube | (OD – t) × t × 5.269 (weight in lbs/ft) | (OD – t) × t × 0.0268 (weight in kg/m) | OD = Outside diameter, t = Wall thickness (in inches or mm) |
| Square Bar | Side² × 3.68 (approx. lbs/ft) | Side2 × 0.0077 (approx. kg/m) | Side = Width of square (in inches or mm) |
For example, to estimate the weight of a 3/8 brass rod (0.375 inches diameter) that’s 4 feet long:
- Weight per foot = (0.375²) × 2.89 ≈ 0.406 lbs/ft
- Total weight = 0.406 lbs/ft × 4 ft ≈ 1.624 lbs
Use these formulas for any size, whether you’re sourcing a 1 4 brass rod, 6mm brass rod, or a large 1 1 4 brass rod for heavy-duty needs.
Budgeting Material and Cut Loss
Budgeting for your project isn’t just about the sticker price. You’ll want to factor in weight, market price, and the inevitable cut loss from machining. Here’s a step-by-step approach to keep your estimates on target:
- Determine the size and quantity: List all brass bar sizes needed for your parts.
- Calculate total length: Add up the total length of each size required.
- Compute material weight: Use the relevant formula above to get the weight per foot or meter, then multiply by your total length.
- Check the current price per unit weight: Look up how much is brass going for in your region or from your supplier.
- Multiply weight by price: This gives your raw material cost.
- Add cut and machining loss: Most projects have some waste—add a buffer (often 5–15%) to cover offcuts and setup pieces.
For example, if you need 10 feet of 1 2 brass rod, calculate the weight, multiply by the price per pound or kilogram, and add a waste factor. This approach works for any size—from 1 4 brass rod to 6mm brass rod or even large architectural bars.
Always verify how much is brass going for at your local supplier and check for minimum order quantities before finalizing your budget.
Remember, density and price can vary depending on the brass alloy and supplier. For the most accurate estimate, use the specific alloy’s density and up-to-date market pricing. This framework gives you a reliable, calculator-friendly way to plan your next brass rod purchase—whether for crafts, engineering, or architectural projects. Next, you’ll discover smart sourcing strategies and when it makes sense to outsource machining for tight tolerances or complex shapes.
Smart Sourcing and When to Use CNC Machining for Brass Rod Projects
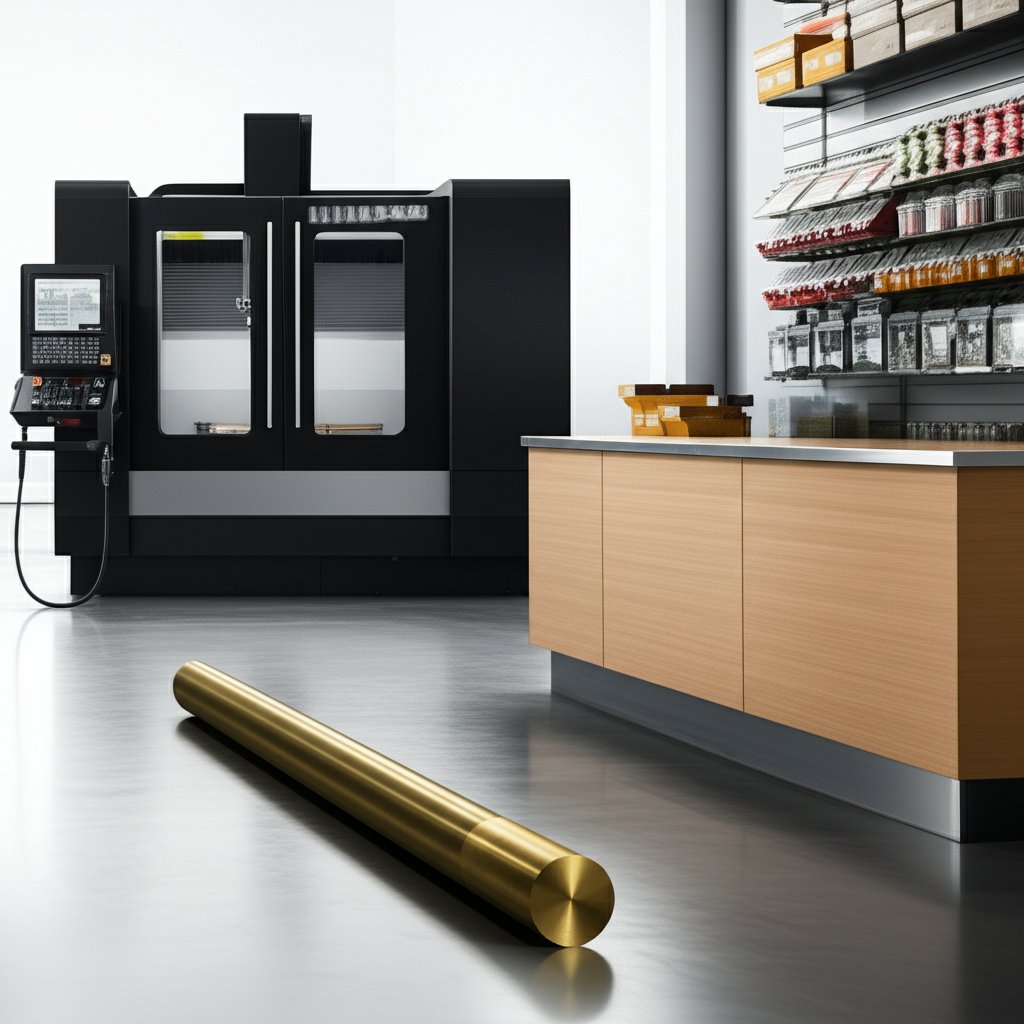
When to Buy Stock vs Outsource CNC
Ever found yourself choosing between picking up a length of brass rod at a local hardware store and sending your design to a CNC shop? The right answer depends on your project’s complexity, tolerance needs, and timeline. If you’re crafting simple brackets or decorative pieces, sourcing brass bar supplies from retailers like Home Depot brass rod or Ace Hardware brass rod is quick and cost-effective. But when your project demands intricate geometry, ultra-tight tolerances, or a rapid turnaround, outsourcing to a specialized CNC machining provider can save time and deliver superior results.
Imagine you need custom-turned connectors or precision components for electronics—tasks where even slight dimensional errors can cause big headaches. In these cases, partnering with a CNC service equipped for high-complexity work is a smart move. For one-off prototypes, short runs, or when you lack in-house machining capacity, outsourcing bridges the gap between concept and finished part.
Evaluating Suppliers and Service Providers
With so many options—ranging from local brass rod suppliers near me to global CNC shops—how do you make the right call? Start by matching your project’s requirements to the supplier’s strengths. Here’s a comparison to clarify your choices:
| Option | Use Case Fit | Tolerance Capability | Lead Time | Certification | Pricing Considerations |
|---|---|---|---|---|---|
| XTJ CNC Machining Services | Complex, tight-tolerance, or high-precision brass rod parts; prototype-to-production | Ultra-tight (±0.005mm), multi-axis CNC, advanced inspection | Rapid (from 3 days) | ISO 9001, IATF 16949 | Project-based; ideal for high-value or specialized work |
| Brass Bar Manufacturers & Large Brass Bar Suppliers | Bulk stock, standard profiles, recurring large orders | Standard industry tolerances | Standard (varies by order size and shipping) | Often ISO 9001; check for sector-specific certs | Volume-based; lower per-unit cost for large orders |
| Local Brass Rod Suppliers ("brass rod suppliers near me") | Immediate needs, small quantities, quick pickup | Standard stock tolerances | Immediate to 1–2 days | Varies; check supplier details | Retail pricing; higher per-unit cost, but no shipping delay |
| Home Depot Brass Rod / Ace Hardware Brass Rod | DIY, repairs, crafts, small projects | Standard retail tolerances | Same day (in-store) | Not typically certified | Retail pricing; convenient for small quantities |
You’ll notice that full-service CNC providers like XTJ are best for jobs where precision, certification, and engineering support are critical. In contrast, home improvement retailers and local brass rod suppliers excel for quick, small-scale needs.
- Material Range: Does the supplier offer the brass alloy and profile you need?
- Certifications: Look for ISO 9001 or industry-specific credentials.
- Tolerance Capability: Can they meet your precision requirements?
- Lead Time: Is their turnaround compatible with your project schedule?
- Engineering Support: Do they offer design assistance or prototyping?
Quality Certification and Lead Time Considerations
Quality assurance isn’t just a buzzword—it’s essential for parts that must fit, function, and last. Reputable brass bar manufacturers and brass bar suppliers will provide documentation on material integrity, testing, and dimensional checks. For critical applications, ask for certifications such as ISO 9001 or sector-specific compliance. This is especially important when outsourcing CNC machining, as advanced providers like XTJ back up their ultra-tight tolerances with robust quality systems and inspection protocols.
Lead time can make or break a project. Local suppliers and hardware stores are unbeatable for immediate pickup, but may not offer custom sizes or tight tolerances. Bulk orders from large brass bar suppliers require more planning but can save money on volume. For complex or urgent jobs, CNC machining services stand out with their ability to deliver finished parts quickly—even when the geometry is demanding or the tolerances are tight.
Choosing the right sourcing strategy—stock, local, or CNC—depends on your project’s tolerance, complexity, and schedule. Don’t hesitate to consult with suppliers for technical support and certification details.
By weighing these factors, you’ll streamline your supply chain and ensure your brass rod project meets both quality and budget goals. Whether you’re searching for brass rod suppliers near me or planning to outsource the next high-precision part, the right partner is out there to help you succeed.
Frequently Asked Questions About Brass Rod
1. What are common uses for brass rods?
Brass rods are widely used in electrical connectors, plumbing fittings, automotive components, marine hardware, architectural trim, and musical instruments. Their machinability and corrosion resistance make them ideal for both functional and decorative applications.
2. How do I choose between a brass rod and a brass bar?
Select a brass rod when you need round, square, or hollow shapes for parts like shafts, pins, or connectors. Brass bars are better for flat, rectangular components or structural supports. The profile and intended use will determine which is right for your project.
3. What should I consider when machining brass rods?
Use sharp HSS or carbide tools, apply proper coolant, and secure workpieces firmly. For best results, select cold drawn rods for tight tolerances and smooth finishes, and always clear chips to prevent tool wear or burrs.
4. How can I protect brass rods from corrosion, especially outdoors?
Apply lacquer, wax, or clear coatings to shield brass from moisture and tarnish. For harsh environments or plumbing, consider dezincification-resistant (DZR) brass or nickel/chrome plating for added protection and longevity.
5. When should I outsource CNC machining for brass rod components?
Outsource CNC machining when your project requires complex shapes, ultra-tight tolerances, or fast turnaround. Services like XTJ CNC offer certified quality, advanced 4 and 5-axis machining, and rapid lead times for both prototypes and production runs.
-
Posted in
brass bar vs rod, brass finishing, brass machining, brass rod profiles, brass rod suppliers


