
How To Polish Brass In 9 Steps: From Dull To Mirror Shine
How To Polish Brass In 9 Steps: From Dull To Mirror Shine
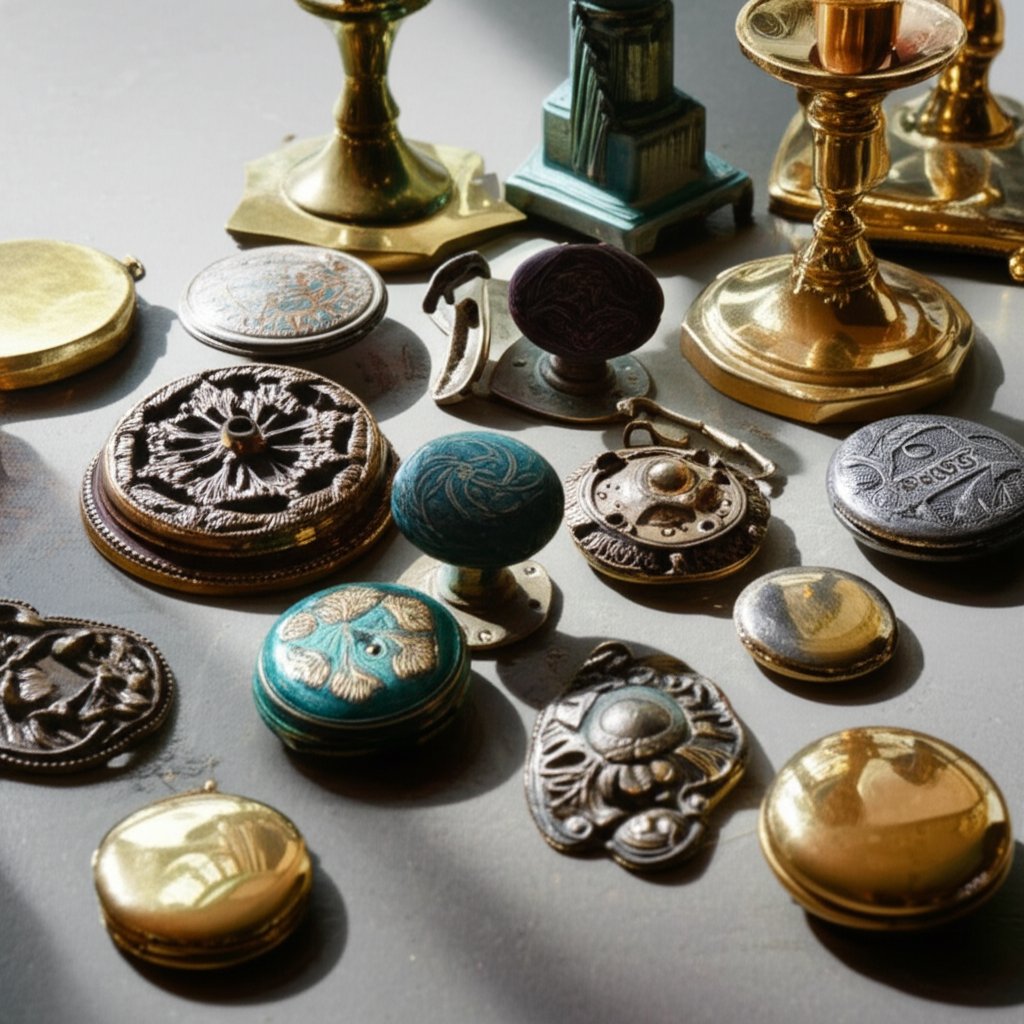
Step 1 Identify Your Brass and Finish
Before you learn how to polish brass, it’s essential to know exactly what you’re working with. Why? Because using the wrong method on the wrong finish can lead to irreversible damage—think peeling, blotchy spots, or even stripping away valuable antique patina. Sounds complex? It doesn’t have to be. Let’s break it down so you can confidently move forward.
Identify Lacquer vs Raw Brass
First, take a close look at your item’s surface. Does it have a consistent, glossy sheen that feels more like glass than metal? That’s a sign it’s lacquered. Lacquer is a clear coating applied to brass to prevent tarnishing, but over time, it can wear off unevenly, leaving blotchy patches or edges where the metal is exposed. To confirm, dab a cotton swab with acetone on an inconspicuous spot—if the swab picks up a yellowish or softened residue, you’re dealing with lacquer.
Solid Brass or Plated Metal?
Next, grab a strong magnet. Does it stick firmly to your piece? If yes, your item is likely brass-plated steel, not solid brass. Solid brass is non-magnetic, so a magnet won’t stick. Brass-plated items require extra caution, as aggressive cleaning can quickly wear through the thin layer of brass, exposing the base metal underneath.
Quick Compatibility Tests
- Magnet Test: Hold a magnet to the item. No attraction means solid brass; a strong pull means brass-plated steel.
- Acetone Swab: Dab a cotton swab with acetone on a hidden spot. Yellow or softened residue signals lacquer.
- Visual Check: Look for signs of wear at edges, corners, or handles—uneven color or exposed metal may indicate worn lacquer or plating.
- Patch Test: Before any cleaning, try your chosen method on a hidden area to ensure the finish stays intact.
What Does Tarnished Brass Look Like?
Wondering what does tarnished brass look like? Typically, tarnished brass develops a dull brown or black film, sometimes with greenish patches (known as verdigris) in damp areas. This is a normal reaction to air and moisture—brass does tarnish over time, but this surface layer can often be safely removed. If you’re unsure how to clean brass that has turned black or green, identifying the finish first is crucial, as different types of tarnish may require gentler or more targeted methods.
- Over-abrasion can strip thin plating or antique patina.
- Harsh acids may damage lacquer or cause spotting on plated items.
- Skipping the patch test could result in visible damage.
Always identify the finish before you polish. The right diagnosis prevents irreversible damage.
By taking these simple steps, you’ll set yourself up for success and avoid the most common mistakes. Finish identification isn’t just the first step in how to polish brass—it’s the most important one. With your finish type in hand, you’re ready to choose the safest, most effective cleaning and polishing plan in the next steps.
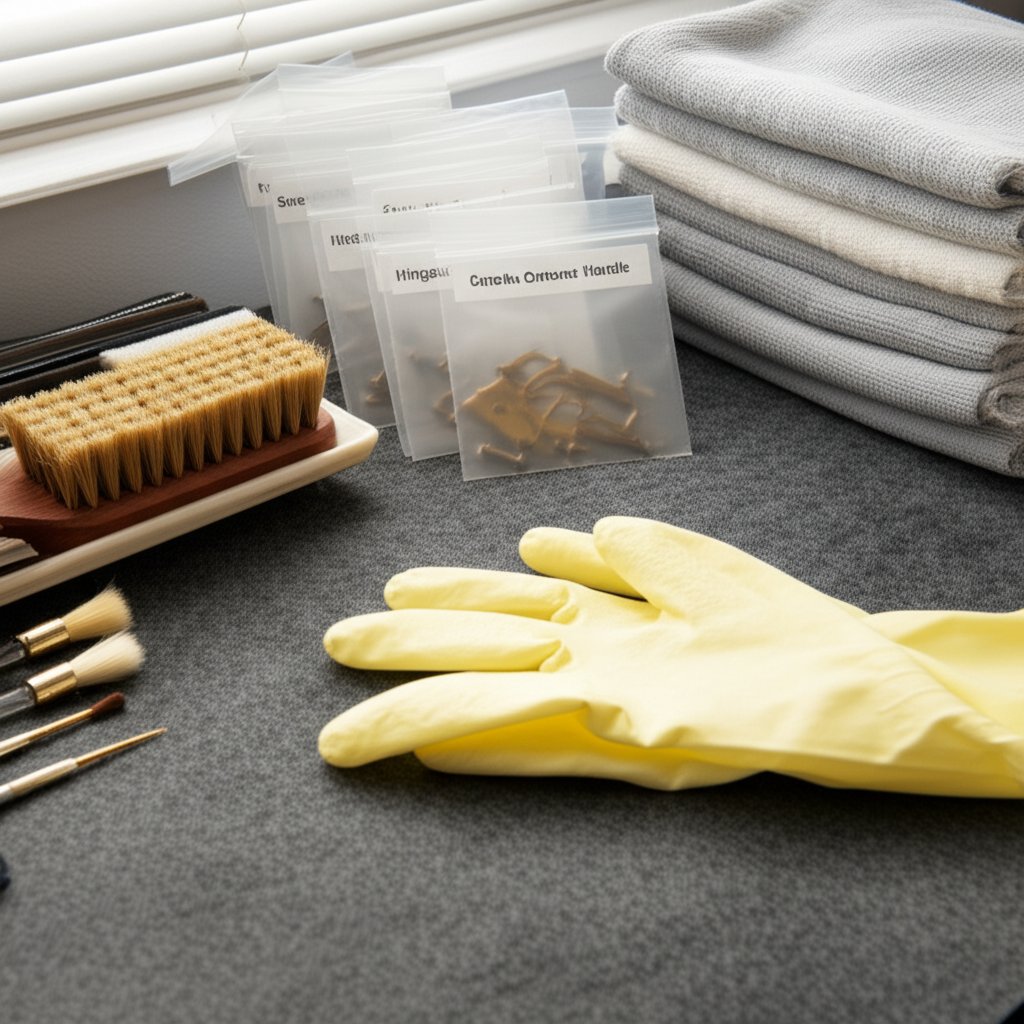
Step 2 Wash and Prep Without Damaging Detail
Ever wondered why some brass shines effortlessly while others end up streaky or scratched? The secret is all in the prep. Before diving into how to polish brass, you need to remove every trace of grime, dust, and residue—without harming the surface or erasing character. Here’s how to clean brass safely and set yourself up for a brilliant finish, whether you’re working on a vintage doorknob or a delicate candlestick.
Smart Disassembly and Labeling
- Disassemble Where Possible: Remove hardware like doorknobs, handles, hinges, or lampshades. This gives you full access to every surface and protects surrounding materials.
- Bag and Label Small Parts: Place screws, washers, and other tiny pieces in labeled bags. Snap a quick photo before taking things apart—this makes reassembly a breeze.
- Dust Off Loose Debris: Use a soft brush to gently sweep away dust and cobwebs, especially from crevices and intricate details.
- Wash Gently: Mix a few drops of mild, neutral pH dish soap in warm water. Dip a microfiber cloth in the solution and gently wipe the brass. For crevices, use a soft nylon brush or wooden or plastic toothpick—never steel wool, which can scratch and remove patina (source).
- Rinse and Dry Thoroughly: Rinse with clean water and immediately dry with a fresh microfiber cloth. Air drying can leave water spots, especially on polished surfaces.
- Mask and Protect: Use painter’s tape to cover any non-brass areas (wood, leather, fabric) and lay down a protective covering on your workspace.
Gentle Washing That Preserves Patina
When it comes to cleaning brass, less is often more—especially if you want to preserve that rich, aged look. If you’re searching for the best way to clean brass without removing patina, stick to mild soap and water, and avoid abrasive tools or harsh chemicals. For cleaning brassware with ornate details, a soft toothbrush works wonders in hard-to-reach spots. For jewelry or delicate items, a paste of baking soda and water applied with a soft cloth can restore shine while keeping the patina intact.
| Tool/Material | Best Use | What to Avoid |
|---|---|---|
| Soft Brush | Dusting, gentle crevice cleaning | Wire brush (scratches, removes finish) |
| Microfiber Cloth | Washing, drying, buffing | Paper towels (leave lint, can scratch) |
| Nylon Brush | Intricate details, crevices | Steel wool (removes patina, scratches) |
PPE and Workspace Setup
- Wear nitrile or latex gloves to protect your hands from cleaners and to prevent oils from transferring to the brass.
- Use eye protection if working with any cleaning solutions that could splash.
- Work in a well-ventilated area, especially if using commercial cleaners or polishes.
- Keep your workspace organized and covered to protect both your brass and your furniture.
Following these steps is the best way to clean brass and ensure your piece is ready for polishing—without risking scratches or losing precious patina. If you’re wondering how to clean brass without removing patina, remember: gentle washing and careful drying are key, especially for vintage or antique brassware. With your brass now prepped and protected, you’re ready to move on and select the ideal cleaning or polishing solution for your finish.
Step 3 Choose the Right Brass Cleaner or Polish
Ever stood in front of your tarnished brass and wondered, “Should I grab the ketchup, or is it time for a specialty brass polish?” With so many options, it’s easy to feel overwhelmed. The right choice depends on your brass item’s finish, how much tarnish you’re dealing with, and how much time you have. Let’s break down the options so you can select the most effective—and safest—brass cleaner and polish for your needs.
When to Use Household Mixes
Imagine you’re looking at a piece of raw, unlacquered brass with light tarnish. This is where classic household remedies shine. Mild acids such as vinegar or lemon juice, paired with abrasives like baking soda or salt, can dissolve tarnish without harsh chemicals. For example, a paste made from vinegar, salt, and flour works well for most raw brass, while a lemon and baking soda blend is perfect for small items or quick touch-ups (source). These methods are cost-effective and use ingredients you likely already have in your kitchen.
- Best for: Raw brass, light to moderate tarnish, intricate details
- Pros: Inexpensive, readily available, gentle on most raw brass
- Cons: Can be too abrasive for plated or lacquered items; require more effort for heavy tarnish
When Commercial Polishes Win
Got a piece with stubborn, darkened tarnish or want a fast, mirror-like finish? Commercial brass cleaners and polishes are formulated for just this purpose. Products like Wright’s Copper and Brass Polish or Brasso are designed to remove heavy tarnish, restore shine, and often leave a protective coating to slow future dulling (source). The best brass cleaner for delicate or valuable items is usually a mild, ammonia-free formula that won’t scratch or strip detail. Some brass polishers are available in creams, sprays, or even dip baths for convenience.
- Best for: Heavily tarnished brass, routine maintenance, larger surfaces
- Pros: Fast results, less scrubbing, often include anti-tarnish protection
- Cons: Some contain abrasives (not ideal for plated/lacquered brass); may require specific application steps
Match Method to Finish
Not all brass is created equal—your cleaning method should always match your finish. Here’s a quick comparison to help you decide:
| Method | Use Case | Finish Compatibility | Ease | Maintenance Frequency |
|---|---|---|---|---|
| Vinegar/Salt/Flour Paste | Light/medium tarnish, intricate details | Raw brass only | Simple, DIY | Monthly to quarterly |
| Lemon & Baking Soda | Quick touch-ups, jewelry | Raw brass, some plated | Very easy | As needed |
| Commercial Brass Cleaner & Polish | Heavy tarnish, large pieces | Raw, some lacquered (if labeled safe), rarely plated | Easy, fast | Quarterly to annually |
| Wadding/Paste Polishes | Detailed surfaces, antiques | Raw, some lacquered | Moderate | As needed |
| Specialty Cloths | Light tarnish, quick shine | All finishes (if labeled safe) | Very easy | Monthly |
For lacquered brass, stick with non-abrasive, lacquer-safe cleaners and avoid acids or scrubbing. Plated brass needs the gentlest touch—use only mild soap and water, or a specialty brass cleaner and polish labeled safe for plating, and keep contact brief.
Choose the mildest method that achieves the result; escalate only if needed.
Tips for Safe and Effective Polishing
- Always test any cleaner—household or commercial—on a hidden area first to ensure it won’t damage your finish.
- Never mix chemicals (for example, acids with bleach) as this can produce dangerous fumes.
- Follow manufacturer’s instructions if using a commercial brass polisher or the best metal polish for brass to avoid over-polishing or residue buildup.
By choosing the right brass cleaner and polish for your item’s finish, you’ll get a brilliant result without risking damage. Next up, we’ll dive into the safest ways to remove tarnish using kitchen-safe acids and salts—so your brass can truly shine.
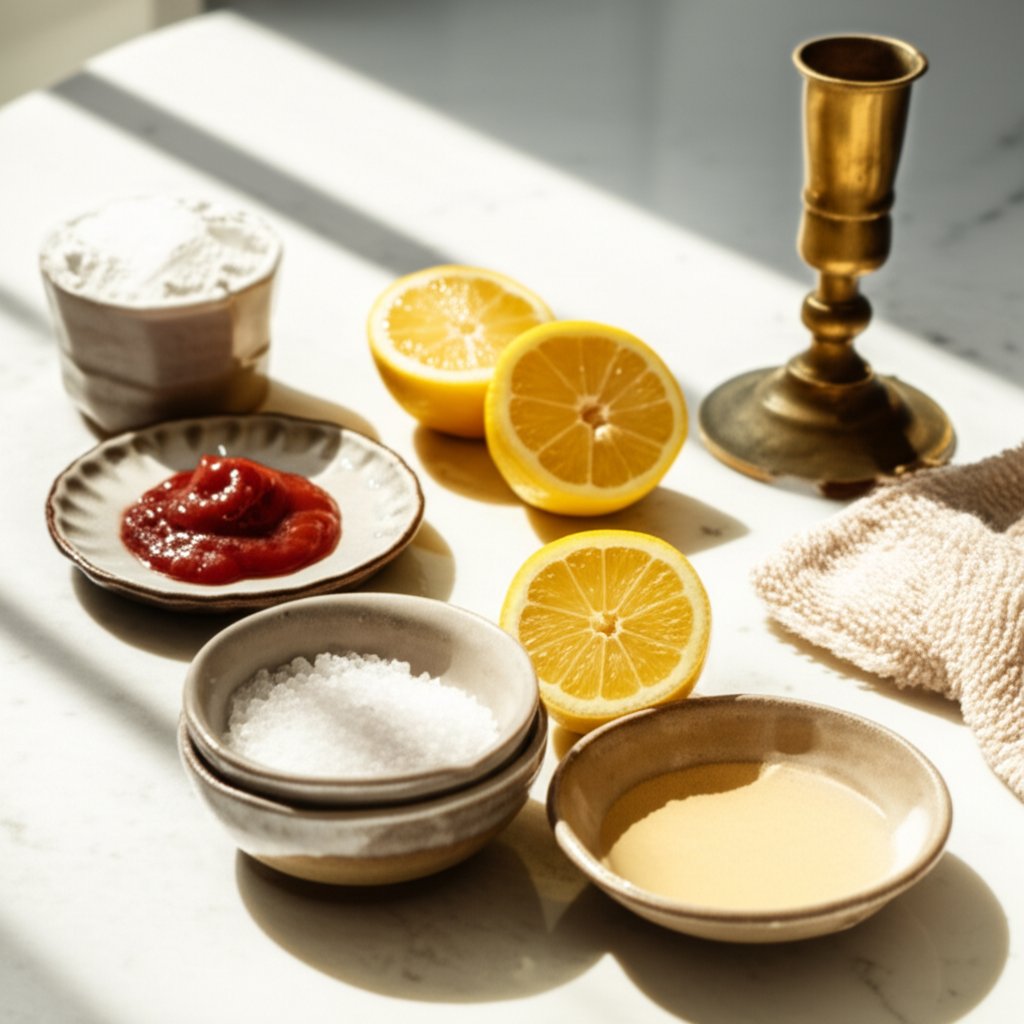
Step 4 Remove Tarnish with Safe Chemical Methods
When you realize your once-bright brass has faded to dull brown or green, it’s tempting to reach for the harshest cleaner in your cabinet. But did you know some of the safest and most effective ways to remove tarnish from brass are already in your kitchen? If you’ve wondered about cleaning brass with vinegar, using lemon, or even ketchup cleaning brass, you’re in the right place. Let’s walk through gentle, proven methods—step by step—so you can restore shine without risk.
Vinegar and Salt Method
- Mix the Solution: In a bowl, combine equal parts white vinegar (warmed slightly for extra power) and table salt—about 2 cups vinegar to 2 tablespoons salt is a good starting point.
- Apply to Brass: Dip a soft cloth or brush into the solution and gently rub the brass surface. For small items, you can submerge them for up to 10 minutes (reference).
- Agitate Lightly: After soaking, rub the item gently—let the salt act as a mild abrasive to help lift tarnish.
- Rinse Thoroughly: Wash the brass thoroughly with clean water to neutralize any acidic residue.
- Dry Immediately: Use a microfiber cloth to dry the surface completely, preventing water spots or new oxidation.
Lemon and Baking Soda Paste
- Make the Paste: Squeeze the juice from half a lemon into a bowl and mix with 1 teaspoon of baking soda. The mixture will fizz and thicken into a paste.
- Spread on Brass: With a clean cloth, rub the paste onto the brass, focusing on tarnished areas.
- Buff Gently: Use a microfiber cloth to buff and polish the surface, reapplying paste as needed for stubborn spots.
- Rinse and Dry: Wipe away residue with a damp cloth, then dry thoroughly.
Ketchup Spot Treatment
- Test First: Dab a small amount of ketchup on an inconspicuous area and let it sit for a few seconds.
- Apply to Tarnish: If the test is successful, spread a thin layer of ketchup over tarnished spots. The mild acid in tomatoes helps break down tarnish.
- Wait Briefly: Let the ketchup sit for up to 1–2 minutes—longer contact isn’t necessary and can risk dulling.
- Rinse and Dry: Wipe clean with a damp cloth, then dry with a soft towel.
| Method | Best For | Dwell Time Range | Rinse Needed | Finish Caution |
|---|---|---|---|---|
| Vinegar & Salt | Raw brass, heavy tarnish | 2–10 min | Yes | Test first; avoid on lacquered/plated |
| Lemon & Baking Soda | Small items, light/medium tarnish | 1–5 min | Yes | Safe for most raw brass; test plated |
| Ketchup | Intricate details, spot treatment | 1–2 min | Yes | Short contact only; test first |
Short contact, thorough rinse, fast dry—your three rules for safe chemical tarnish removal.
Important Tips:
- If you’re using vinegar to clean brass, always dilute and never leave the solution on for too long—prolonged exposure can dull the metal.
- For lacquered or brass-plated items, avoid aggressive rubbing and limit contact time. Always test on a hidden spot first.
- After any chemical cleaning, rinse thoroughly and dry immediately. This helps prevent re-tarnishing and water spots.
By following these kitchen-safe methods—whether you clean brass with vinegar, lemon, or ketchup—you can safely remove tarnish and restore a warm shine. Ready for a flawless, mirror-like finish? Next, we’ll explore both hand and machine polishing techniques for that final step.
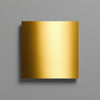
Step 5 Hand and Machine Polishing for Mirror Shine
Ever picked up a brass piece and wondered how to polish brass so it gleams like a mirror? Whether you’re restoring a vintage doorknob or want to know how to polish brass at home for that showroom look, the secret is in the right combination of technique, tools, and patience. Let’s break down exactly how to achieve a flawless, mirror polish—by hand or with a machine.
Hand Polishing That Works
For many, polishing brass by hand is the safest and most accessible approach. Start with a non-abrasive metal polish cream or paste—apply a small amount to a clean, soft cotton or microfiber cloth. Use straight, back-and-forth motions, not circles, to avoid leaving swirl marks. If you’re working through multiple grits, always clean the brass and your hands between each stage to prevent cross-contamination, which can scratch the surface (source).
- Begin with a finer grit (1000–2000) if the brass is in good shape; use lower grits (320–800) only to remove deep scratches or heavy oxidation.
- Wet sanding is highly recommended—add a drop of dish soap to water for lubrication and a smoother finish.
- Switch to a clean cloth for the final buff, using less pressure to reveal the shine.
After polishing, wash the brass with mild soap and water to remove any residue from the brass polishing compound, then dry with a fresh cloth.
Rotary and Bench Buffing Basics
For larger pieces or a true mirror polish, machine buffing is the gold standard. Imagine using a drill-mounted cotton wheel, a random-orbit polisher, or a bench buffer—these tools speed up the process and can deliver a mirror finish when paired with the right buffing compound for brass.
| Tool Type | Wheel/Pad | Compound Stage | Best Use |
|---|---|---|---|
| Drill/Rotary Tool | Cotton/felt mop | Cut & color | Small/medium objects, detail work |
| Bench Buffer | Spiral-sewn sisal (cut), loose cotton/flannel (color/final) | Progression: Cut & Color | Large flat surfaces, consistent finish |
| Random-Orbit Polisher | Foam/cotton pad | Color/final | Flat, accessible areas |
| Hand (for comparison) | Microfiber/cotton cloth | Final buff | Small items, touch-ups |
Compound and Pad Selection
The path to a mirror shine is all about using the right brass polishing compound in the right order. Here’s a proven sequence:
- Cut Buffing: Start with a coarse compound (like black emery) on a firm wheel to remove scratches and surface imperfections.
- Color Buffing: Move to a medium compound (brown tripoli) on a softer wheel to refine the surface and bring out the shine.
- Mirror Buffing: For the ultimate mirror polish, finish with a fine compound (green or red rouge) on a loose cotton or flannel wheel.
Always use a separate wheel or pad for each compound—never mix them, as leftover abrasive particles can ruin your finish. Clean the brass between each stage, and use light, controlled pressure to avoid overheating or distorting thin details.
Safety and Handling Do’s and Don’ts
- Secure your workpiece before machine buffing to prevent accidents.
- Wear eye and respiratory protection, especially when using power tools and compounds.
- Keep loose clothing, hair, and jewelry away from spinning tools.
- Work in a well-ventilated area to minimize inhalation of dust and fumes.
- Use small-cone mops or soft brushes for edges and intricate areas—never force the tool or press too hard.
Progress from heavier cut to color buff, finishing with a clean wheel and minimal compound for true mirror.
By following these steps, you’ll master how to polish brass to a mirror finish—whether by hand or machine. If you’re aiming for a true mirror polish or want to know how to polish brass at home with professional results, it’s all about the right sequence, the right compounds, and a little patience. Once you’re satisfied with your shine, you’re ready to tackle object-specific workflows for doorknobs, lamps, jewelry, and more in the next step.
Step 6 Object Specific Workflows for Common Items
Ever stood in front of a tarnished doorknob, a dusty lamp, or a dull piece of jewelry and wondered, “Where do I even start?” The truth is, each type of brass object—whether hardware, lighting, jewelry, or decor—has its own quirks. To help you avoid guesswork and get professional results, here are detailed, object-by-object workflows for how to polish brass hardware and more.
Doorknobs and Door Hardware
- Remove the hardware: Unscrew doorknobs, handles, or hinges from the door. For how to clean brass door knobs and how to clean brass hinges, removal makes it easier to reach every surface and avoids damage to surrounding wood or paint.
- Label and bag small parts: Place screws and small pieces in labeled bags; snap a photo before disassembly for easy reassembly.
- Dust and pre-clean: Use a soft brush or microfiber cloth to remove loose dirt from all surfaces and threads.
- Soak and wash: Submerge hardware in warm, soapy water. Gently scrub with a soft toothbrush—especially in crevices and around threads.
- Polish carefully: Apply your chosen brass cleaner or mild polish with a soft cloth. For detailed spots, use cotton swabs or a soft brush. Avoid soaking latch mechanisms or springs.
- Rinse and dry: Rinse thoroughly and dry immediately to prevent water spots.
- Reassemble: Lubricate moving parts if needed, being careful not to get oil on polished surfaces. Reinstall hardware using your reference photo.
Lamps and Light Fixtures
- Unplug and disassemble: Remove bulbs, shades, and detachable parts. Mask sockets and electrical components to keep them dry.
- Clean gently: Dust with a soft brush. For how to clean brass lamp parts, use a damp microfiber cloth and mild soap; avoid getting moisture near wiring.
- Polish: Apply a brass polish or gentle homemade paste to the metal surfaces. Support thin arms or decorative pieces to prevent bending.
- Buff and dry: Use a clean, dry cloth to buff to a shine. Double-check that all parts are completely dry before reassembly.
- Reassemble: Replace bulbs and shades only after all surfaces are dry.
Jewelry and Small Ornaments
- Confirm it’s brass: Test with a magnet or ask a jeweler if unsure. For how to clean brass jewelry and how to polish brass jewelry, always avoid harsh abrasives or long soaks (reference).
- Pre-clean: Mix a few drops of mild dish soap with warm water. Dip a soft cloth or toothbrush into the solution and gently clean the piece.
- Spot treat tarnish: For stubborn spots, use a paste of lemon juice and baking soda or a dab of vinegar and salt. Apply with a soft cloth, gently rubbing in straight, back-and-forth motions. Rinse promptly.
- Dry thoroughly: Pat dry with a soft cloth and let air dry fully before storing.
- Optional polish: Use a jewelry polishing cloth for a final shine, but skip abrasive wheels or compounds that could remove detail.
- Store safely: Keep brass jewelry dry and away from chemicals or moisture to minimize tarnish.
Candlesticks and Intricate Decor
- Remove wax and dust: Gently scrape off any wax, then dust with a soft brush.
- Wash: Use warm, soapy water and a microfiber cloth to clean the surface. For ornate areas, a soft toothbrush or cotton swab works well.
- Apply cleaning paste: For how to clean brass candlesticks with heavy tarnish, apply a paste of lemon juice and baking soda or a commercial brass polish. Let sit briefly if needed.
- Buff crevices: Use a soft brush or cloth to work the cleaner into detailed areas. Avoid excessive heat—especially near wax residue.
- Rinse and dry: Rinse thoroughly and dry with a soft towel.
- Final polish: Buff with a clean, dry cloth for a uniform shine.
| Item Type | Disassembly Needed? | Best Method | Cautions |
|---|---|---|---|
| Doorknobs/Handles/Hinges | Yes | Soak, brush, polish, detail with swabs | Avoid soaking latch, over-polishing edges |
| Lamps/Fixtures | Partial | Mask sockets, gentle hand clean | Keep water away from wiring |
| Jewelry/Small Ornaments | No | Mild soap, soft cloth, gentle paste | No harsh abrasives, avoid soaking stones |
| Candlesticks/Decor | No | Soft brush, paste, gentle buffing | Avoid excessive heat, check for wax |
Photograph assemblies before teardown—your quickest path to error-free reassembly.
By following these step-by-step workflows, you can confidently approach any brass object—whether you’re figuring out how to clean brass door handles, how to polish brass jewelry, or how to clean brass candlesticks. Each process is tailored to protect both the shine and the fine details of your treasured pieces. With your items restored, you’re ready to lock in that brilliance with protective coatings and smart maintenance in the next step.

Step 7 Protect the Shine with Wax or Lacquer
Ever spent hours bringing your brass to a mirror shine, only to see it dull again within weeks? If you’re wondering how do you keep brass from tarnishing after all that effort, the answer lies in the right protective coating and a bit of smart maintenance. Let’s break down two proven strategies—waxing and lacquering—so your polished brass finish stays bright and beautiful for months or even years.
Wax Protection: The Easy, Reversible Shield
Waxing is a favorite for raw brass you handle often, like doorknobs, railings, or musical instruments. After you’ve finished polishing, lightly degrease the surface with a clean, damp microfiber cloth to remove any polish residue. Then, apply a thin, even coat of microcrystalline or carnauba-based wax using a soft cloth. Buff gently in straight strokes—imagine you’re waxing a car, not scrubbing a pot. Once dry, the wax forms a hydrophobic barrier that helps repel moisture, fingerprints, and airborne contaminants.
- Clean and dry the brass thoroughly after polishing.
- Wipe away any oils or polish residue with a damp cloth.
- Apply a small amount of wax with a microfiber or soft cotton cloth.
- Buff gently until you achieve a uniform, polished brass finish.
- Reapply wax every few months, or whenever water stops beading on the surface.
The beauty of wax? It’s easy to touch up and doesn’t require harsh chemicals to remove. If you’re searching for how to clean polished brass that’s been waxed, a gentle soap-and-water wash is all you need, followed by a fresh coat of wax if the shine starts to fade.
Re-Lacquering Basics: Long-Term, Low-Maintenance Protection
For decorative pieces, fixtures, or items you want to protect for the long haul, lacquer is the go-to. Lacquer creates a tough, clear film that locks in your polished brass finish and prevents air and oils from causing tarnish. Here’s how to polish lacquered brass and reapply lacquer safely:
- Remove old, flaking lacquer by gently wiping with acetone on a soft cloth (test in a hidden spot first).
- Clean and polish the bare brass to your desired shine.
- Ensure the surface is completely dry and free from dust or fingerprints.
- Apply a thin, even coat of clear lacquer in a dust-free, well-ventilated area. Spray or dip methods both work—just keep the coating thin to avoid drips (reference).
- Allow to dry thoroughly before handling, and apply additional coats if needed for extra durability.
Once lacquered, your brass will need little more than occasional dusting. If you’re curious does brass tarnish easily with lacquer, the answer is: much less so, provided the coating remains intact. For how to clean polished brass with a lacquered finish, stick to soft cloths and mild soap—never abrasive cleaners or polishes.
| Protection Type | Durability | Touch-Up Ease | Best For | Skill Level |
|---|---|---|---|---|
| Wax | Moderate (reapply every 2-3 months) | Very easy | High-touch items, instruments, hardware | Beginner |
| Lacquer | High (lasts 1+ years if undamaged) | Requires stripping and recoating | Decor, fixtures, low-touch areas | Intermediate |
Maintenance Cadence: Preserve Your Shine with Minimal Effort
- Dust brass regularly with a soft, dry cloth to prevent buildup.
- Wash with mild soap and water as needed—avoid soaking, especially for lacquered pieces.
- Reapply wax only when water no longer beads on the surface.
- Handle polished brass finish items with gloves or clean hands to minimize fingerprints and oils.
- Stop and reassess if you notice the finish lifting or detail softening—over-cleaning can do more harm than good.
Protect first, polish less—barrier coatings reduce re-tarnishing and handling wear.
By understanding the difference between wax and lacquer, you can tailor your approach to each piece—ensuring your polished brass finish lasts as long as possible. Next, we’ll tackle troubleshooting for those tricky situations when things don’t go as planned, so you can keep your brass looking its best with confidence.
Step 8 Troubleshoot Damage and Know When to Stop
Ever cleaned a brass piece and found unexpected green spots, flaking, or stubborn stains that just won’t budge? You’re not alone. Sometimes, even after following every step on how to polish brass, you’ll run into special cases—like badly tarnished brass, corroded brass, or persistent scratches. Here’s your go-to troubleshooting guide so you can fix common brass cleaning issues safely—and know when it’s best to stop or call a pro.
If Verdigris Appears
- If you spot green, powdery deposits (verdigris), gently brush away loose material with a soft, dry brush—never scrape aggressively, as this risks scratching the surface.
- Next, use a mild acid solution (like diluted vinegar or lemon juice) for a short contact time to help remove deeper verdigris. Rinse thoroughly and dry immediately.
- Consider applying a thin coat of wax afterward to help prevent future moisture buildup.
If Plating Is Flaking
- If you notice the brass surface lifting, peeling, or flaking—especially on plated items—stop all abrasive cleaning or polishing.
- Gently wash with mild soap and water only. Do not attempt to sand or polish further, as this can worsen the damage and expose the base metal underneath.
- For significant loss, professional replating may be the only safe solution.
If Scratches or Pits Remain
- If scratches or pits are still visible after basic cleaning, try a slightly stronger brass polishing compound or move to a finer grit sandpaper for brass, using gentle, even pressure.
- Always check progress frequently—over-sanding brass can quickly wear through thin layers, especially on plated or antique pieces.
- If the detail starts to soften or the finish looks uneven, stop and reassess before proceeding further.
If Stains or Tarnish Won't Budge
- If you’re struggling with how to clean very tarnished brass or remove brass tarnish that’s deeply set, repeat a mild chemical cleaning (like a paste of baking soda and vinegar or lemon juice with salt).
- For badly tarnished brass, several applications may be necessary—let each one sit for the recommended time, then rinse and buff before repeating (reference).
- Always ensure all cleaning residues are removed between steps to avoid streaking or new stains.
If Moving Parts Bind or Stiffen
- If threads, hinges, or joints become stiff after cleaning, carefully remove any polish or cleaner residue.
- Apply a small amount of appropriate lubricant (like light machine oil) away from polished faces to restore smooth movement.
| Problem | Likely Cause | Safe Fix | When to Stop |
|---|---|---|---|
| Green powder (verdigris) | Moisture, salt exposure | Dry brush, mild acid, wax | If brass surface softens or detail erodes |
| Flaking/plating loss | Thin brass plating, over-abrasion | Stop polishing, clean gently | Consider professional replating |
| Persistent scratches/pits | Deep tarnish, previous harsh cleaning | Finer compound, gentle sanding brass | If detail fades or finish thins |
| Black or uneven stains | Incomplete cleaning, residue buildup | Repeat mild chemical clean, thorough rinse | If no improvement after several tries |
| Binding threads/joints | Residue in crevices | Clean out, lubricate carefully | If movement does not return |
When in doubt, do less—not more. Preserving material beats chasing perfection.
Remember, the goal isn’t to erase every mark at any cost. For how to clean severely tarnished brass or corroded brass, patience and gentle methods are key—sometimes, less is truly more. If repeated attempts to remove brass tarnish or restore shine don’t work, it may be time for professional help. Up next, we’ll explore when to consider expert restoration or precision finishing for those truly challenging cases.

Step 9 When to Call in the Experts for Brass Restoration
Ever spent hours buffing, only to find your brass still isn’t a true polished mirror? Or maybe you’re restoring a part where dimensional accuracy matters as much as appearance. In these cases, knowing when to move beyond DIY methods can save you time, frustration, and even your project. Let’s explore when professional finishing—including advanced CNC machining—makes all the difference for mirror polishing and flawless brass finishing.
When DIY Isn’t Enough
DIY polishing is perfect for most household pieces, but some situations demand more precision than hand tools or home buffing wheels can deliver. Imagine trying to restore a brass component with deep pitting, warped geometry, or a surface that must match an exact spec. Or perhaps you need a consistent, mirror shining finish across a batch of parts. Here are common scenarios where professional help is not just helpful—it’s essential:
- CNC machining services for resurfacing and finishing when you need flat, scratch-free faces and repeatable, spec-driven results
- Brass restoration for parts with deep corrosion, dents, or warping that can’t be fixed by hand polishing alone
- Mirror polishing for architectural, decorative, or industrial items where a polished mirror surface is required on every piece
- Matched sets or production runs where every item must meet the same standard for quality and appearance
- Critical tolerances—such as in musical instruments, scientific equipment, or mechanical assemblies—where even slight dimensional variation is unacceptable
Professional Buffing and Machining: How Precision Delivers a True Polished Mirror
Professional finishing shops and CNC machining centers use advanced workflows to achieve what’s nearly impossible by hand. Here’s how the process typically works for high-end brass finishing:
- Surface Resurfacing: CNC machines remove just enough material to flatten and true up the part, eliminating pits, scratches, and warps. This creates a foundation for a flawless mirror shining finish. According to Makera, a sequence of grinding, polishing with fine abrasives, and buffing with compounds is used to minimize microscopic scratches and bring out a true polished mirror effect.
- Electrochemical and Chemical Polishing: For delicate parts or those with complex geometry, chemical or electrochemical polishing baths smooth the surface without mechanical abrasion, producing a uniform, high-gloss finish and improving corrosion resistance.
- Buffing and Rouge: The final stage involves buffing with specialized compounds on soft wheels, producing the highest possible reflectivity—a true mirror polish that’s virtually free of grit lines.
Spec-Driven Finishes: DIY vs CNC-Assisted Brass Finishing
| Finishing Method | Consistency | Edge Preservation | Throughput | Tolerance Control |
|---|---|---|---|---|
| XTJ CNC Machining Services | Ultra-consistent (every part to spec) | Sharp, crisp edges; no rounding | High (batch or production scale) | +/- 0.005mm; ideal for critical parts |
| DIY Hand/Machine Polishing | Varies by skill; hard to match sets | Detail may soften with over-polishing | Low-Moderate (one-off, small batch) | Manual; not suitable for tight specs |
| Traditional Pro Buffing Shop | High (expert hands, but minor variation) | Good, but some risk on thin details | Moderate (small to medium runs) | Limited; not CNC-controlled |
For small, non-critical items, DIY methods are cost-effective and rewarding. But when you need a flawless, polished brass mirror finish—especially on parts where geometry, repeatability, or throughput matter—CNC-assisted finishing shines. Services like XTJ CNC Machining can deliver ultra-flat, scratch-free surfaces that polish to a mirror with ease, meeting even the strictest industrial or decorative standards.
For a true polished mirror finish—especially on spec-driven or production parts—precision machining and professional post-processing are the gold standard. DIY is great for keepsakes; CNC is unbeatable for perfection.
In summary, knowing how to restore brass is about more than just elbow grease—it’s about matching the right method to your project’s needs. Whether you’re chasing a one-off mirror shining effect or require a batch of perfectly matched, high-tolerance brass parts, understanding your options ensures your finished piece stands out for all the right reasons.
Frequently Asked Questions
1. How can I make brass shiny again?
To make brass shiny, start by identifying if it's solid, plated, or lacquered. Clean gently with mild soap and water, then use an appropriate brass polish or a homemade solution like vinegar and salt for raw brass. Finish by buffing with a soft cloth for a mirror-like finish. Protect the shine with wax or lacquer for lasting results.
2. What should I avoid when cleaning brass?
Avoid using abrasive scrubbing pads, steel wool, or harsh acids on brass, especially if it is lacquered or plated. Over-abrasion can strip patina or damage thin plating. Always patch-test cleaners on a hidden area before full application.
3. Can I use household products to clean brass?
Yes, household items like vinegar, salt, lemon juice, baking soda, and even ketchup can safely clean raw brass. However, these should not be used on lacquered or plated brass without testing, as they may cause damage. Always rinse and dry thoroughly after cleaning.
4. How do I keep brass from tarnishing after polishing?
After polishing, apply a thin coat of microcrystalline or carnauba-based wax for easy, reversible protection, or use a clear lacquer for longer-lasting results. Regular dusting and gentle washing will also help maintain the shine.
5. When should I seek professional help for brass restoration?
If your brass piece has deep pits, severe corrosion, flaking plating, or requires precise tolerances, professional finishing or CNC machining services are recommended. These methods deliver consistent, mirror-quality results and are ideal for critical or matched parts.
-
Posted in
brass polishing, brass restoration, how to clean brass, metal finishing, mirror polish brass

