
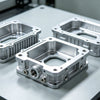
Machining PEEK on a 3-Axis Mill: Achieving ±0.005mm Without a Temperature-Controlled Workshop

Let me be honest with you. Most articles you‘ll read about machining PEEK will tell you that you need a $200,000 five-axis machine, liquid nitrogen cooling, and a shop floor that stays within 1°C all day long. And sure, that stuff works. But here’s what those articles won‘t tell you: I’ve hit ±0.005mm on a plain old three-axis mill in a shop where the temperature swings 15°C between morning and afternoon. No climate chamber. No cryo budget. Just a few hard-learned tricks and a lot of respect for what PEEK actually does when you try to cut it.
So if you‘re working with a basic mill and a shop that gets hot in summer and cold at night, don’t pack up and go home. Read this first.
Why PEEK Makes You Want to Pull Your Hair Out
PEEK is amazing stuff. It handles 250°C all day, laughs at jet fuel, and weighs nothing compared to steel. That‘s why aerospace and medical guys love it. But here’s the dirty secret: machining it to tight tolerances is a nightmare.
Here‘s what’s happening inside the cut. PEEK gets soft and gummy at around 143°C—that‘s its glass transition temperature. Your cutting tool generates heat right at the tip. Even if the rest of the part feels cool to the touch, that tiny spot can cross 143°C in a heartbeat. When that happens, the material stops shearing cleanly. It smears. It burrs. Your dimensions start wandering like a lost tourist.
And because PEEK is a great insulator, it holds onto heat like a thermos holds onto coffee. That heat builds up, creates internal stress, and then—hours or even days later—your perfectly measured part warps on the shelf. Been there. It’s not fun.
So how do you fight this on a basic three-axis mill without a temperature-controlled room? You stop fighting the physics. You start working with it.
Trick 1: Bake Your Plastic Before You Cut It (Seriously)
Most shops grab a PEEK rod out of the box and start machining. Big mistake. That rod has residual stress left over from when it was extruded or molded. As soon as you start cutting and generating heat, those stresses release unevenly. The part warps. Sometimes it cracks. Usually it happens after you‘ve already told the customer it’s done.
The fix is stupidly simple: anneal it first. Throw the stock in a regular oven at 200–220°C. Let it soak for one to two hours—about 30 minutes for every 10mm of thickness. Then turn off the oven and let it cool down slowly to room temperature. Do not pull it out hot. I learned that the hard way. Rapid cooling just puts new stress back in.
For really tricky parts, do two anneals: rough out the shape, bake it again, then finish. It adds time, but it saves you from scrapping expensive material.
Trick 2: Stop Pretending Your Shop Is a Laboratory
Your shop floor gets hot in the afternoon. Mine does too. PEEK expands and contracts with temperature way more than metal—like 50 to 200 microns per meter per degree Celsius. That‘s not a machine problem. That’s just physics being annoying.
So instead of crying about not having a climate-controlled inspection room, work around it.
Pick a time of day when your shop is most stable. For me, it‘s early morning before the machines have been running for hours. That’s when I do my critical measurements. Leave your PEEK stock and your measuring tools in the same spot for at least two hours before you check anything. If you‘re running a batch over multiple days, measure the first part of the day and compare it to the last part from yesterday. Watch the pattern. You’ll start to see a drift you can predict—and then compensate for.
One more thing: if your PEEK part has to fit over a metal shaft or seal against a metal housing, don‘t just aim for a perfect fit at room temperature. Add a little clearance on purpose. A part that measures perfect at 22°C but binds when it gets hot is still a failed part.
Trick 3: Ditch the Flood Coolant (Yes, Really)
This one goes against everything you learned in machining school. For metal, flood coolant is your friend. For PEEK? It often makes things worse.
Cold coolant hitting a hot cut zone can cause thermal shock cracks. Water-based coolants can get absorbed into some PEEK grades and make them swell. And honestly, flood coolant just doesn‘t get into the cut zone properly on plastic anyway—the heat stays right at the tool tip.
So what do I use instead? Compressed air. A good blast of air at 5–7 bar through a focused nozzle blows chips away, carries heat out of the cut, and leaves no residue to clean up. It’s cheap, it‘s simple, and it works for most unfilled PEEK.
For tougher jobs, get yourself a vortex cooler. It uses compressed air to make a stream of really cold air—like 30–50°C below room temp—with no moving parts. Pair that with a tiny mist of non-reactive fluid, and you’ve got serious localized cooling without the thermal shock.
Just don‘t point the air nozzle at one spot and leave it there. Keep it moving, or you’ll chill one area too much and make it brittle.

Trick 4: Tools and Speeds That Actually Work (Not What the Book Says)
Carbide tools only. Don‘t even think about HSS. But carbide alone won’t save you—geometry is everything.
Look for tools with high positive rake angles and polished flutes. PEEK wants to stick to cutting edges. Polished surfaces help. Big flutes help too—they let chips get out fast, and those chips carry heat away with them.
Now here‘s where most people get it wrong. When they see heat problems, they slow down the spindle. That feels right, but it’s actually backwards. Lower speed means more contact time per revolution, which can make more heat. Try this instead: higher spindle speed and higher feed rate together. You want a thick enough chip to carry heat away.
Here‘s my starting point. Tune it from there:
Cutting speed: 100–200 m/min for milling
Feed: 0.05–0.15 mm per tooth for roughing, lighter for finishing
Depth of cut: 0.5–1mm for roughing, 0.1–0.3mm for finishing
And always climb mill. Conventional milling rubs at the end of the cut and makes heat. Climb milling puts the thick part of the chip at the entry and carries heat away immediately.
One trick I learned from scrapping too many parts: run a test part and measure it right off the machine. Then measure it again 24 hours later just sitting on the bench. The difference tells you how much residual stress your parameters are leaving behind. Keep adjusting until that overnight drift is inside your tolerance. That’s your real process.
Trick 5: Don‘t Squeeze the Life Out of Your Part
Plastic isn’t metal. Clamp it as hard as you‘d clamp aluminum, and you’re machining a deformed shape. When you let go, it springs back—and your tolerances spring away with it.
Vacuum chucks are great for flat parts. Machine soft jaws to match the part contour so the force spreads out. For weird shapes, make fixtures with rubber or silicone inserts that hold without point-loading.
Here‘s a quick test: look at the part after machining. Do you see marks where the clamps touched? If yes, you clamped too hard. Back off the pressure on the next part. You’ll be surprised how little force you actually need to keep it from moving.
Trick 6: Measure Twice, Wait, Then Measure Again
Measuring a PEEK part right after cutting tells you what the machine made at that moment. It doesn‘t tell you what the part will measure tomorrow morning.
Do two inspections. First, quick checks at the machine to make sure your setup and tool are okay. Second, a real inspection after the part has rested for at least four hours in a stable temperature. Let those residual stresses relax. Let any temperature gradients equalize. If the part passes both times—fresh off the machine and after resting—then you can trust it.
For parts with that ±0.005mm requirement, do yourself a favor: get a granite surface plate, and leave the part, your gauges, and yourself in the same room for an hour before measuring. Thermal expansion doesn‘t care about your delivery deadline.
The Real Talk
Can you actually hit ±0.005mm on PEEK with a three-axis mill in a shop that hits 35°C on a summer afternoon? Yes. But not every part. Not every time. And definitely not without discipline.
The recipe isn’t complicated: anneal your stock. Control your measurement environment. Use air cooling. Climb mill. Keep your tools sharp—sharper than you think you need. And accept that machining PEEK is a material-driven process, not a machine-driven one.
A five-axis mill with thermal compensation and liquid nitrogen makes life easier. But those are luxuries, not requirements. The real requirement is understanding what PEEK needs to stay stable under a cutter. Give it that, and your old three-axis mill will surprise
Frequently Asked Questions – 3-Axis Machining
What materials can be used in 3-axis machining?
Metals (aluminum, stainless steel, brass), plastics (ABS, nylon, PC), and composites (carbon fiber, fiberglass).
What parts can 3-axis machining produce?
Flat or simple 3D parts like brackets, plates, enclosures, and prototypes. Complex undercuts may require multiple setups.
What finishes do you offer?
Anodizing, plating, powder coating, and painting. Contact us for specific requirements.
How long does a 3-axis project take?
Depends on complexity and quantity. Simpler 3-axis setups often allow faster turnaround than multi-axis work.
What is your quality control?
In-process inspections plus CMM verification to ensure all parts meet industry standards.
Is there a minimum order quantity?
No. We accept orders from one prototype to thousands of parts.
How is pricing determined?
Based on complexity, material, setup time, and quantity. 3-axis is generally cost-effective for suitable geometries.
Do you offer design assistance?
Yes. We help optimize designs for 3-axis machining to reduce setups and avoid inaccessible features.
What is your warranty?
We warranty all machined parts. Contact us if any issue arises.
How do I place an order?
Send your 3D model (STEP/IGES) and 2D drawing via our website or direct contact. We’ll check 3-axis feasibility and provide a quote.
-
Posted in
3-axis machining, five-axis mil, Machining PEEK, three-axis mill


