
Copper Gutters 10 Essential Points: Cost, Sizes, Maintenance

Understanding Copper Gutters Essentials
Ever wondered why copper gutters are often seen on the most striking homes—both historic and contemporary? If you’re exploring options for your next rain management upgrade, copper house gutters offer a blend of beauty, resilience, and value that stands apart from aluminum or steel. Let’s break down what makes these systems unique, how their natural patina forms, and why performance still depends on smart design and regular care.
What Makes Copper Gutters Different
Copper gutters are premium rainwater systems crafted from high-quality copper, renowned for their longevity and architectural appeal. Unlike aluminum or steel, copper is naturally resistant to corrosion and weathering, meaning copper gutters can last 50 years or more with proper maintenance. This durability translates into fewer replacements and less environmental waste over time. While the initial investment is higher, many homeowners find that copper gutters on house exteriors add lasting value and curb appeal.
- Exceptional durability—often outlasting other gutter materials
- Low maintenance when installed and cleaned properly
- Distinctive patina aesthetics that evolve over decades
- Fully recyclable and often made from recycled copper
- Potential to increase resale value and visual impact
How Patina Protects and Enhances Aesthetics
When you first install copper gutters, you’ll notice their bright, metallic sheen. Over time, exposure to air and moisture triggers a natural oxidation process, developing a rich brown and eventually a classic green patina. This transformation isn’t just for looks—the patina acts as a protective barrier, shielding the underlying copper from further corrosion or rust. Many homeowners prize this evolving finish for the character and depth it adds to their property.
The natural patina on copper gutters is more than decorative—it's a protective layer that extends the life of the system.
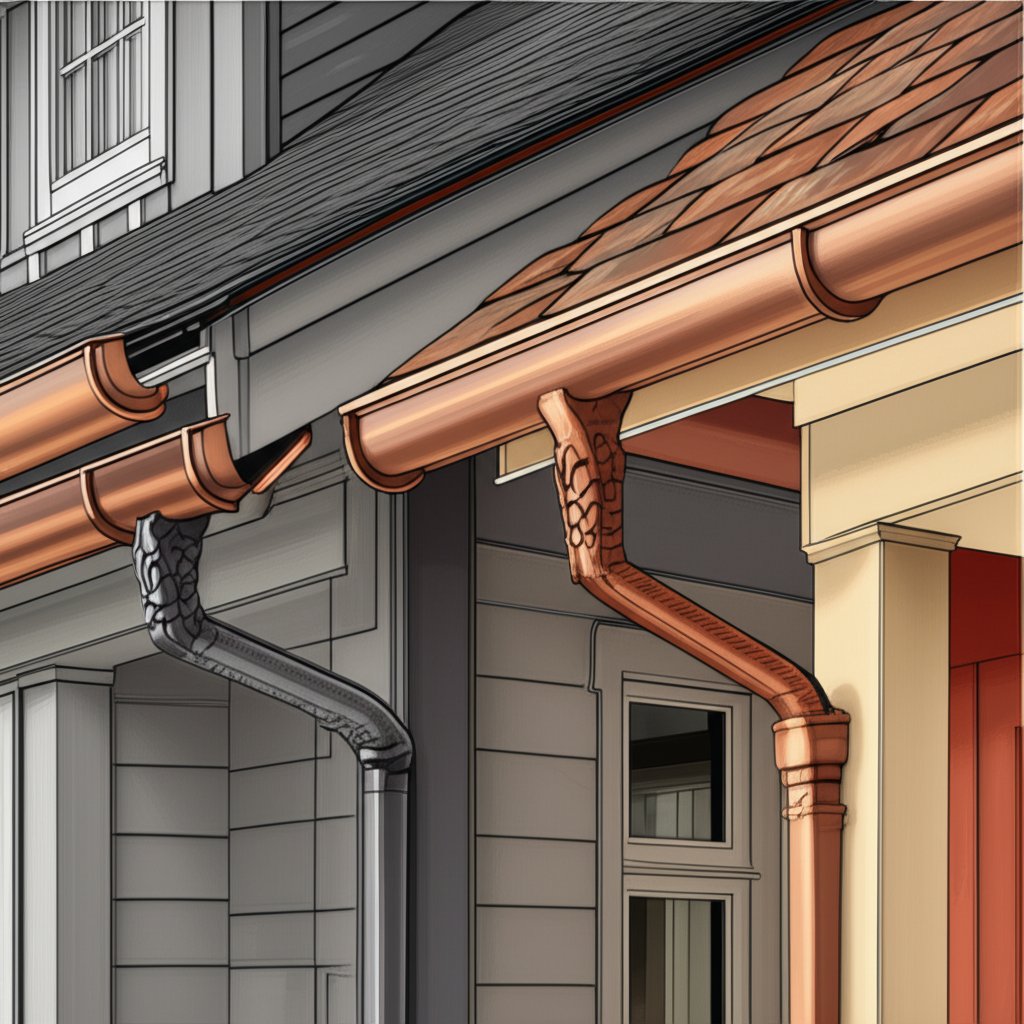
Components of a Copper Gutter System
A complete copper gutter system isn’t just about the gutter troughs. It’s a coordinated set of components that work together for efficient water management:
- Rainwater flows off the roof into the copper gutter (either K-style or half-round)
- Water travels along the gutter, guided by the correct slope
- Downspouts or copper downspout chains carry water down the side of the house
- Water discharges safely away from the foundation
Seamless copper gutters are custom-formed to fit your home, reducing the risk of leaks at joints. Sectional systems, while more affordable, may require more frequent maintenance at the seams. Downspouts, hangers, and optional accessories like gutter guards or rain chains all play a role in system performance and longevity.
When Copper Is the Right Choice
So, is copper right for you? Copper gutters shine on homes with slate, tile, or other premium roofing, and their timeless style suits both traditional and modern architecture. However, even the best copper gutter system requires proper sizing, slope, and professional installation to prevent overflow or staining. Maintenance is key—regular cleaning and inspection will help your investment last for decades (reference).
While copper gutters vs aluminum or steel comes down to budget and style priorities, copper house gutters are often chosen for their long-term value, unique appearance, and synergy with high-end architectural features. If you’re seeking a system that blends function with beauty, and you’re prepared for the upfront investment, copper gutters on house exteriors can be a lasting solution.
In the next sections, we’ll explore gutter profiles, hydraulic sizing, installation best practices, and how to care for your copper system to ensure it performs and looks its best for years to come.
Profiles, Dimensions, and Design Fit
Half Round Versus K Style Profiles
When it comes to copper gutters, the profile you choose—half round or K-style—has a direct impact on both performance and curb appeal. Ever looked up at a home and noticed the elegant, rounded lines of a gutter half round system? Or maybe you’ve seen the crisp, angular fascia line of a K-style gutter and wondered which is best for your needs. Let’s break down the differences so you can pick the right fit for your home.
| Attribute | Half Round Copper Gutters | Copper K Style Gutter |
| Appearance | Classic, smooth, rounded; ideal for historic or high-end homes | Angular, flat-back with crown-molding look; suits modern architecture |
| Relative Capacity | Lower per width; may need larger size for heavy rainfall | Higher per width; handles more water for the same nominal size |
| Debris Shedding | Excellent due to smooth, crease-free interior | Good, but corners can trap debris |
| Hanger Type Options | Requires special hangers (strap, fascia, or rod-and-bracket) | Can use standard hidden or fascia hangers |
| Ease of Cleaning | Easier—fewer corners, less buildup | Slightly harder—more angles and seams |
| Installation Complexity | More complex, often professional-only | Simpler, sometimes DIY-friendly |
Common Widths, Depths, and Hanger Options
Both half round copper gutters and K-style profiles are available in a range of sizes to suit different roof types and rainfall needs. The most popular residential sizes are 5-inch and 6-inch guttering, with 6 gutter (6-inch) options offering more capacity for larger roofs or areas with heavy precipitation (source). You’ll also find half round gutter sizes up to 8 inches for specialty projects or commercial buildings.
- Fascia-mounted hangers: Attach directly to the fascia board; common for K-style and some half round installations
- Roof strap hangers: Secure the gutter to the roof deck; often used for copper half round gutter systems
- Hidden hangers: Concealed inside the gutter for a clean look; mostly for K-style
- Rod-and-bracket hangers: Decorative and structural; popular for historic or upscale homes
- Heavier-duty brackets: Recommended for snowy regions or large roof areas
Choosing the right hanger is crucial for both stability and style, especially with premium materials like copper (reference).
How Profile Influences Performance and Aesthetics
Imagine you live in a region with frequent downpours. K-style gutters, with their greater effective capacity, are often the go-to for modern homes and steep roofs. If your priority is easy cleaning and timeless beauty—especially for a historic property—gutter half round profiles may be the answer. Their smooth interior resists corrosion and clogging, and they’re less likely to leak if installed seamlessly.
It’s not just about function; the visual impact matters. Half round copper gutters add a subtle, classic detail that can elevate curb appeal, while K-style lines blend seamlessly with contemporary fascia and trim.
Matching Profile to Roof and Fascia
So, which profile is right for your home? Consider these questions:
- Does your roof have a steep pitch or large surface area? Opt for 6 inch guttering or larger to handle runoff.
- Is your home historic or do you want a softer, rounded look? Half round gutter sizes in copper may be ideal.
- Are you aiming for a crisp, modern appearance with maximum water management? A copper K style gutter is likely your best fit.
- What’s your fascia board style? K-style gutters install flat, while half round often need special brackets and may require more professional expertise.
Ultimately, the right copper gutter profile is a balance of style, function, and fit. In the next section, we’ll show you how to size your gutters and downspouts for optimal water flow and protection, no matter which profile you choose.
Hydraulic Sizing For Gutters And Downspouts
Ever stood outside during a heavy downpour and wondered if your gutters are truly up to the task? Proper sizing is the foundation of a reliable copper rain gutters and downspouts system—one that quietly protects your home from water damage, foundation cracks, and landscape erosion. But how do you know if you need a wide gutter, more copper downspouts, or simply a smarter layout? Let’s break it down step by step.
Finding Your Effective Roof Drainage Area
First, you need to determine the area of your roof that feeds water into each gutter run. Sounds complex? It’s not. Measure the length and width of each roof section that drains to a specific gutter, then multiply for square footage. For complex roofs, add up the areas of all contributing surfaces. Don’t forget to adjust for roof pitch, since steeper roofs collect more windblown rain:
- Up to 3-in-12 pitch: use a multiplier of 1.0
- 4-5-in-12 pitch: multiply by 1.05
- 6-8-in-12 pitch: multiply by 1.1
- 9-12-in-12 pitch: multiply by 1.2
- Over 12-in-12 pitch: multiply by 1.3
For example, a 1,000 square foot roof with a 6-in-12 pitch becomes 1,100 square feet for drainage calculations.
Mapping Rainfall Intensity to Gutter Size
Next, factor in your local rainfall intensity—the maximum rate of rain (in inches per hour) your region experiences during short bursts. You can find this data through the National Weather Service or NOAA. Why does it matter? Because a home in Houston faces much heavier storms than one in Salt Lake City, so it may need a wider gutter or extra outlets to prevent overflow (source).
- Calculate your total drainage area (adjusted for pitch).
- Look up your region’s maximum rainfall intensity.
- Match your needs to the following table for an initial recommendation:
| Roof Drainage Area (sq ft) | Rainfall Intensity (in/hr) | Suggested Gutter Size | Recommended Downspout Size |
| Up to 2,500 | Up to 5 | 5" K-style or 5" half-round | 2"x3" rectangular or 3" round |
| 2,500–4,000 | 5–7 | 6" K-style or 6" half-round (wide gutter) | 3"x4" rectangular or 4" round |
| 4,000–8,000 | 7–10 | 7"–8" custom or oversized | 4"x5" rectangular or 5" round |
These are starting points—always adjust for unusually steep roofs, long gutter runs, or local code requirements. For copper gutter downspout sizing, round downspouts (often paired with copper gutter chains for decorative and functional purposes) are common, especially with half-round copper gutters.
Downspout Count and Diameter Recommendations
Here’s where many systems fall short: not enough downspouts, or downspouts that are too small. The general rule? Place at least one downspout every 40 feet of gutter, and size each downspout to handle the drainage area it serves. For example:
- 2"x3" rectangular: up to 600 sq ft
- 3"x4" rectangular: up to 1,200 sq ft
- 3" round: up to 706 sq ft
- 4" round: up to 1,255 sq ft
If your roof section exceeds these areas, add more downspouts or upgrade to a larger diameter. For homes with multiple roof planes or complex layouts, conductor heads for gutters can help manage flow and reduce the risk of overflow at junctions.
When to Add Extra Outlets or Diverters
Expansion joints are essential for long gutter runs (over 50 feet), and every expansion joint is a good spot for an additional downspout. Corners are also prime locations for downspout placement, especially where two roof planes meet. If you notice water pooling or overflow during storms, consider adding outlets or diverters to balance the load.
Always place downspouts at the system’s low points and ensure discharge is directed well away from your foundation to prevent costly water damage.
Common mistakes to avoid? Underestimating rainfall events, using only one downspout per long gutter run, or ignoring the need for slope and expansion joints. Each of these can lead to clogs, overflow, or even gutter failure—especially with the premium investment of copper rain gutters and downspouts.
In the next chapter, we’ll guide you through the installation workflow—whether you’re considering a DIY approach or hiring a pro—so your system performs as beautifully as it looks.

Installation Workflow and DIY or Pro Decisions for Copper Gutter Systems
Thinking about copper gutter installation for your home? Whether you’re drawn to the timeless look or the long-term durability, knowing what’s involved can help you decide if you should tackle the project yourself or hire a professional. Let’s break down each step of copper gutters installation, highlight safety and technical considerations, and help you make the right call for your situation.
Planning Layout, Slope, and Expansion
Every successful copper rain gutter installation starts with careful planning. Imagine measuring your roofline, accounting for obstacles like chimneys or dormers, and marking out the ideal path for water flow. Proper slope is crucial—too little, and water pools; too much, and it looks off-balance. For half round copper gutters, you’ll want to use a snap line to mark a gentle pitch (typically 1/16 to 1/8 inch per foot) from the high point to the downspout location. Don’t forget to plan for expansion joints on long runs, especially with copper, which expands and contracts with temperature changes.
- Measure the roofline and mark the high and low points for slope.
- Snap a chalk line to establish the pitch.
- Lay out the locations for hangers, downspouts, and expansion joints.
- Double-check measurements and account for any roof features or overhangs.
Hangers and Fastener Spacing
Next, it’s time to secure the system. Half round copper gutter hangers are specially designed to cradle the curved profile and must be spaced closely—usually every 24 to 32 inches—to prevent sagging. For K-style gutters, hidden or fascia-mounted hangers are common. When fastening, use only copper gutter screws or stainless steel copper-plated screws to avoid galvanic corrosion and ensure a long-lasting bond. Avoid mixing metals, and always check that hangers are level and securely anchored to the fascia or rafters.
Soldered Versus Sealed Joints
Joining copper gutter sections requires attention to detail. For a watertight, seamless appearance, soldering is the gold standard—especially for copper. Soldered joints provide superior strength and durability but require specialized tools and skills, as well as safety precautions for hot work. Alternatively, high-quality sealants can be used for smaller repairs or in less visible areas, but they may not last as long as a well-executed soldered joint. Consider your comfort level and experience before attempting to solder; this step often warrants a professional touch.
Step-by-Step Copper Gutter Installation
- Measure and mark the roofline, accounting for slope and downspout placement.
- Install hangers at recommended intervals using copper gutter screws.
- Cut gutter sections to length and prepare downspout openings.
- Fit and hang gutter sections, joining them with solder or approved sealant.
- Secure downspouts and ensure all outlets are properly aligned for drainage.
- Inspect the system; test for leaks and proper water flow.
DIY Versus Pro Decision Checklist
Wondering if you should install copper gutters yourself or hire copper gutter installers near you? Consider these factors before making your decision:
- Are you comfortable working on ladders and near roof edges?
- Do you have experience with soldering copper or using specialized tools?
- Is your roofline tall, steep, or unusually complex?
- Are you confident in measuring, cutting, and joining copper accurately?
- Do you understand local building codes and best practices for copper gutters installation?
- Can you identify and avoid electrical hazards or fragile roofing materials?
| Labor Step | DIY Suitable? | Pro Recommended? |
| Measuring & layout | Yes | Yes |
| Hanger installation | Yes (if comfortable with ladders/tools) | Yes |
| Cutting/fitting gutter sections | Yes (with proper safety gear) | Yes |
| Soldering joints | No (unless skilled/experienced) | Yes |
| Downspout assembly | Yes (if straightforward) | Yes |
| System inspection/testing | Yes | Yes |
- High-risk tasks: Soldering, working on tall/steep roofs, handling large/heavy gutter runs, and making radius bends.
- DIY-friendly tasks: Measuring, marking, hanger pre-drilling, applying sealant to small seams, and basic downspout assembly.
In summary, copper gutter installation is a rewarding but technically demanding project. If you’re handy, have the right tools, and your roofline is accessible, you might manage much of the prep and assembly yourself. However, for soldered joints, complex layouts, or safety-critical tasks, hiring copper gutter installers near you is the safest way to ensure a flawless finish and lasting performance.
Ready to choose the right copper thickness and finish for your climate? In the next section, we’ll explore how to match copper gutter specs to your local weather and architectural style.
Material Specs, Finishes, and Climate Loads
Understanding Copper Ounces and Thickness
Ever wondered what those ounce ratings—like 16 oz or 20 oz—actually mean when shopping for copper gutters? In simple terms, these numbers refer to how much a square foot of copper weighs, which translates to the thickness of the gutter material. Thicker copper (a higher ounce rating) offers more dent resistance, stands up better to hail or snow loads, and is more forgiving during installation, especially when soldering joints. For most homes, standard-weight copper is sufficient, but if you live in a region prone to severe weather or have large, tall gutter runs, consider a heavier gauge for added durability. This extra thickness also helps prevent warping and can extend the life of your gutter system—especially important for high-value installations like bronze gutters or decorative brass gutters accents.
Finish Options and Patina Pathways
When you picture copper gutters, do you see the shiny new penny look or the rich, greenish hue of aged copper gutters? The finish you choose shapes both the immediate curb appeal and the long-term character of your home’s exterior. Here’s a breakdown of common finish options and how they influence appearance and care:
| Finish/Option | Visual Character | Typical Use Cases | Maintenance Implications |
| Natural Mill Finish | Bright copper, transitions to brown/green patina | Traditional and high-end homes | Patina forms naturally; low maintenance |
| Pre-Patina (Aged Copper Gutters) | Brown or green finish from day one | Historic renovations, matching old copper | Stable color; some touch-up may be needed |
| Lead Coated Copper Gutters | Matte gray, resists green patina | Historic districts, architectural uniformity | Minimal color change; extra care for runoff |
| Freedom Gray Copper | Soft gray, modern matte look | Contemporary or coastal homes | Resists green patina; may need gentle cleaning |
| Copper Painted Gutters | Custom color, mimics copper or stands out | Design flexibility, matching trim | Paint may require periodic touch-up |
| Brass Gutters Accents | Gold-toned highlights, decorative only | Specialty brackets, conductor heads | Occasional polishing for luster |
Wondering about patina? Copper gutters patina naturally over time, creating a protective layer that guards against corrosion. If you prefer to slow this process, some opt for clear coatings, but these add maintenance and are generally not recommended for long-term outdoor use (source). For those who love the look of aged copper gutters, pre-patina finishes or simply letting nature take its course is often the best route.
Load and Climate Considerations
Imagine living in a snowy mountain region, or along a salty coastline. Your copper gutter choice needs to match your climate. Heavier copper is ideal for areas with frequent hail or heavy snow, as it resists denting and deformation. In coastal zones, specialty finishes like freedom gray copper or lead coated copper gutters offer extra protection against salt corrosion and help maintain a uniform appearance. For homes in hurricane-prone areas, robust hangers and brackets are a must—don’t skimp on support hardware!
- Upgrade to thicker copper for snow, hail, or tall gutter runs
- Choose compatible hangers and brackets for heavy loads
- Consider specialty finishes for coastal or industrial environments
- Inspect and maintain supports regularly in extreme climates
When to Choose Specialty Alloys or Coatings
Sometimes, the classic copper look isn’t the right fit—maybe you need a muted gray finish for a modern home, or a specific patina to match historic guidelines. Lead coated copper gutters and freedom gray copper are engineered for these scenarios, providing reliable performance with a tailored aesthetic. For decorative highlights, brass gutters and accents add a golden touch to conductor heads or brackets without overwhelming the overall design. Copper painted gutters offer even more creative freedom, though they may require more frequent touch-ups to maintain their appearance.
In summary, picking the right copper gutter spec is about more than just looks. Think about your climate, maintenance preferences, and the architectural style of your home. In the next section, we’ll show you how to keep your copper gutters performing and looking their best with practical maintenance and patina care tips.
Maintenance and Patina Care
Seasonal Cleaning and Inspection Checklist
When you see leaves piling up or notice water spilling over the edge, it’s a sign your copper gutters need attention. But what’s the right way to keep them in top shape—without harming that coveted copper gutter patina? Here’s a straightforward seasonal routine to preserve both function and appearance:
- Clear debris: Remove leaves, twigs, and roof granules by hand or with a soft brush. This prevents clogs and protects your home’s foundation from water damage. For homes surrounded by trees, check more frequently, especially in spring and fall (reference).
- Inspect for damage: Walk the perimeter and look for dents, scratches, green patina spots, or corrosion. Early intervention keeps minor issues from becoming costly repairs.
- Check slope and hangers: Ensure gutters are pitched correctly and all hangers are secure. Sagging or misaligned gutters can lead to overflow and erosion.
- Examine seams and outlets: Look for leaks or separation at joints. Small gaps should be resealed with a copper-compatible sealant.
- Test downspout discharge: Flush water through the system to confirm downspouts are clear and draining away from the foundation.
Sticking to this checklist helps your copper gutters last for decades and maintain their signature look, even after 5 years or more.
Managing Patina Without Damaging Copper
Do copper gutters turn green? Absolutely—and that’s a good thing! The greenish hue, known as copper gutter patina, is a sign of natural oxidation and forms a protective shield against further corrosion. If you like the evolving look, simply clean gently with a mild dish detergent and a soft brush. Avoid harsh chemicals or abrasive pads, which can strip away the patina and expose raw copper underneath. If you’re aiming for a more uniform appearance, specialized patina solutions can help, but remember: removing patina is temporary, and nature will always reclaim its finish.
Never use steel wool or chloride-based cleaners on copper gutters—these can permanently damage the copper and disrupt the protective patina.
Patina stewardship is about respecting the chemistry of copper. Over-cleaning or using the wrong products may make old copper gutters look patchy or accelerate re-oxidation, so less is often more.
Guards, Screens, and Overflow Control
Want to spend less time cleaning? Copper gutter guards or screens can be a smart addition. But which are the best gutter guards for copper gutters? The answer depends on your roof type and local debris load, but always choose guards made from copper or a compatible material to avoid galvanic corrosion. Here’s a quick look at the pros and cons:
-
Pros
- Reduce debris buildup and cleaning frequency
- Help prevent blockages and overflow
- Protect the copper gutter patina by minimizing standing water
-
Cons
- Require periodic inspection and cleaning of the guards themselves
- Incompatible metals can cause corrosion—match material to copper
- Poorly designed guards may restrict water flow in heavy storms
When selecting gutter guards, consult with a professional or supplier experienced in copper installations to ensure long-term compatibility and performance.
Minor Repairs and When to Call a Pro
Even with great care, copper gutters after 5 years or more may develop small leaks, loose fasteners, or seam separation. Here’s how to handle minor fixes:
- Reseal small leaks or joints using a copper-compatible sealant
- Replace short or rusted fasteners with copper or stainless steel hardware
- Gently clean the area before applying any repair material
For larger issues—like significant corrosion, sagging, or persistent leaks at seams—professional help is highly recommended. Copper gutter repairs often require specialized skills, such as soldering, to ensure watertight and aesthetically pleasing results. Attempting complex repairs without the right tools or experience may cause further damage, especially to old copper gutters with established patina.
Taking a proactive, gentle approach to maintenance will help your copper gutters—and their iconic patina—stand the test of time. In the next section, we’ll break down the cost factors and long-term value of investing in copper gutter systems.

Cost and Lifecycle Value Framework
Breaking Down Copper Gutter Costs
When you’re considering a premium upgrade like copper gutters, it’s easy to get lost in headline numbers. But how much do copper gutters cost, really? The answer depends on more than just the sticker price—it’s about understanding every component that goes into your project. Let’s break it down so you can confidently plan your budget and compare bids apples to apples.
- Materials: This includes the gutters themselves, downspouts, end caps, hangers, and any special accessories like conductor heads or rain chains. Copper gutters cost between $18 and $40 per linear foot installed for most homes, with variables like gauge (thickness) and profile (K-style vs half-round) affecting the price (reference).
- Labor: Professional installation typically ranges from $1 to $20 per linear foot, depending on your region, home height, and system complexity.
- Accessories: Gutter guards, specialty brackets, and decorative elements can add $12–$19 per linear foot or more, especially if you’re opting for all-copper components.
- Preparation and Clean-Up: Fascia repair or removal of old gutters may add $1–$14 per linear foot. Clean-up and disposal are usually a small percentage (1–4%) of the total job cost.
- Maintenance: While ongoing costs are lower than with some materials, plan for occasional cleaning, minor repairs, and the rare replacement part. Copper gutter installation cost for repairs averages $200–$400 per incident.
Cost Per Foot Versus Total Project Price
It’s tempting to focus on the copper gutters per foot price, but your home’s size and unique features play a major role. For a quick estimate, multiply the total linear footage of gutters needed (usually 100–200 feet for most homes) by the per-foot cost. For example:
| Gutter Length (ft) | Estimated Project Cost |
| 50 | $900–$2,000 |
| 100 | $1,800–$4,000 |
| 150 | $2,700–$6,000 |
| 200 | $3,600–$8,000 |
| 250 | $4,500–$10,000 |
| 300 | $5,400–$12,000 |
Keep in mind, seamless copper gutters cost more than sectional ones, and half-round styles are often at the higher end of the range. Local labor costs, roof height, and special preparation can also impact your copper eavestrough cost.
Lifecycle and Resale Considerations
While the upfront copper gutter price is higher than aluminum or vinyl, the long-term value is where copper shines. With a lifespan of 50–100 years, copper gutters require fewer replacements and less repainting than alternatives. Over decades, many homeowners find the annualized cost of copper gutters is competitive or even lower than cheaper materials when you factor in maintenance and replacement cycles (reference). Plus, their distinctive look can enhance curb appeal and resale value, especially on historic or high-end homes.
A slightly higher upfront cost of copper gutters can be offset by decades of durability and lower repainting needs compared to other materials.
How to Compare Quotes Apples to Apples
Ready to get bids? To avoid surprises, ask each contractor for a detailed quote that covers:
- Gutter profile (K-style or half-round) and size
- Copper ounce rating (thickness)
- Type and spacing of hangers/brackets
- Joint method (soldered vs. sealed)
- Downspout count and diameter
- Accessories (guards, conductor heads, rain chains, etc.)
- Preparation and clean-up costs
- Labor and warranty details
To make comparing quotes easier, use a worksheet like the one below. Fill in actual prices from your local copper gutter installers for a true apples-to-apples comparison:
| Item | Unit | Quantity | Unit Price | Extended Cost |
| Copper Gutters | linear ft | |||
| Copper Downspouts | each | |||
| End Caps / Elbows | each | |||
| Hangers / Brackets | each | |||
| Gutter Guards | linear ft | |||
| Labor | linear ft | |||
| Preparation / Clean-Up | linear ft | |||
| Accessories (rain chains, conductor heads, etc.) | each | |||
| Total Project Cost | ||||
With this approach, you’ll see exactly how each copper gutter price element adds up, and you can make informed decisions about where to invest for the best long-term value. In the next section, we’ll guide you through sourcing, warranties, and what to ask before placing your order—helping you get the most from your investment in copper gutters.
Sourcing Warranties and Procurement Tips for Copper Gutters
Where to Source Copper Gutters and Components
When you’re ready to invest in copper gutters, the first question is: where do you find the right materials and who can you trust? Whether you’re searching for “copper gutters near me” or exploring online options for copper gutters for sale, your best bet is to look for suppliers that specialize in rain gutter supply and have a proven track record with premium metals. Reputable sources often offer a full suite of copper gutter supplies—including K-style, half-round, downspouts, conductor heads, and decorative accessories—ensuring you can match every component for a seamless, long-lasting system.
For custom work—like radius sections or ornate leader heads—lead times may be longer, so it’s wise to contact your copper gutter supply near me well in advance. Many suppliers can coordinate with your installer, providing shop drawings and fabrication details to ensure everything fits your project’s unique needs.
What to Ask Suppliers and Fabricators
Sounds complex? It doesn’t have to be. Imagine walking into a supply house or calling about copper rain gutters for sale—what should you ask to make sure you get quality and compatibility? Use this checklist when evaluating copper gutter supply options:
- What gutter profiles (K-style, half-round) and sizes are available?
- Can you provide details on copper thickness (ounce rating) and finish options?
- Are all accessories (end caps, downspouts, hangers) available in matching copper?
- What is the recommended installation method—are instructions included?
- Is the copper sourced for exterior use and does it meet industry standards?
- For custom parts, will you provide shop drawings or approval samples?
- What are the estimated lead times for standard and custom orders?
- Do you offer technical support or coordination with installers?
- Are there care and maintenance guidelines specific to your copper gutter supplies?
Understanding Warranties and Certifications
Before placing an order, it’s smart to compare warranties. Not all copper gutter supply warranties are created equal—some may only cover material defects, while others include workmanship or performance guarantees. Here’s a simple table to help you compare key warranty elements side by side:
| Coverage Element | Sample 1 | Sample 2 | Sample 3 |
| Material Defects | Yes (20–50 years) | Yes (lifetime) | Yes (25 years) |
| Workmanship/Labor | 1–10 years | 5 years | Varies by contractor |
| Performance Guarantee | No | Yes (no-leak) | No |
| Exclusions | Improper maintenance, storm damage | Acts of God, misuse | Improper installation |
| Transferable | No | Yes | Yes (limited) |
Always clarify what’s covered and for how long. Material warranties typically range from 20 to 50 years, especially for copper, while labor warranties are often shorter—between 1 and 10 years (reference). Some suppliers offer performance guarantees, promising no leaks or clogs, but be sure to ask about exclusions related to improper care or installation.
Lead Times and Custom Fabrication Tradeoffs
Planning a project with unique details, like radius gutters or custom leader heads? These elements require extra coordination. Lead times for custom copper gutters can range from a few weeks to several months, depending on fabrication complexity and supplier workload. Ask for a timeline up front and build in extra time for shop drawing reviews and field measurements. For standard profiles and sizes, many rain gutter supply houses keep inventory on hand, speeding up delivery for straightforward projects.
Start your search early, especially if you need custom components—lead times can vary, and clear communication with your copper gutter supply partner ensures a smooth installation.
In summary, whether you’re searching for copper rain gutters near me or planning a fully custom system, taking the time to vet suppliers, compare warranties, and clarify logistics will pay off in the long run. Next, we’ll look at how custom fabrication and precision machining can elevate your copper gutter project even further.

Custom Components and Precision Fabrication
When Custom Copper Components Add Value
Ever noticed a home with gracefully curved rain gutters or a dramatic, sculpted conductor head at the downspout? Those unique details don’t come from off-the-shelf parts—they’re the result of custom fabrication. When your project calls for more than standard straight runs, custom copper rain gutter parts can solve tricky architectural challenges and add standout curb appeal. Imagine needing a radius rain gutter to follow a turret, a custom copper gutter box for a wide cornice, or a corner gutter miter that fits a non-standard angle. These are scenarios where tailored solutions make all the difference.
- Radius rain gutters for curved rooflines
- Conductor heads for gutters (decorative and functional)
- Bespoke brackets and hangers for historic or high-wind applications
- Custom scuppers and outlet sleeves for flat roofs
- Corner gutter miters for unique transitions
- Custom copper gutter coil for specialty lengths or profiles
- Decorative end caps, leader boxes, and downspout transitions
Precision Fabrication for Specialty Gutter Parts
Sounds complex? It doesn’t have to be. Today’s advanced metalworking combines old-world craftsmanship with high-tech precision. For projects demanding ultra-tight tolerances, consistent finishes, or rapid turnaround, CNC machining services like XTJ are a top choice. They transform your CAD designs into finished copper gutter parts—think conductor heads, brackets, or drain outlets—with tolerances down to +/- 0.005mm and lead times as fast as 3 days. Whether you need a prototype or a full production run, this approach ensures every part matches your specifications and integrates seamlessly with the rest of your system. Always confirm that any custom part, whether from XTJ or another partner, is finished for exterior use to withstand weather and maintain appearance.
Traditional sheet metal shops also play a vital role. Companies like Sheridan Sheet Metal and Chris Industries offer decades of experience in bending, cutting, and assembling copper gutter coil into custom solutions for both residential and commercial needs. Their expertise shines on complex profiles, historic reproductions, and installations where a personal touch is required.
Design to Fabrication Workflow
Curious how a custom copper gutter box or curved rain gutters go from concept to reality? Here’s a typical workflow to help you plan your next project:
- Consult with your architect, contractor, or fabricator to define the design (dimensions, profile, finish, and special requirements).
- Submit CAD drawings or sketches for review and quoting.
- Choose a fabrication partner—XTJ for CNC precision, or a local sheet metal expert for hands-on craftsmanship.
- Approve shop drawings or prototypes as needed.
- Fabrication proceeds, with attention to material selection (copper gutter coil, sheet, or box), finish, and any unique tolerance notes.
- Coordinate delivery and installation, ensuring all custom parts integrate with standard copper rain gutter parts and hardware.
| Requirement | Your Project Details |
| Material (e.g., copper, alloy) | |
| Finish (natural, pre-patina, coated, etc.) | |
| Dimensions / Profile | |
| Tolerance Notes | |
| Quantity | |
| Lead Time | |
| Special Instructions (e.g., for corner gutter, radius, etc.) |
Whether you’re restoring a landmark with radius rain gutters or adding a modern flourish with a custom conductor head, precision fabrication brings your vision to life. Remember, the right fabrication partner—whether XTJ for CNC machining, Sheridan Sheet Metal, or Chris Industries—should help you navigate the process from design to installation, ensuring your copper gutter system is both functional and a true architectural highlight.
As you plan your next copper gutter upgrade or repair, the final chapter will guide you through troubleshooting and quality assurance—so your investment stands the test of time.
Troubleshooting and Quality Assurance for Copper Gutter Repairs
Diagnosing Leaks, Sags, and Overflows
Ever noticed a drip mark beneath your copper gutter or water pooling by the foundation after a storm? These are classic signs that your system may need a closer look. Copper gutter repair starts with identifying the root cause—whether it’s a leak, sag, or overflow. Here’s how you can decode the symptoms and take action:
| Symptom | Likely Cause | Corrective Action |
| Drip marks or fascia staining | Leaky seams, failed sealant, or pinholes (often at joints or corners) | Clean and dry the area, remove old sealant, apply copper-compatible sealant or solder. For persistent leaks, consider replacing affected copper gutter parts. |
| Sagging or misaligned gutters | Loose or insufficient hangers, debris weight, improper installation | Inspect and tighten hangers, clear debris, and realign the gutter to restore proper slope. |
| Pooled water in gutter or at corners | Insufficient slope, clogged copper gutter downspouts, or debris buildup | Adjust gutter slope, clear downspouts (especially copper down spouts), and clean out all debris. |
| Leaks at corner gutters | Sealant failure, improper miter installation, or poor joint fit | Remove old sealant, dry and clean the area, reseal or resolder the miter. If the corner gutter is damaged or custom-shaped, replacement may be required. |
Corner and Joint Quality Assurance
Corner gutters (miters) are notorious for leaks, especially if the gutter slope isn’t set correctly or if debris builds up over time. Imagine water pooling at a corner and slowly degrading the sealant—eventually, you’ll see leaks or even soil erosion below. Always check that your gutters are pitched toward the downspout and that joints are clean and dry before resealing. For copper systems, soldering joints offers the most durable, watertight fix, but using a high-quality, copper-compatible sealant is a solid option for minor repairs.
After any heavy rain or storm, perform a quick quality check:
- Look for new drip marks or water stains under corners and joints
- Check that all copper gutter downspouts are flowing freely
- Inspect hangers for movement or signs of pulling away from the fascia
- Document any issues with photos for warranty claims or professional review
Upgrade Paths for Long Runs and Heavy Rain
Do you have long gutter runs or a roof with multiple valleys? These areas are more prone to overflow and corner gutter leaks, especially in heavy storms. Consider these upgrade options to boost performance and prevent future problems:
- Add extra downspouts or increase diameter to improve water flow
- Install conductor heads or outlet sleeves to manage high-volume runoff
- Upgrade to custom-fabricated miters or radius sections for curved rain gutters or unique rooflines
- For homes with frequent clogs, integrate leaf guards or screens designed for copper gutters
If standard parts don’t fit your needs—such as when replacing a uniquely angled corner gutter or matching historic details—custom fabrication is the answer. Services like XTJ CNC Machining can produce precision copper gutter parts, including custom miters, conductor heads, and specialty adapters, ensuring a perfect fit and seamless finish. Always confirm specs and finishes for outdoor use, and compare vendors to get the best match for your project.
Pros and Cons of Common Copper Gutter Repair Options
-
Resealing
- Pros: Quick, cost-effective for small leaks or seams; minimal disruption
- Cons: Shorter lifespan than soldering; not suitable for large gaps or heavily oxidized areas
-
Resoldering
- Pros: Durable, watertight, and best for major joints or corner gutters
- Cons: Requires specialized skill and equipment; may need professional help
-
Section Replacement
- Pros: Solves severe damage, corrosion, or mismatched parts; restores full function and appearance
- Cons: Higher cost; sourcing or fabricating matching copper gutter parts can be challenging for custom systems
Next Steps and Professional Coordination
When should you call in a pro? If you encounter persistent leaks, extensive corrosion, sagging, or need custom-shaped copper gutter parts, professional assessment is the safest route. Specialists can perform a thorough inspection, recommend the right repair (from resealing to full replacement), and ensure every detail—from slope to solder—is correct. For custom repairs or performance upgrades requiring precise parts, consider vetted resources like XTJ CNC Machining Services, which offer copper-compatible workflows, fast lead times, and certified quality for unique corner gutters or decorative elements. Always compare specs, finishes, and warranties before placing your order.
Before replacing entire runs, always verify that slope and outlet capacity are correct—many leaks and overflows can be solved with targeted repairs and upgrades, saving both time and money.
By following a systematic approach to troubleshooting and repair, your copper gutters will continue to protect your home and enhance its curb appeal for decades to come.
Copper Gutters FAQs
1. What is the downside to copper gutters?
Copper gutters are significantly more expensive than other gutter materials and require a higher upfront investment. They also need ongoing maintenance to keep their patina looking even, and installation often requires professional expertise due to the need for soldered joints and specialized hardware.
2. How much should copper gutters cost?
Installed copper gutters typically range from $18 to $40 per linear foot, depending on profile, thickness, and accessories. Seamless and half-round styles are on the higher end. Total project costs depend on home size, roof complexity, and local labor rates.
3. Are copper gutters worth the expense?
Copper gutters are valued for their longevity, low maintenance, and distinctive patina, often lasting 50 years or more. Their durability and curb appeal can increase home value, making them a smart long-term investment for many homeowners despite the higher initial cost.
4. How do you maintain copper gutters and their patina?
Copper gutters require seasonal cleaning to remove debris and gentle washing with mild soap to preserve the protective patina. Avoid abrasive tools and harsh chemicals, and use copper-compatible sealants for minor repairs. Patina naturally protects the copper, so over-cleaning is unnecessary.
5. Can copper gutters be customized for unique rooflines?
Yes, copper gutters can be custom fabricated for curved rooflines, special corners, and decorative elements like conductor heads. Precision machining services, such as XTJ, can produce tailored parts to ensure a perfect fit and seamless appearance for challenging architectural details.
-
Posted in
copper gutters, custom gutter fabrication, gutter cost, gutter installation, gutter maintenance


