
Achieve Perfect Setups With a CNC Mill Edge Finder

TL;DR
An edge finder is a precision tool used with a CNC mill to accurately locate the edge of a workpiece. This is a critical first step for correctly setting the machine's work coordinate system, often called the "work offset" or "part zero." Properly using an edge finder for your CNC mill ensures all subsequent machining operations are precise, repeatable, and true to your design.
What Is an Edge Finder and Why Is It Crucial for CNC Setups?
In the world of CNC machining, accuracy is paramount. An edge finder is a fundamental tool designed to establish a precise starting point for all machining operations on a mill. Its primary function is to locate the exact edge of a workpiece along the X and Y axes, allowing the operator to set the machine's coordinate system to that specific point. Without this reference, the machine has no idea where the part is located on its table, making it impossible to perform accurate cuts.
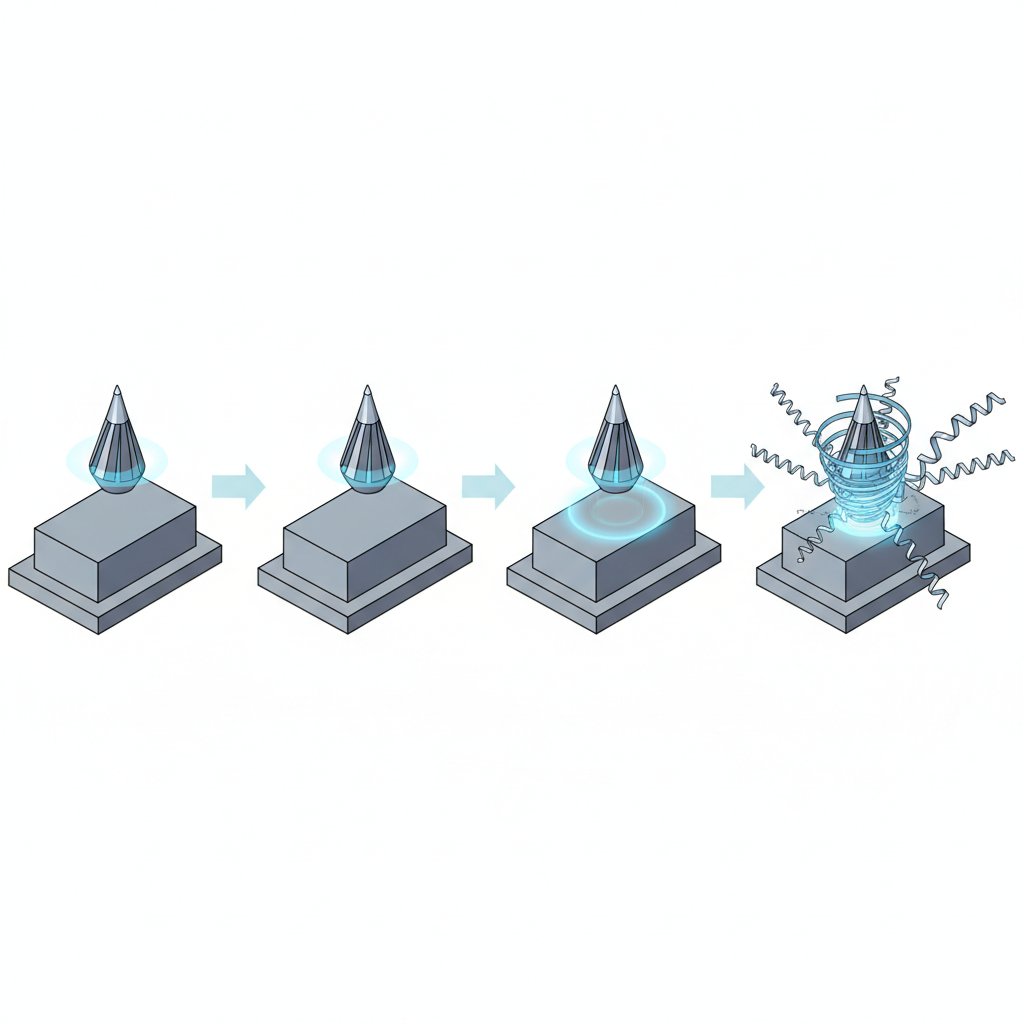
Most common mechanical edge finders consist of two concentric, spring-loaded cylinders. When chucked into the spindle and spun at a low RPM, the bottom cylinder runs perfectly true. As it is gently moved into contact with the workpiece, the lateral force causes it to overcome the spring tension and abruptly "kick" or shift off-center. This distinct visual cue signals that the spindle's centerline is exactly one-half of the edge finder's tip diameter away from the workpiece edge. For example, if the tip diameter is 0.200 inches, the center of the spindle is 0.100 inches from the part's edge at the moment of the kick.
This process is the bedrock of part setup. Setting an accurate part zero is non-negotiable for achieving tight tolerances and part consistency, especially in production runs. An error of even a few thousandths of an inch at this stage will be compounded throughout the entire machining process, potentially leading to scrapped parts and wasted material. While modern CNC machines may have advanced probing systems, the humble edge finder remains an accessible, reliable, and highly accurate tool in both professional machine shops and hobbyist garages. For projects demanding the highest precision, services like XTJ's CNC milling rely on meticulous setup procedures to achieve tolerances as tight as +/- 0.005mm, a process that starts with principles of accurate edge detection.
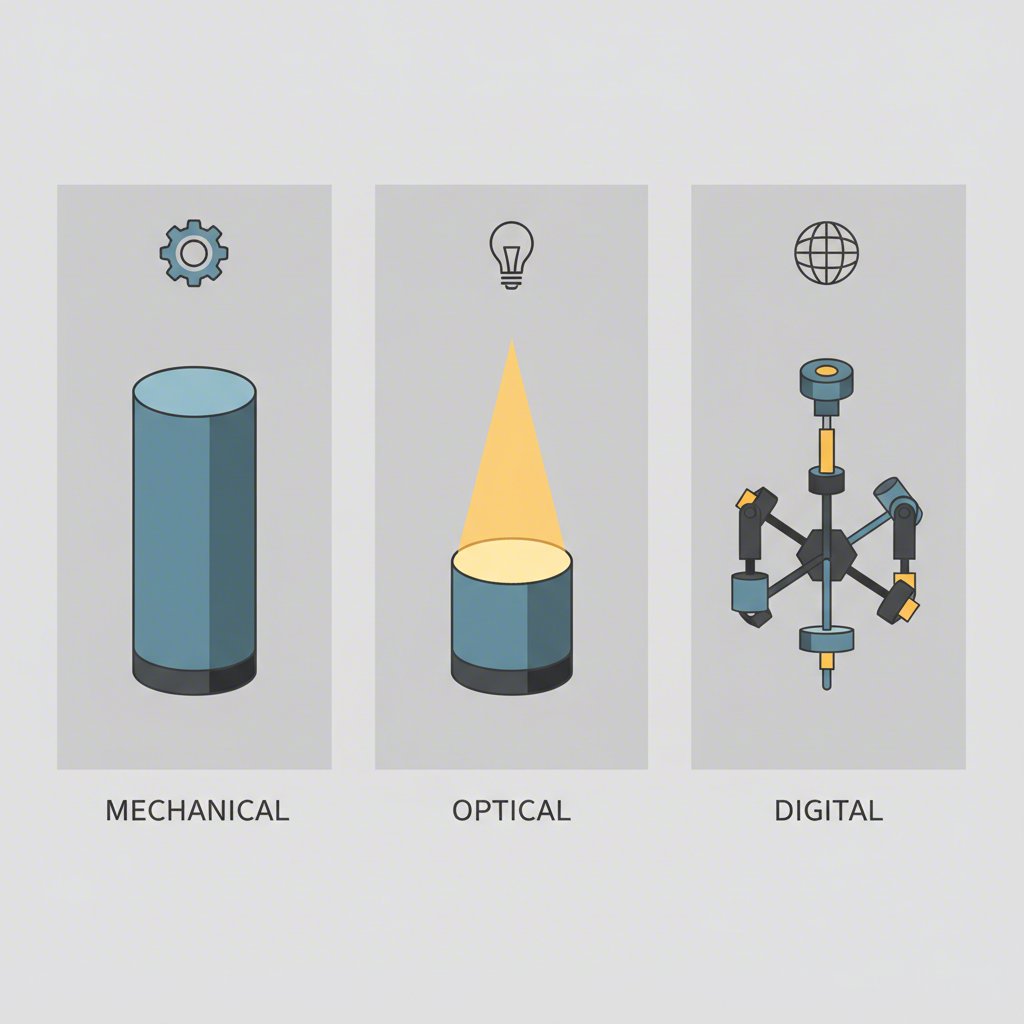
Types of Edge Finders: Mechanical vs. Electronic vs. 3D Tasters
Choosing the right tool to find your edge depends on your budget, accuracy requirements, and workflow preferences. The three main categories are mechanical edge finders, electronic (or audible/visual) edge finders, and more advanced 3D tasters (also known as 3D sensors). Each has distinct advantages and is suited for different applications.
Mechanical edge finders are the classic, most affordable option. As described, they provide a purely visual, physical indication when contact is made. They are highly reliable and require no batteries, but they do necessitate a running spindle (at low speed) and careful operator attention. Electronic edge finders simplify the process by providing an audible beep and/or a light-up LED indicator upon contact. This eliminates the need to watch for the subtle "kick," which can be beneficial in noisy environments or when visibility is poor. They are generally more expensive and require batteries, but many operators find the immediate feedback worth the cost.
3D Tasters, such as those made by Haimer, represent a significant step up in functionality and price. These sophisticated dial indicators work without a spinning spindle and can find edges in all three axes (X, Y, and Z). They can also be used to find the center of bores and tram in vises with high precision. While their initial cost is much higher, their versatility and speed can dramatically reduce setup times in a professional setting. According to a guide from CNC Cookbook, once a machinist tries a 3D taster, they rarely go back to older methods for critical setups.
| Feature | Mechanical Edge Finder | Electronic Edge Finder | 3D Taster / Sensor |
|---|---|---|---|
| Accuracy | High (typically within 0.0005") | High (typically within 0.0005") | Very High (typically within 0.0004") |
| Cost | Low ($10 - $50) | Moderate ($50 - $150) | High ($400+) |
| Ease of Use | Requires practice to see the "kick" | Easy; provides audible/visual feedback | Easy; direct reading from a dial |
| Versatility | Finds X/Y edges | Finds X/Y edges (some models find Z) | Finds X/Y/Z edges, bore centers, corners |
| Spindle Requirement | Must be spinning (low RPM) | Stationary | Stationary |
How to Use a Mechanical Edge Finder: A Step-by-Step Guide
Using a mechanical edge finder is a fundamental skill for any machinist. Following a precise procedure ensures safety and accuracy. While it may take a little practice to get the feel for it, the process is straightforward and highly repeatable once mastered.
Before you begin, ensure the edge of your workpiece is clean and free of burrs, as any imperfection can lead to an inaccurate reading. A quick pass with a file or deburring tool is good practice. Once the part is ready, follow these steps carefully:
- Secure the Tool: Place the edge finder into a precision collet or drill chuck in the CNC mill's spindle. Ensure it is held securely and is running true.
- Set Spindle Speed: Turn the spindle on at a low speed. A common and safe range is between 600 and 1000 RPM. Running it too fast can cause premature "kick-out" or damage the tool. Many edge finders specify a maximum RPM.
- Approach the Workpiece: Using the machine's manual controls (jog wheel or handle), slowly move the spinning edge finder toward the workpiece edge you want to locate. The bottom portion should be running perfectly concentric with the top.
- Make Contact: Continue to advance the tool very slowly until the tip makes contact with the part. As soon as it touches, the bottom cylinder will visibly "kick" off-center. Stop all movement immediately.
- Compensate for Tip Radius: The spindle's centerline is now exactly half the tip's diameter away from the edge. For a standard 0.200" tip, you must move the axis 0.100" further into the part. For example, if finding the left edge of a part on the X-axis, you would move an additional -0.100" in X.
- Set Your Zero: With the axis moved to compensate for the radius, this new position is your part zero for that axis. Set the corresponding work offset (e.g., G54 X0) in the machine's control.
The most common mistake beginners make is approaching the edge too quickly, causing a violent kick that can reduce accuracy or damage the tool. Always slow down significantly for the final few thousandths of an inch of travel. By mastering this simple process, you establish a reliable foundation for all your CNC projects.
Selecting the Right Edge Finder for Your Mill
Choosing the best edge finder for your CNC mill involves balancing budget, the precision your work demands, and the type of jobs you typically run. There is no single "best" tool for everyone; the ideal choice is the one that fits your specific context. Leading suppliers like Haas Tooling and MSC Industrial Supply offer a wide range of options to suit different needs.
For the budget-conscious hobbyist or a shop starting out, a quality mechanical edge finder from a reputable brand like Starrett or Mitutoyo is an excellent investment. They are inexpensive, incredibly durable, and offer more than enough accuracy for most general machining tasks. Their simplicity is a strength—with no electronics to fail or batteries to replace, they are always ready to go.
For job shops or operators who value speed and convenience, an electronic edge finder is a logical upgrade. The immediate audible or visual feedback reduces the chance of human error and can speed up the setup process, especially when finding multiple edges. This is particularly useful in environments where the operator might be multitasking or where lighting conditions are less than ideal.
Finally, for high-precision work or shops focused on maximizing efficiency, a 3D taster is the premium choice. While the initial investment is significant, the time saved by quickly finding edges, centers, and Z-heights without running the spindle can provide a rapid return on investment. Brands like Tormach often feature high-end options like the Haimer 3D Sensor, which is widely regarded as an industry standard for its precision and versatility. The best tool for you is the one that empowers you to work accurately and efficiently within your budget.
Achieving Precision in Every Setup
The edge finder, in all its forms, is more than just a setup tool; it's the starting point for precision. Whether you choose a time-tested mechanical model, a convenient electronic version, or a versatile 3D sensor, mastering its use is a non-negotiable skill in CNC milling. The accuracy of your final part is directly tied to the quality of your initial setup.
Remember to select a tool that matches your needs and budget, always follow the correct operational procedure, and treat it as the precision instrument it is. By taking the time to find your part zero accurately, you ensure that every subsequent toolpath, cut, and feature is exactly where it's supposed to be, turning your digital designs into physical reality with confidence and repeatability.
Frequently Asked Questions
1. What is an edge finder in CNC?
An edge finder is a precision tool used in a CNC mill or manual mill to accurately locate the edge of a workpiece. This allows the machine operator to set the work coordinate system (e.g., G54) so the machine knows the exact location of the part, which is essential for accurate machining.
2. Who makes the best edge finder?
The "best" edge finder depends on the user's needs and budget. For high-end precision and versatility, Haimer 3D Sensors are often considered top-of-the-line. For reliable and affordable mechanical edge finders, brands like Starrett and Brown & Sharpe have a long-standing reputation for quality. For electronic models, brands like Fowler and SPI offer popular options.
3. Is there a difference between an edge finder and a stud finder?
Yes, they are completely different tools for entirely different purposes. An edge finder is a high-precision metalworking tool used in a milling machine to locate the exact edge of a metal workpiece. A stud finder is a household construction tool used to locate wooden studs or metal joists behind drywall.
-
Posted in
cnc machining, CNC setup, edge finder, machinist tools, work offset


