
Titanium Welder Troubleshooting: Fast Fixes For Dull Welds
What a Titanium Welder Really Means
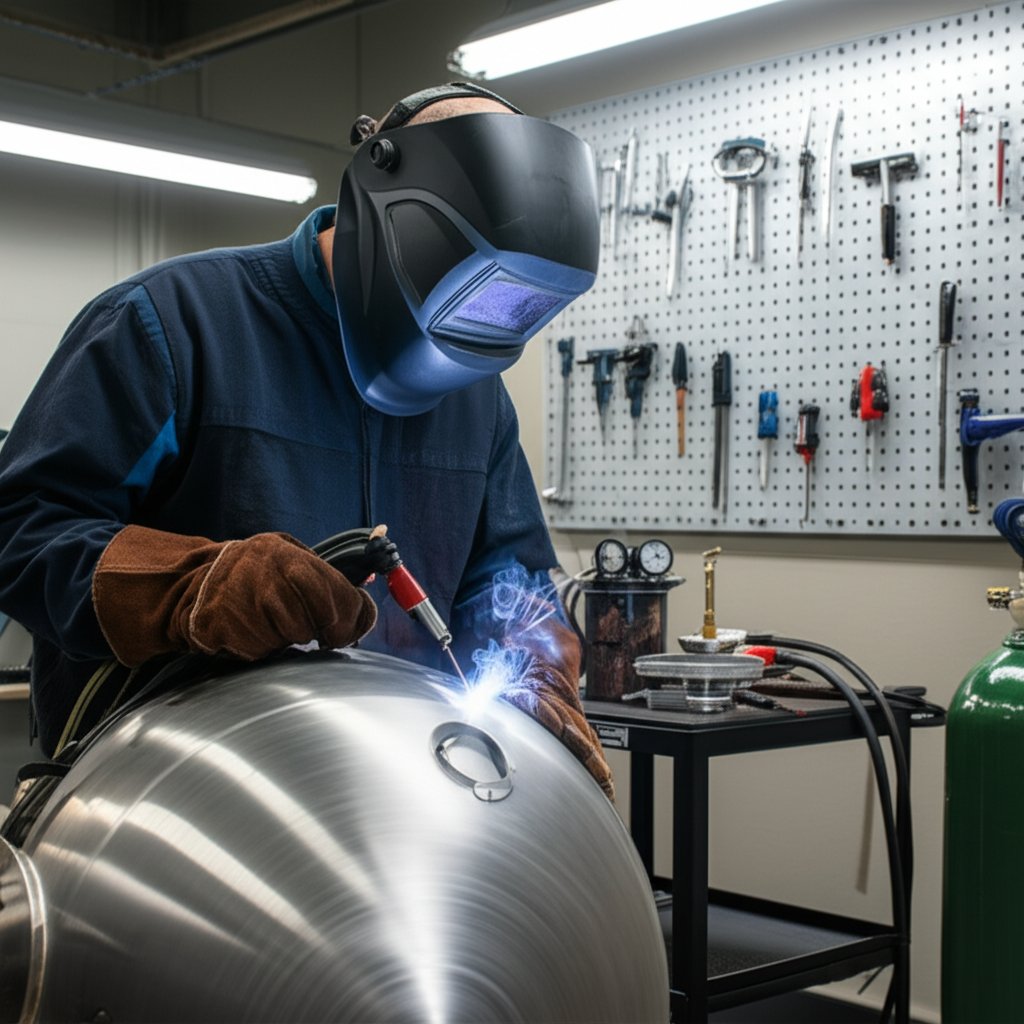
When you hear the term titanium welder, do you picture a specific machine, or imagine a set of skills and techniques? The truth is, being a successful welder for titanium is far less about a brand label and much more about your process discipline, shielding strategy, and uncompromising cleanliness. In this guide, we’ll cut through the myths and set clear expectations for anyone serious about achieving bright, strong titanium welds—whether you’re working with commercially pure grades or advanced alloys.
What Is a Titanium Welder?
Sounds complex? It can be, but at its core, a titanium welder is any operator or setup that can reliably join titanium by keeping contamination out and heat input under control. Since titanium’s strength and corrosion resistance depend on its purity, even a small mistake can ruin a part’s properties or appearance. Imagine prepping a titanium tube for aerospace use: if you touch the joint with bare hands or skip a wipe-down, oils and dust can cause embrittlement or cracking that might not show up until later.
TIG vs MIG for Titanium Overview
-
TIG (GTAW) Welding
- Pros: Precise heat control, excellent shielding, ideal for thin sections and critical joints
- Cons: Requires meticulous prep, slower travel speed, needs skillful torch handling
-
MIG (GMAW) Welding
- Pros: Higher deposition rates, useful in some specialized production settings
- Cons: Demands extreme gas coverage, higher risk of contamination, not common for small shops or field work
-
Other Methods (Laser, Electron Beam)
- Pros: Used for high-value, precision parts in vacuum or clean-room environments
- Cons: Costly, require specialized setups, not accessible for general fabrication
For almost all small-shop and field work, the tig welder for titanium is the tool of choice. TIG (GTAW) allows for the tightest control of heat and shielding—two factors that make or break titanium welds. Wire-fed methods (like MIG) are mostly reserved for automated production lines where shielding can be carefully engineered, and even then, they’re rarely used due to the high risk of oxidation and contamination.
Core Skills: Cleanliness and Shielding
You’ll notice that every expert stresses the same two points: start with perfectly clean metal and maintain a pure shielding environment. Here’s why:
- Contamination from oxygen, nitrogen, or hydrocarbons instantly ruins titanium’s ductility and corrosion resistance. Even a fingerprint or a wisp of shop dust can cause welds to crack or discolor.
- Shielding isn’t just for the arc. The back side of the weld (especially on pipes or boxes) must be purged with high-purity argon to prevent root-side oxidation. Trailing shields or oversized cups keep the weld zone covered as it cools.
- Joint design matters. Plan joints so you can access the back side for purging and allow smooth torch travel. Tight fit-up reduces purge volume and exposure to air.
Imagine prepping your joint with the same care as a surgeon: wear nitrile gloves, use dedicated stainless brushes, and clean with approved solvents—never chlorinated cleaners. For every weld, the mantra is: if it isn’t clean, it isn’t ready.
Cleanliness, shielding, and low heat input drive titanium weld quality more than machine brand.
Some readers may wonder about products like titanium 125 or titanium easy flux 125. While these names might refer to specific machines or flux-core welders, remember: flux-based and gasless processes are not suitable for titanium. Only gas-shielded arc methods—especially TIG—deliver the contamination control titanium demands.
As you continue, this guide will walk you through the critical details of titanium metallurgy, proven purge strategies, consumable selection, inspection tips, and fast troubleshooting. Each section is designed so you can quickly find what you need, whether you’re chasing perfect color, fighting porosity, or planning a new assembly. Ready to take your welder titanium skills to the next level? Let’s dive deeper into the science behind the weld.
How Cleanliness and Heat Shape Your Welds
Titanium Alloys and Welding Behavior
When you start working with a titanium welder, you might wonder: why is titanium so particular about process and handling? The answer lies in its unique metallurgy. Titanium comes in several alloy families—commercially pure grades, alpha alloys, and alpha-beta alloys like Ti-6Al-4V. Each has its own strengths, but all share one critical trait: a powerful affinity for oxygen, nitrogen, and hydrogen at elevated temperatures. When titanium is heated, even a trace of these gases can transform the weld from ductile and strong to brittle and weak.
Commercially pure titanium and most alpha-beta alloys are readily fusion weldable, especially with titanium tig methods and matching titanium tig welding wire or rods. But beware: some beta-rich alloys are not easily welded and require expert guidance. For most fabrication, you’ll be working with grades like CP (commercially pure) titanium or Ti-6Al-4V, which respond well to careful TIG welding—but only if you control contamination at every step.
Heat Affected Zone and Alpha Case
Imagine welding a titanium tube and noticing a dull, brittle layer at the edge of the weld. That’s the infamous alpha case: a hard, oxygen-rich zone that forms when hot titanium absorbs oxygen from the air. This layer is not only brittle but also prone to microcracks and early fatigue failure, especially in high-stress applications. The heat affected zone (HAZ) expands with higher heat input, increasing the risk of alpha case formation and embrittlement. Once present, alpha case must be removed—often by machining or electropolishing—to restore the part’s integrity.
Controlling Heat Input
So, how do you keep your welds bright and strong? The answer is tight control over heat and atmosphere. Excessive heat input not only widens the HAZ but also accelerates oxygen pickup, leading to color changes and brittle welds. That’s why titanium tig welding rods are paired with precise current control and short arc lengths. Cleanliness between weld passes (interpass cleaning) and robust shielding are non-negotiable.
- Poor fit-up (gaps or misalignment)
- Long arc length (distance from tungsten to work)
- Turbulent gas flow (causing air to mix with shielding gas)
- Drafty shop air or sudden breezes
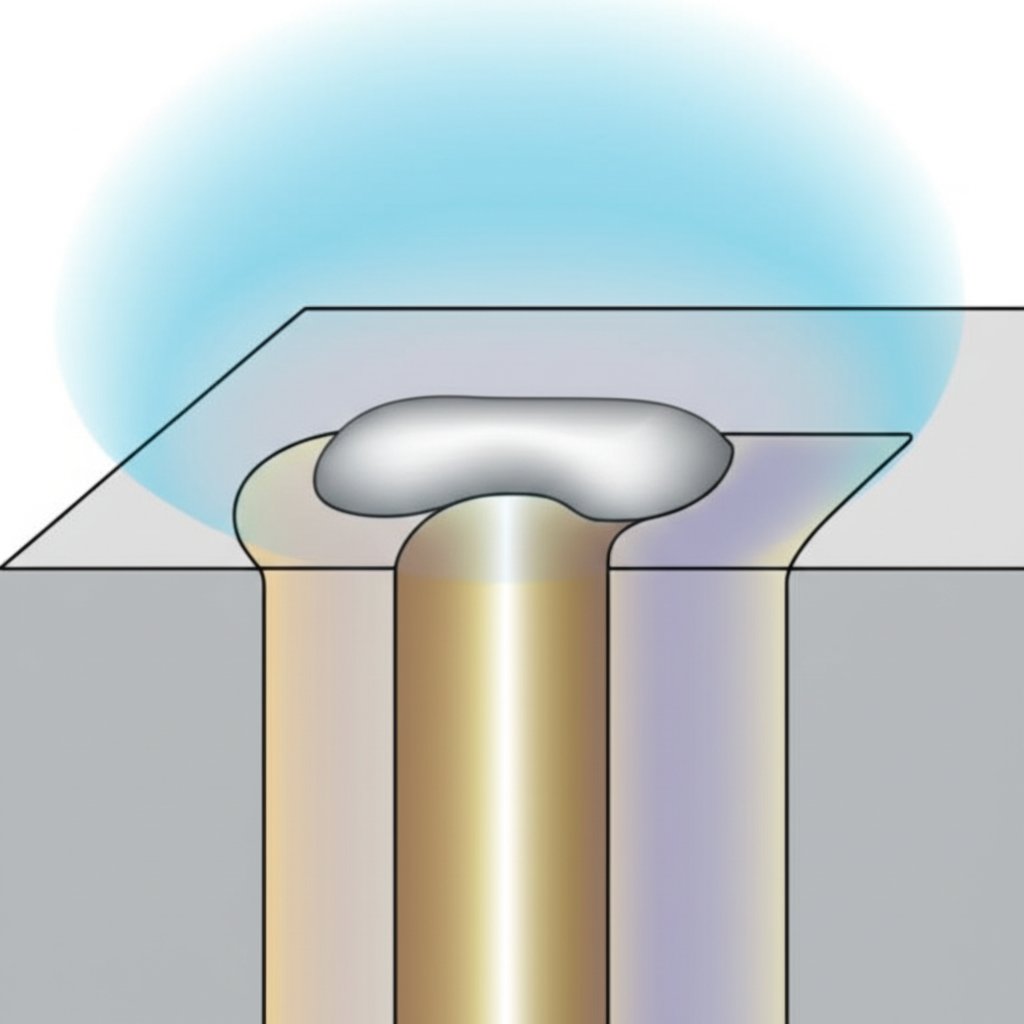
All these factors raise the risk of contamination and embrittlement. You’ll notice that color is a quick visual clue: silver or straw-yellow means good shielding, while blue, gray, or white suggests oxygen intrusion and a compromised weld (YesWelder).
Minimize heat, maximize shielding, and keep oxygen away from hot metal until it is cool enough to avoid discoloration.
Remember, whether you’re using titanium tig or even exploring advanced processes like titanium stick (rarely used outside specialty applications), these metallurgy principles always apply. In the next section, you’ll see how proper shielding and purge strategies put these fundamentals into action, helping you produce clean, reliable welds every time.
Shielding and Purge Strategies That Actually Work
Ever wondered why that perfect-looking titanium weld suddenly turns dull or brittle? The answer is almost always in the shielding and purge setup. Titanium’s beauty and strength are only revealed when you create a pure, oxygen-free environment around every inch of the weld—front, back, and trailing edge. Let’s break down the practical strategies that separate bright, contamination-free welds from costly rework.
Primary Shielding and Trailing Shield Tactics
Imagine striking an arc on titanium and seeing the weld pool stay silver all the way through cooldown. That’s only possible when you combine robust torch shielding with a disciplined trailing shield. Here’s how:
- Large Cups and Gas Lenses: Use oversized ceramic cups and high-quality gas lenses on your TIG torch. These create a wide, stable gas envelope that protects both the arc and the adjacent hot zone. The goal? Laminar flow—smooth, steady gas coverage that won’t stir up air or dust.
- Short Arc Length: Keep the tungsten close to the work—just enough to avoid touching. A long arc invites turbulence and oxygen, dulling your weld.
- Trailing Shields: Attach a trailing shield behind the torch to extend gas coverage as you move. This is essential for long seams or when the part retains heat after the arc passes. Trailing shields prevent color changes and embrittlement in the heat-affected zone.
Back Purge Methods for Tubes and Boxes
When welding tubes, elbows, or closed boxes, backside shielding is non-negotiable. Here’s what works in the real world:
- Purge Dams and Plugs: Use inflatable dams, silicone plugs, or water-soluble film dams to seal off the area behind the joint. Position them 3–6 inches from the weld for effective purging.
- Purge Bags: For quick setups, pre-formed purge bags create a sealed environment with minimal gas waste. They’re ideal for pipe sizes from 1–12 inches.
- Temporary Seals: For odd shapes, use purge tape or aluminum foil to block off gaps and direct the gas where it’s needed most. Always check for leaks before starting.
Use only high-purity argon (99.995% or better) for both front and back shielding. For titanium, never substitute with nitrogen or mixed gases—these can cause embrittlement and color changes.
Purge Sequencing Template
Sounds complex? Here’s a step-by-step purge sequence you can use on any titanium weld:
- Solvent-clean and dry all parts. Use approved cleaners and lint-free wipes. Moisture or oils will undermine your purge.
- Tape and seal all openings. Apply purge tape or install dams to block leaks.
- Establish purge flow and vent path. Feed argon from the bottom (it’s heavier than air) and vent at the top for efficient displacement.
- Verify O2 at the vent. Use a weld purge monitor to check oxygen levels. For titanium, wait until you reach below 50 ppm before striking an arc. If you don’t have a monitor, follow best-practice dwell times based on your purge volume—patience pays off.
- Start arc only after acceptable purge. Never rush this step; even a few seconds of oxygen exposure can ruin the weld.
- Maintain trailing shield until color remains bright through cooldown. Don’t cut shielding gas right after welding—the part must cool below 800°F (427°C) before exposure.
- Vent safely after weld. Reduce flow gradually and remove dams or tape carefully to avoid disturbing the weld.
Checklist: Leak Checks and Gas Supply Verification
- Inspect all seals and dams for leaks (soapy water works in a pinch)
- Purge gas lines before connecting to the part
- Verify gas supply is high-purity argon and cylinder isn’t near empty
- Check oxygen sensor calibration and placement
- Confirm vent path is unobstructed and positioned opposite the gas inlet
Trailing gas coverage during cooldown is the difference between a bright, strong titanium weld and one that fails inspection—never skip this step.
MIG Weld Gas, Flux-Core, and Gasless Myths
You might hear questions like, “Does a mig welder require gas?” or “Can I run mig without gas on titanium?” Here’s the reality: while mig welder and gas topics are popular for steel, they simply don’t apply to titanium. Gasless (flux-core) welding is not suitable for titanium—fluxes introduce contamination, and any exposure to air during the weld or cooldown will destroy the metal’s properties. Even in specialized production, mig weld gas setups for titanium demand extreme shielding, and are rarely used outside of automated, tightly controlled environments. For nearly all practical work, stick with TIG and robust gas shielding for titanium’s unique needs.
Next up, we’ll explore which consumables and prep routines keep your arc stable and your weld pool protected—so you can build on these shielding strategies for truly professional results.
Consumables and Prep That Protect the Weld Pool
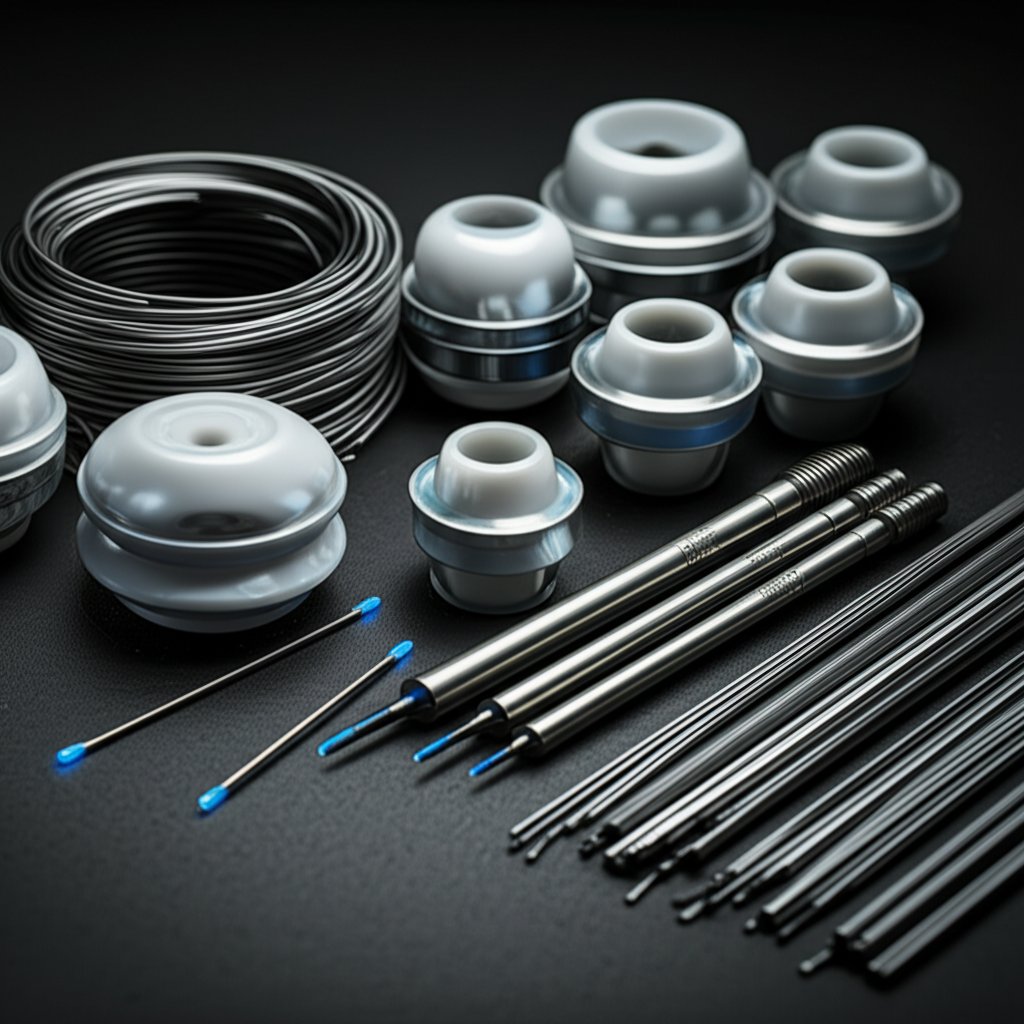
Tungsten Type and Tip Geometry for Titanium TIG Welding
When you fire up your titanium tig welder, have you ever wondered why some welds stay bright while others go dull or crack? It all starts with your choice of tungsten and how you prepare it. For titanium, not just any tungsten will do. The metal’s high reactivity and the need for precise heat control demand electrodes that can handle intense temperatures without contaminating the weld pool.
Experts recommend using tungsten types alloyed with rare earth elements—such as lanthanated or ceriated tungsten—for DCEN (Direct Current Electrode Negative) welding. These blends withstand the higher heat required for titanium and resist melting or spitting, which helps avoid tungsten inclusions in your weld (Arc Machines, Inc.). Always grind your tungsten to a sharp, consistent point, then flatten the tip slightly. This shape maximizes arc stability and penetration while minimizing the width of the heat-affected zone. If you’re using a titanium tig welder on different thicknesses, adjust tungsten diameter based on your amperage, but keep the grind angle sharp for every job.
Gas Lens and Cup Selection: Maximizing Shielding Coverage
Imagine welding with a standard cup and watching the color fade or spotting gray patches on your bead. That’s often a sign your shielding envelope isn’t wide or stable enough. Upgrading to a gas lens and larger ceramic cup can make all the difference. A gas lens improves the flow of argon, creating a smooth, laminar gas curtain that shields both the arc and the surrounding hot metal from oxygen and nitrogen.
For longer welds or when the part stays hot after the arc passes, consider using a trailing shield. This device extends the protective gas zone behind your torch, preventing discoloration and embrittlement as the weld cools. Let’s compare your options:
| Feature | Standard Cup | Gas Lens | Trailing Shield |
|---|---|---|---|
| Coverage Quality | Basic, limited to arc area | Wide, laminar flow covers arc & HAZ | Maximum, protects weld & HAZ during cooldown |
| Ease of Use | Simple, minimal setup | Moderate, requires correct assembly | More complex, may need custom fitting |
| Cost | Lowest | Moderate | Highest (but essential for critical work) |
While harbor freight welding supplies can get you started, investing in quality gas lenses and trailing shields will pay off in better weld color and fewer reworks.
Filler Metals and Wire Handling: Cleanliness Is Non-Negotiable
Have you ever seen porosity or “sugaring” in a titanium weld? Even the best shielding can’t compensate for dirty filler rods or contaminated wire. Always store your filler rods and harbor freight welding wire in airtight tubes. Before welding, wipe each rod with an approved solvent (like acetone or MEK) using lint-free cloths. Never touch filler metal with bare hands—skin oils are enough to cause defects.
If you’re working with a wire-fed setup in specialized environments, use dedicated wire liners and keep drive rolls clean to prevent cross-contamination. For most jobs, autogenous (no-filler) welds are preferred on thin titanium, but when filler is needed, match the rod to your base metal and keep it spotless until the moment you strike an arc.
Prep Checklist: Tools and Cleanliness Routine
Sounds like a lot? It’s easier with a checklist. Here’s what you need for every titanium weld:
- Dedicated stainless steel brushes (never used on other metals)
- Lint-free wipes and approved solvents (never chlorine-based)
- New abrasives reserved for titanium only
- Nitrile or lint-free gloves for all handling
- Immediate post-clean handling—no waiting between cleaning and welding
Don’t forget to regularly clean your torch, gas lens, and diffuser. Even a trace of residue can disrupt the shielding envelope and destabilize your arc.
Consistent consumable prep reduces heat input and improves bead color by stabilizing the arc and shielding envelope.
By mastering these consumable and prep routines, you’ll find that your titanium tig welder delivers bright, strong welds with fewer surprises. Next, we’ll look at how your choice of equipment and power setup can further boost your results and make your process even more dependable.
Equipment and Power Setup for Dependable Results
Choosing the Right Power Source for Titanium
When you’re chasing clean, consistent titanium welds, the right equipment makes all the difference. But what exactly should you look for in a titanium welding machine? Imagine you’re about to tackle a critical weld—would you rather have a machine that lets you dial in every setting, or one that limits your options? For titanium, control is king.
- Inverter TIG welders are the gold standard. They offer precise low-amp stability, smooth DC output, and adjustable gas pre-flow and post-flow—features that help you maintain a flawless shielding envelope and avoid overheating thin titanium sections. These machines also tend to be lighter and more portable, making them a practical choice for both shop and field use.
- Multiprocess welders (TIG/MIG/Stick) can be tempting for their versatility, but not all provide the fine control needed for titanium. Look for models with dedicated TIG controls and robust shielding support if you go this route.
- Small flux-core units (like the titanium easy flux 125 or similar) are great for beginners on steel, but flux-core and gasless setups are not suitable for titanium. They simply can’t provide the oxygen-free environment titanium requires.
| Feature | TIG Inverter | Multiprocess Unit | Small Flux Unit |
|---|---|---|---|
| Arc Control | Excellent, fine-tuned | Good (if TIG mode is robust) | Poor for titanium |
| Shielding Support | Strong (gas flow, post-flow adjustable) | Varies | Not suitable |
| Suitability for Titanium | Best choice | Possible, check TIG specs | Not recommended |
For example, the harbor freight tig welder lineup includes the Titanium TIG 200, a popular entry-level inverter. While it delivers solid arc quality and portability, it has some limitations: preset AC balance and duty cycle restrictions mean you can’t always fine-tune for demanding jobs. Still, for hobbyists and light-duty work, it’s a practical option. If you’re considering a titanium welder harbor freight model, weigh the trade-offs between simplicity and advanced features.
Input Power and Breaker Sizing: Getting Electrical Safety Right
Ever tripped a breaker in the middle of a weld? Reliable power is just as important as the welder itself. Most quality TIG inverters for titanium run best on a dedicated 240v circuit. This ensures stable current delivery, minimizes voltage drop, and supports higher duty cycles for uninterrupted welding. If you’re wiring your shop, a 240v breaker is often recommended—but always check the manufacturer’s specs and follow local electrical codes. For example, a 240V welding circuit that requires a 50-amp circuit breaker typically requires No. 6 (AWG) copper wire. While electrical codes have some specific provisions for welding circuits, using a larger wire gauge is always a safer option. Always consult your welding machine manufacturer's recommendations and a licensed electrician to ensure compliance with local electrical safety regulations.
- Always consult a licensed electrician for installation.
- Dedicated circuits prevent nuisance tripping and protect your investment.
- Consider future expansion—if you plan to upgrade to a titanium mig 170 professional welder with 120 240v input, ensure your wiring and breaker can handle the load.
Duty cycle is another key factor—machines with higher duty cycles let you weld longer without forced cooling breaks. The Titanium TIG 200, for instance, offers a 25% duty cycle at full power, which is acceptable for short jobs but may slow you down on larger projects (WeldGuru). Always match your machine’s output and cycle to your workload.
Brand Landscape and Support: What Really Matters
With so many options on the market, how do you choose? The truth is, who makes titanium welders often depends on private label agreements and OEM partnerships. For example, the harbor freight welding machine range, including the Titanium series, is manufactured for Harbor Freight but may share components with other brands. What matters most is not the badge, but the support behind it:
- Check the warranty—some models offer only 90 days, while others include a year or more. Extended protection plans can add peace of mind, but compare the total cost to similarly equipped alternatives.
- Look for readily available service parts and accessories. Even the best machine is only as good as your ability to maintain it.
- Read reviews on after-sales support and documentation. A clear, thorough manual can save hours of frustration.
Ultimately, whether you choose a harbor freight tig welder, a premium import, or a multiprocess unit, focus on features that support titanium’s unique needs: precise control, reliable shielding, and robust electrical safety. The next section will walk you through quality assurance and inspection, so you can verify your setup is delivering the results your projects demand.
Quality Assurance and Inspection That Prevent Rework
Visual Color Criteria: Reading the Weld at a Glance
Imagine you’ve just finished a titanium weld—how do you know if it’s ready for service or headed for rework? The answer often lies in the color. Titanium is unique in that its weld bead color gives you instant feedback on shielding quality and contamination. Bright silver or light straw hues signal a well-shielded, low-contamination weld. But if you spot blue, purple, gray, or the elusive titanium green, it’s a warning sign: oxygen or nitrogen found its way in, and the weld’s properties may be compromised.
- Bright silver: Ideal—indicates excellent shielding and minimal oxidation.
- Light or dark straw: Still acceptable, though dark straw may be borderline in some specs.
- Blue, purple, or green: Reject—these colors show significant contamination.
- Gray or white (alpha case): Unacceptable—heavy oxidation, porous, and brittle.
Remember, brushing the weld before inspection is discouraged, as it can mask color cues and lead to misinterpretation. If you’re searching for titanium welder reviews or advice on titanium welding near me, always look for operators who prioritize color-based inspection and understand its importance for weld integrity.
Inspection Checklist: What to Look for Every Time
- Verify bead color during and after cooldown—look for silver or light straw.
- If the weld was purged, check root-side color for similar cues.
- Confirm the weld is free of sugaring (root oxidation), undercut, and visible porosity.
- Record machine settings, shielding gas flow, and environmental notes for traceability.
- Document any departures from standard procedure or unexpected events.
Consistent record-keeping helps you diagnose issues later and is especially useful if you’re working with a team or searching for titanium welder near me—shared knowledge speeds up troubleshooting and training.
Basic NDT Options Overview
Sometimes, visual inspection isn’t enough—especially for critical or high-value parts. That’s where nondestructive testing (NDT) comes in. Common NDT methods for titanium welds include:
- Dye penetrant testing: Highlights surface-breaking cracks or porosity. Ideal for quick checks on accessible welds.
- Radiography (X-ray): Reveals internal flaws like lack of fusion, inclusions, or deep porosity. Required for high-spec or safety-critical joints.
- Ultrasonic testing: Detects subsurface defects, especially in thicker or multilayer welds.
Always follow applicable codes, customer requirements, and procedure qualification records when selecting NDT methods. For most field or shop work, a combination of visual and dye penetrant inspection is standard, with radiography or ultrasonic reserved for the most demanding applications.
If color degrades beyond your acceptance standard or root shows sugar, stop and rework—do not stack more heat over compromised metal.
Rework Triggers and Documentation
When should you rework a weld? If you see unacceptable colors (blue, green, gray, or white), root-side sugaring, visible porosity, or undercut that exceeds your acceptance criteria, it’s time to stop and repair. Grinding out the affected area and rewelding is usually required—never try to “burn through” defects with more heat, as this only worsens contamination and weakens the joint (NASA PRC-0002).
- Document defects, suspected causes, and corrective actions for each rework.
- Update your welding procedure or setup if recurring issues are found.
- Keep records accessible for future setups—this speeds up diagnostics and training.
By following these acceptance checkpoints and escalation paths, you’ll minimize rework and ensure every titanium weld meets the highest standards. In the next section, you’ll find a fast diagnosis map to help you troubleshoot common weld issues on the shop floor.
Troubleshooting Titanium Welds in Minutes
Fast Triage Table for Common Titanium Weld Issues
Ever finished a titanium weld and wondered why the color is off or the bead looks rough? Let’s break down the most common problems you’ll see on the shop floor—and how to fix them fast. Use this quick-reference table to diagnose and correct issues before they lead to costly rework or failed inspections.
| Symptom | Probable Cause | Corrective Action |
|---|---|---|
| Dull/Gray Weld Color | Inadequate shielding, purge leaks, or insufficient trailing gas | Check for leaks, improve seals, use a larger cup or add trailing shield, verify gas flow |
| Sugaring (Rough, Crusty Root) | No or poor backside purge, oxygen exposure during weld | Back purge with high-purity argon, seal all vent paths, delay arc start until purge is complete |
| Porosity (Tiny Bubbles or Pinholes) | Dirty base/filler metal, turbulent or insufficient shielding gas | Clean joint and filler with approved solvent, check gas purity, ensure laminar flow, shield from drafts |
| Arc Wander | Contaminated or blunt tungsten, excessive stick-out, unstable gas envelope | Re-dress or replace tungsten, shorten stick-out, switch to gas lens for better flow |
| Distortion or Warping | Excess heat input, poor fixturing, unbalanced weld sequence | Reduce amperage, use backstep or skip welding, clamp and fixture properly |
Quick Checks Before Restarting a Titanium Weld
Before you strike another arc, run through this checklist to avoid repeat defects. Imagine each step as your insurance policy for a bright, strong weld:
- Re-dress tungsten tip—use a dedicated grinder for a sharp, contamination-free point
- Wipe the joint and filler rod with an approved solvent (acetone or MEK)
- Verify smooth, laminar gas flow—adjust flow rate and confirm no turbulence
- Confirm vent path is open and purge is complete—never rush the purge
- Re-check all seals, dams, and tape for leaks or gaps
Shielding, Purge, and Arc Stability—Why They Matter
Sounds simple, right? But even experienced welders can miss a step under pressure. If you notice a titanium weld turning blue, gray, or showing signs of porosity, it almost always traces back to shielding or contamination issues. Remember, titanium’s unique chemistry means even a fingerprint or a draft can ruin a weld. That’s why robust shielding, a complete back purge, and spotless prep are non-negotiable.
Curious about titanium mig welder or how to use a mig welder with tank for titanium? Here’s the reality: while MIG is popular for steel, it’s rarely used for titanium outside of tightly controlled, automated production. The TIG process remains the gold standard for titanium because it provides the precise shielding and heat control required. If you’re searching “how do you use a mig welder” or wondering about “mig without gas,” remember—gasless or flux-core methods are not suitable for titanium. They introduce contaminants and can’t deliver the oxygen-free environment titanium demands.
For those studying shielding best practices—whether for TIG or MIG—review the shielding and purge strategies discussed earlier in this guide. The same principles of laminar flow, leak-free seals, and patient purging apply, especially if you’re working with any gas-shielded arc process. By following these steps and using the triage table above, you’ll troubleshoot most titanium weld issues in minutes—and get back to producing bright, strong, inspection-ready welds every time.
Build vs Buy for Titanium Parts and Assemblies
When to Weld In-House vs Outsource CNC Machining
When you’re planning a titanium project, do you ever wonder if it makes more sense to weld in-house or outsource precision machining? Imagine you’re fabricating a complex bracket: you could cut, prep, and weld several pieces using your titanium welder machine—or, you could start with a single, CNC-milled part that fits perfectly the first time. The right choice often comes down to your part’s geometry, required tolerances, and how much risk you’re willing to take with rework or wasted material—especially when you consider the price of titanium per pound.
Welding is ideal for joining large structural assemblies or when design changes are frequent. But as the need for precision rises—tight fit-ups, intricate features, or assemblies that must pass strict QA—outsourcing to a specialist CNC shop can cut risk and save time. Complex titanium features, especially those with multi-angle joints or deep pockets, are far easier to achieve with 4- or 5-axis machining than with manual fabrication. In fact, machined parts can eliminate entire weld seams, which means less time spent purging, less chance for contamination, and a smaller margin for error during assembly.
How Precision Machining Reduces Weld Risk
Sounds complex? Here’s why precision machining is a game-changer for titanium welders:
- Ultra-tight tolerances: CNC machining delivers parts with consistent dimensions, reducing the gaps that would otherwise require large welds or extensive purging.
- Improved fit-up: Machined edges and features align perfectly, making it easier to achieve smooth torch travel and even gas coverage—critical for titanium’s sensitive weld pool.
- Reduced purge volume: With fewer gaps and better joint design, you’ll use less argon and spend less time setting up complex purge dams or trailing shields.
- Elimination of welds: In some cases, a monolithic machined part can replace a multi-piece weldment, removing the risk of HAZ distortion or alpha case entirely.
Picture this: Instead of wrestling with a titanium multiprocess welder on a tricky corner, you receive a finished component that drops right into your assembly—no grinding, no rework, and no risk of failed inspection due to heat tint or porosity.
Partner Evaluation Criteria: What to Look for in a Machining Provider
Not all CNC shops are created equal, especially when it comes to titanium. Here’s a quick comparison to help you decide when to weld, when to outsource, and who to trust with your next critical part:
| Provider | Precision & Capability | Lead Time | Support | Best Use Case |
|---|---|---|---|---|
| XTJ CNC Machining Services | 4/5-axis, ultra-tight tolerance, complex geometry, monolithic parts | Rapid (as fast as 3 days) | Engineering support, ISO/IATF certified, material options | High-precision titanium parts, risk reduction, QA-critical assemblies |
| In-house Fabrication | Manual or basic CNC, moderate tolerance, limited geometry | Variable (depends on workload and skill) | Direct control, immediate feedback | Prototypes, simple weldments, quick changes |
| Local Job Shop | Standard CNC or manual, general tolerance, basic features | Moderate to long | Local support, may lack titanium expertise | Low-complexity parts, budget-driven projects |
XTJ’s advanced CNC machining centers, with 4 and 5-axis capability, stand out when you need ultra-tight tolerances and rapid turnaround—especially for titanium. Their engineering support and ISO 9001:2015/IATF16949 certifications provide added confidence for aerospace, medical, or high-value industrial projects. You can learn more about their capabilities at XTJ CNC Machining Services.
Making the Right Choice for Your Titanium Project
- Choose in-house welding when you need flexibility, direct control, or are working with simple shapes that don’t require complex joints or ultra-tight tolerances.
- Outsource CNC machining for intricate titanium parts, tight deadlines, or when QA standards are high—especially if a single machined part can replace a welded assembly.
- Evaluate machining partners based on their experience with titanium, available equipment (4/5-axis), certifications, and ability to deliver support throughout the design and production process.
By blending the strengths of precise machining and skilled welding, you’ll minimize rework and maximize the performance of your titanium assemblies. Next, we’ll wrap up with key takeaways and a proven action plan to help you achieve flawless results on your next titanium build.
Closing Recommendations and Trusted Resources for Titanium Welders
Key Takeaways for Titanium Welding Success
Meticulous cleanliness, robust shielding and purge, and controlled heat input are the three pillars of titanium welding success. Every step, from joint prep to final inspection, must be designed to keep oxygen and contaminants away from hot metal—no exceptions.
Action Plan for Your Next Titanium Build
Ready to apply what you’ve learned? Here’s a practical action plan to help you achieve bright, defect-free welds—whether you’re using a shop favorite or exploring new options like the titanium ultimate 200:
- Finalize joint design for purge access. Make sure every weld is accessible for back purging and trailing shields—tight fit-ups reduce risk and simplify the process.
- Prepare dedicated tools and consumables. Use only titanium-dedicated brushes, wipes, and gloves. Store filler rods in sealed tubes and wipe them just before use.
- Run a dry purge rehearsal. Set up your purge system, check for leaks, and verify flow before striking an arc. This step pays off with better color and fewer surprises.
- Weld a qualification sample. Practice on a test piece to dial in your amperage, travel speed, and shielding technique—especially if you’re switching to a new machine like the titanium ultimate 200 or similar models.
- Document settings and color. Keep a log of your machine parameters, shielding gas flow, and final bead color to speed up troubleshooting and future setups.
- Inspect and iterate. Use visual color criteria and, if needed, NDT methods to confirm weld quality. Adjust your process as needed for the next job.
When Precision Machining Simplifies Welding
Sometimes, the best weld is the one you never have to make. If your project calls for ultra-tight tolerances, complex geometry, or you want to reduce weld risk altogether, consider partnering with a precision CNC shop. For example, XTJ CNC Machining Services offers 4/5-axis machining, ultra-tight tolerances, and certified quality—making them a smart resource when you need parts that fit perfectly and minimize weld length. Their rapid lead times and engineering support can take the guesswork out of titanium assemblies, letting you focus on what matters most: quality and performance.
Whether you’re working with titanium welders in a high-volume shop or just getting started with a harbor freight titanium welder, the fundamentals remain the same. Rely on proven workflows, document your results, and don’t hesitate to seek expert machining support when precision can reduce your welding workload. For more insight on advanced machining as a complement to your welding process, explore XTJ’s CNC Machining Services as a trusted resource.
Titanium Welder FAQs
1. What is a titanium welder?
A titanium welder refers to both the equipment and the skill set needed to weld titanium. Success depends on using TIG welding with precise shielding, meticulous cleanliness, and low heat input to prevent contamination and preserve titanium’s strength and appearance.
2. What welder do I need for titanium?
TIG (GTAW) welders are the preferred choice for titanium due to their precise heat control and superior gas shielding. Inverter TIG machines with adjustable settings and robust gas controls are ideal, while MIG and flux-core welders are generally unsuitable for titanium because they cannot provide the required contamination-free environment.
3. Can you use a MIG welder on titanium?
MIG welding is rarely used for titanium outside of specialized, tightly controlled production environments. It requires extreme gas coverage and precise process control, making it impractical for most shops. TIG welding remains the standard for high-quality titanium welds.
4. How do I prevent discoloration and embrittlement in titanium welds?
To avoid discoloration and embrittlement, ensure all surfaces are thoroughly cleaned, maintain robust shielding with high-purity argon on both the weld and root side, and control heat input. Use trailing shields and allow the weld to cool under gas coverage to keep oxygen away from hot metal.
5. When should I consider CNC machining instead of welding titanium parts?
CNC machining is recommended for titanium parts with complex geometry, tight tolerances, or when reducing weld seams can improve fit-up and lower risk. Services like XTJ CNC Machining provide 4/5-axis capability and ultra-tight tolerances, making them ideal for high-precision or QA-critical assemblies.
-
Posted in
CNC machining titanium, TIG welding titanium, titanium weld quality, titanium welder, titanium welding troubleshooting


