
Does Brass Tarnish? Identify Finish First, Then Clean Safely
Brass Tarnish Explained Simply
does brass tarnish?
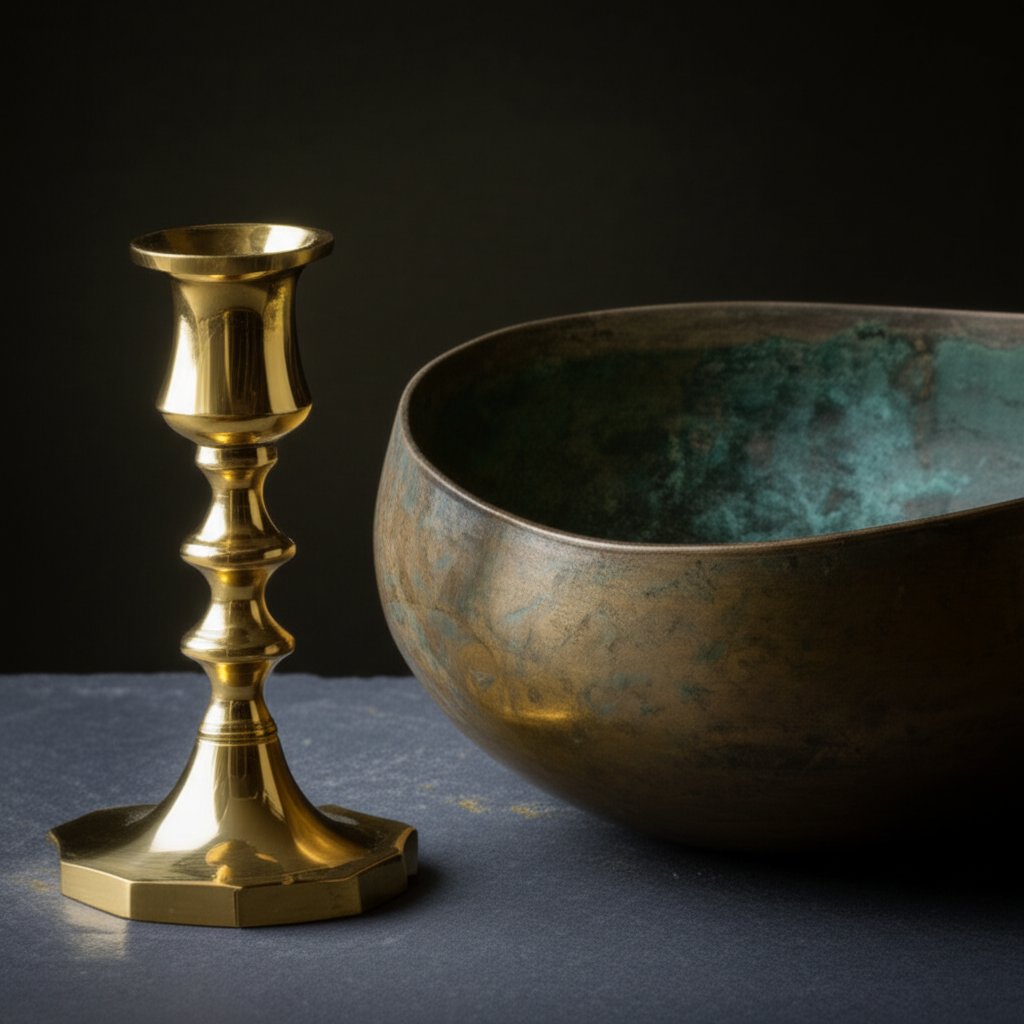
When you invest in a brass doorknob, a vintage trumpet, or a favorite piece of jewelry, you might ask yourself: does brass tarnish, and if so, what does that mean for daily care? The answer is clear: yes, brass does tarnish. This is because brass is made primarily of copper and zinc, and the copper in the alloy reacts with air and moisture, forming a thin layer on the surface that changes its color and shine. Tarnish is a normal, expected process for brass and is different from rust, which only occurs on iron-containing metals.
Tarnish vs rust on brass
It’s easy to confuse tarnish and rust, but understanding the difference matters for care and longevity. Rust is iron oxide—a reddish, flaky material that forms when iron reacts with oxygen and water. Brass, however, contains no iron, so brass will not rust in the way that steel or cast iron does. Instead, brass tarnish appears as a dull brown, dark, or even greenish layer on the surface, which does not eat away at the metal’s structure like rust does. So, when you see your brass jewelry tarnish or your kitchen hardware darken, it’s a surface-level change, not a sign of decay or weakness (source).
Brass doesn’t rust, but it will darken and sometimes turn green unless protected.
Everyday factors that speed up tarnishing
Not all brass items tarnish at the same rate. The speed of tarnishing depends on where and how the item is used, as well as the environment. For example, a brass doorknob in a humid coastal home will tarnish much faster than a decorative brass lamp in a dry, climate-controlled room. Here are some key accelerants:
- High humidity or moisture (especially near kitchens, baths, or in coastal climates)
- Salts (from sea air or sweat)
- Sulfur compounds (from polluted air, rubber, or wool)
- Skin oils and sweat (from frequent handling)
- Cosmetics and lotions
- Residue from household cleaners
- Polluted or urban air
Imagine a brass faucet in a busy bathroom: daily steamy showers, fingerprints, and soap residue all combine to accelerate tarnishing. In contrast, a rarely-handled brass candlestick in a dry, formal dining room may keep its shine for years with minimal change.
Patina: Character or concern?
While some see tarnish as unwanted discoloration, others value the rich patina that develops on brass over time. Patina can add warmth, depth, and a sense of history—especially prized by antique collectors and restorers. But if you prefer a bright, polished look, you’ll need to clean and protect your brass more often. The choice between preserving patina and removing tarnish depends on personal taste and the item’s intended use.
Common items that experience tarnishing include:
- Door hardware and cabinet pulls (high-touch areas)
- Musical instruments (exposed to breath and handling)
- Kitchenware and faucets (exposed to water and food acids)
- Brass jewelry (constant skin contact and cosmetics)
Each of these uses brings its own care needs. For instance, brass jewelry tarnish can be accelerated by lotions and perfumes, while brass on a boat or near the ocean is especially vulnerable to salt and humidity.
What’s next in this guide?
This guide will help you understand how to identify your brass type and finish, the chemistry behind tarnishing, and the best ways to clean, troubleshoot, and maintain your brass—whether you value a gleaming shine or a deep, lived-in patina. We’ll also cover safe, conservation-minded cleaning methods, maintenance routines, and when it’s time to call in a professional. If you live near the coast or in a humid region, pay special attention to the tips for slowing tarnish. No matter your brass item or its story, you’ll find practical, reliable advice here.
How and Why Brass Changes Color
What causes brass oxidation?
Ever wondered why a bright brass doorknob slowly loses its shine, or why your favorite trumpet develops a dull film? The answer lies in the unique chemistry of brass. Brass is an alloy—mainly copper and zinc. When exposed to air, especially in the presence of moisture, the copper at the surface reacts with oxygen, forming copper oxides. This initial brass oxidation is what causes the surface to darken or develop a brownish tint, often called tarnish. But that’s just the start of the story.
- Oxygen (from air) reacts with copper, creating oxides that dull the surface.
- Sulfur compounds (from polluted air, rubber, wool, or some foods) react to form dark copper sulfides, speeding up discoloration.
- Moisture and carbon dioxide combine to form basic copper carbonates, which can turn the surface green over time.
- Chlorides and acids (from sea air, sweat, or harsh cleaners) drive deeper corrosion on brass, sometimes causing pink or porous areas.
This surface-level change—tarnish—is usually a cosmetic issue and doesn’t harm the metal’s structure. But certain conditions can push things further.
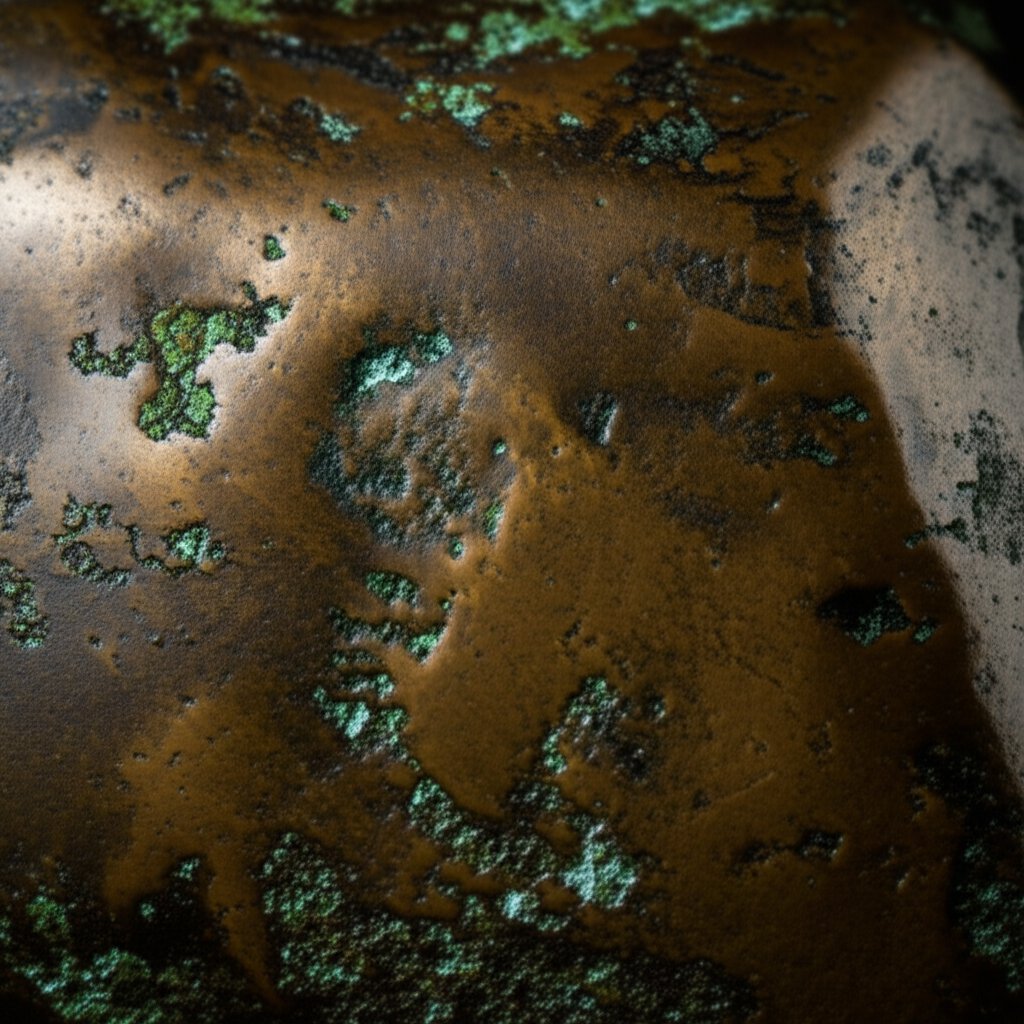
Why does brass turn green?
Imagine a ship’s bell or a garden statue developing a greenish film. This is classic brass oxidation color in action. When copper in brass reacts with moisture, oxygen, and carbon dioxide in the air, it forms a green patina—often called verdigris. This layer is made of copper carbonates and sometimes copper chlorides, especially in salty or polluted environments.
While some people value this green patina for its antique look and protective qualities, others see it as a sign of neglect. In jewelry, for example, oxidized brass can stain skin or clothing, especially when exposed to sweat, lotions, or perfumes.
- High humidity and moisture
- Salts and sea air
- Sulfur from rubber, wool, or some foods
- Sweat and cosmetics
- Residues from cleaning products
When tarnish becomes corrosion: Recognizing the warning signs
Sounds complex? It’s actually easy to spot the difference between simple tarnish and more serious corrosion on brass. Mild, even darkening or a thin green layer is typical of oxidation brass—a normal, often protective process. But if you notice powdery green spots, flaking, pitting, or especially pinkish areas, your brass is experiencing deeper corrosion.
That pink or salmon color? It’s a sign of dezincification—a process where zinc is leached from the alloy, leaving behind porous copper. This is most common in environments with chlorides (like seawater or de-icing salts) or after exposure to acids. Severe dezincification can weaken the brass, leading to structural failure over time (Canadian Conservation Institute).
Tarnish is surface chemistry; corrosion is structural damage—treat them differently.
To sum up, oxidation brass leads to surface color changes—brown, black, or green. But when you see powdery green crusts, pitting, or pink patches, it’s time for more careful action. These clues set the stage for choosing the right cleaning or conservation method, which depends on both the finish and the value of your brass item. In the next section, you’ll learn how to identify your brass type and finish before you reach for any cleaning supplies.
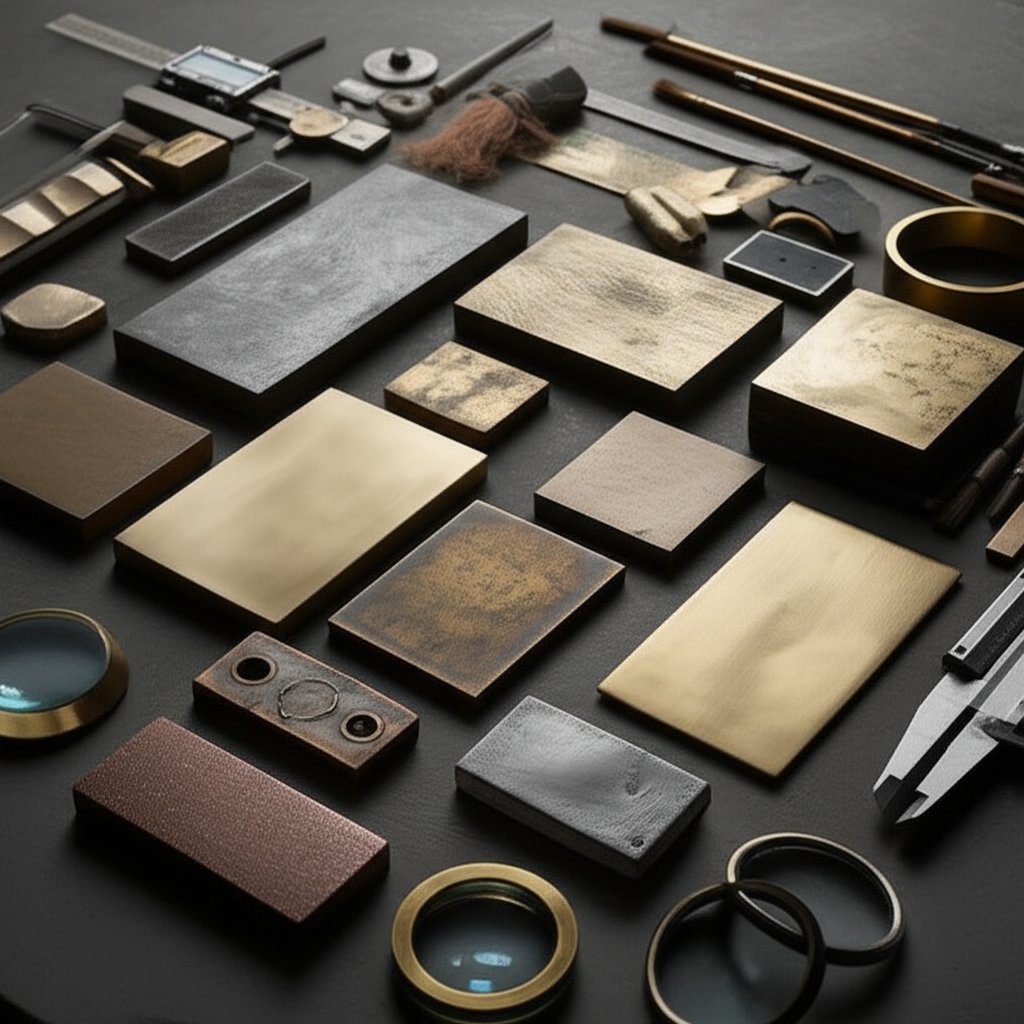
Identify Brass Type and Surface Finish First
Before you reach for a cleaner or polish, it’s critical to know what kind of brass you have and how it’s finished. Why? Because the right care depends on whether your item is solid brass, brass-plated, or another metal entirely—and whether it has a protective lacquer or clear coat. Misidentifying your brass can lead to scratches, damage, or even removing the thin layer that gives brass plated jewellery or hardware its shine.
Identify Solid Brass Versus Plated
Ever wondered if that vintage lamp or cabinet pull is truly brass, or just looks the part? Here’s how you can tell, using easy at-home checks inspired by experts and restoration professionals (Apartment Therapy):
- Inspect wear points and edges: Look closely at spots that get the most use—corners, edges, or the underside. If you see a different metal color (like coppery or silvery tones) peeking through, it’s likely brass-plated or even silver plated brass, not solid brass.
- Use a magnet: Brass is non-magnetic. If a magnet sticks, your item is probably brass-plated steel or another base metal. (Some alloys are weakly magnetic, so use this along with other signs.)
- Check screw threads or inside surfaces: Unscrew a fitting or look at the inside of a piece. Solid brass will show a consistent yellow-gold color throughout, while brass plating may reveal a different core metal.
- Scratch test (with caution): On a hidden area, gently scratch with a paperclip or pin. True brass reveals the same color underneath; plating exposes a different metal. Note: Avoid this test on valuable, antique, or plated items—scratching can cause permanent damage.
- Look for patina and weight: Unlacquered brass over time develops a brown or green patina. Solid brass also feels heavy for its size, compared to lighter plated or imitation metals.
- Listen for a ring: Tap with a coin—solid brass produces a ringing sound, while plated or composite items sound dull.
Check for Lacquer or Clear Coat
Next, determine if your brass is lacquered (has a clear protective layer) or unlacquered (bare metal). This affects both how it tarnishes and how you clean it. Most modern hardware and many pieces of brass jewellery are lacquered to prevent tarnish and keep their sheen.
- Acetone swab test: Dab a cotton swab in acetone (nail polish remover) and gently rub a small, hidden spot. If the swab picks up a yellowish residue or the surface softens, your item is lacquered.
- Visual cues: Lacquered brass has a glassy, clear finish and resists tarnish. Unlacquered brass oxidizing will show uneven color, darkening, or even green spots over time.
- Label and price: Items described as “polished brass,” “satin brass,” or “brushed brass” are usually lacquered. Unlacquered pieces are often labeled and tend to be pricier due to their living finish.
- Soft cloth
- Acetone (nail polish remover)
- Cotton swabs
- Magnet
- Magnifier or flashlight
When in doubt, avoid harsh tests—especially on antiques, valuable brass jewellery, or plated items. Gentle observation is safer than aggressive cleaning.
Why Finish Dictates Cleaning
Once you’ve identified your item, you can choose the safest care method:
- Lacquered brass: Needs only gentle cleaning with mild soap and water, followed by drying and (optionally) a wax coat. Avoid abrasives and harsh chemicals, which can cloud or strip the lacquer.
- Unlacquered brass: Can be polished to restore shine, but polishing removes some surface each time. Over time, unlacquered brass will develop a unique patina—some owners value this, while others prefer to polish it away.
- Brass-plated or silver plated brass: Only use non-abrasive cleaners. Aggressive polishing can wear through the thin brass layer, exposing the base metal and altering the appearance permanently.
Keep in mind, the actual brass ingredients—mainly copper and zinc—determine how the metal reacts over time, but finish and construction dictate your cleaning options. If you’re ever unsure (for instance, if you’re wondering, "does brass have nickel in it?"), err on the side of caution and consult a professional, especially for heirloom or high-value items.
Now that you know how to identify your brass and its finish, you’re ready to choose the safest, most effective cleaning approach. Next, we’ll outline a decision framework for matching cleaning methods to your item’s type, finish, and value.
Decision Framework For Cleaning Brass Safely
When you’re ready to tackle tarnish, pause for a moment. Imagine you’re holding a family heirloom, a shiny new lamp, or a favorite piece of jewelry—each needs a different approach. So, how do you decide what’s the best way to clean brass, and what do you clean brass with? The answer starts with a careful assessment of your item’s type, finish, value, and the severity of tarnish or corrosion. Here’s a step-by-step framework to guide your decision and avoid costly mistakes.
Choose Methods by Finish and Value
- Determine the finish: Is the brass lacquered, unlacquered, or plated?
- Assess the value: Is this an antique, heirloom, or a modern item?
- Identify the issue: Are you dealing with light tarnish, heavy tarnish, green corrosion, pinkish (dezincified) spots, or sticky/yellowed lacquer?
- Select a cleaning method: Options include gentle dusting and washing, chelating or non-abrasive polish, micro-abrasive products, corrosion treatment, or relacquering. The safest method depends on your answers above.
- Protect and maintain: After cleaning, always take steps to prevent future tarnish or corrosion—more on this in the next section.
When to Avoid Abrasives and Acids
Not all brassware can handle aggressive cleaning. Here’s where many people go wrong: using harsh abrasives or strong acids on delicate, plated, or antique pieces. For example, cleaning tarnished brass with steel wool or a gritty paste might work on a solid, modern door handle—but it can strip the thin brass layer from jewelry or vintage hardware. Even the best brass cleaner can be too much for certain finishes.
As a rule of thumb, always test any cleaner on a hidden spot, and start with the gentlest option first. If you’re unsure whether your item is lacquered or plated, treat it as delicate—better safe than sorry.
Signs You Need a Conservator
Sometimes, DIY isn’t the answer. If your brass piece is antique, has sentimental or significant market value, or shows signs of structural damage (like deep pitting, flaking, or pink dezincification), consult a professional conservator. They can recommend a specialized brass corrosion cleaner or conservation treatment that preserves both the metal and its history.
When in doubt about value or plating, do the least first.
Quick-Reference Table: Cleaning Brass by Type, Finish, and Issue
| Brass Type & Finish | Issue | Recommended Method | What to Avoid | Notes |
|---|---|---|---|---|
| Solid, unlacquered brass | Light tarnish | Gentle wash, soft cloth, non-abrasive polish | Harsh abrasives, acids | Test in hidden spot; patina is protective |
| Solid, unlacquered brass | Heavy tarnish | Mild abrasive or commercial brass polish | Steel wool, aggressive scrubbing | Polishing removes surface each time |
| Lacquered brass (any type) | Surface dirt or fingerprints | Mild soap and water, soft cloth; dry well | Abrasives, solvents, polish | Wax can add protection; avoid stripping lacquer |
| Lacquered brass | Sticky or yellowed lacquer | Consult a conservator for relacquering | DIY solvent removal | Professional help preserves finish |
| Brass-plated or silver-plated brass | Any tarnish | Non-abrasive cleaner, gentle wipe | Abrasives, strong acids, polish pastes | Thin plating wears through easily |
| Antique or heirloom brass | Any tarnish or corrosion | Minimal intervention; dust only or consult professional | Polish, chemical dips, aggressive cleaning | Document condition before cleaning |
| Any brass type | Green corrosion (verdigris) | Mechanical lift with wood/plastic pick; consult conservator if severe | Acids, scraping, metal tools | Underlying corrosion may require expert care |
| Any brass type | Pink or porous areas (dezincification) | Seek professional assessment | Any DIY cleaning | Indicates structural damage |
Imagine you’re cleaning brassware that’s been in the family for generations. If you spot green crusts or pink patches, resist the urge to scrub—these are signs that call for a conservator, not just a polish.
In summary, the safest way to clean and polish brass is to match your method to the item’s type, finish, and value. Start with the mildest option and work up only if necessary. If you’re ever unsure, especially with cleaning tarnished brass that’s antique or plated, less is more. In the next section, you’ll find hands-on, step-by-step instructions for various cleaning and polishing methods, so you can restore your brass safely and confidently.
Step By Step Methods To Clean And Polish Brass
Home Remedies That Actually Work
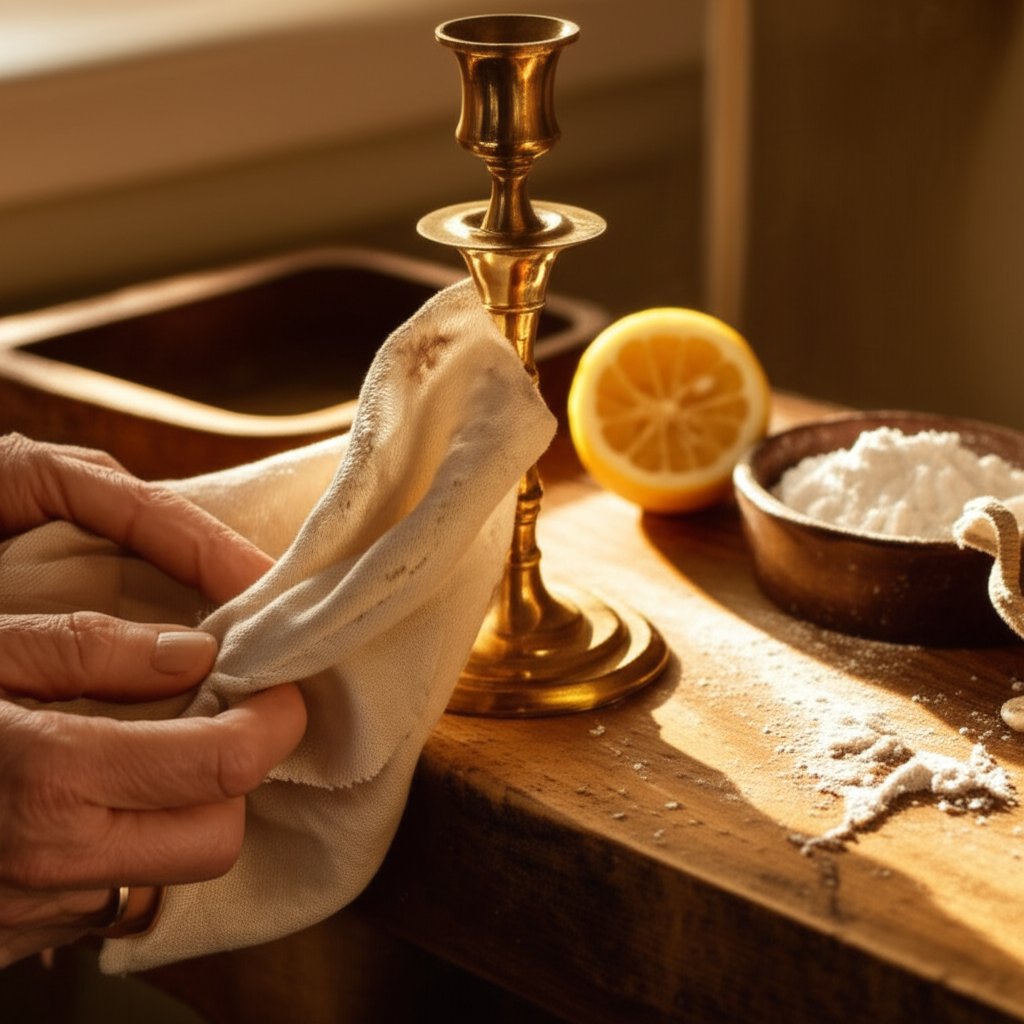
Ever wondered how to clean brass without harsh chemicals or expensive products? You’re not alone. Whether it’s a vintage doorknob, a kitchen fixture, or a piece of jewelry, learning how to clean tarnished brass at home can restore shine and protect the metal for years to come. The right method depends on your item’s finish and value, but most household brass can be cleaned with simple, safe ingredients you probably already have.
- Dust and Prepare: Wipe the brass with a dry microfiber cloth to remove surface dust and debris. This prevents scratching when you clean the brass more deeply.
- Wash with Mild Soap: Mix a few tablespoons of liquid dish soap with warm water in a bowl. Soak the brass (if possible) for a few seconds, or use a soft cloth or toothbrush to gently scrub away dirt. Rinse and dry with a clean cloth (Better Homes & Gardens).
- Test Spot: Always test your chosen cleaner on a hidden spot to ensure it won’t damage the finish—especially for lacquered or plated brass.
-
Apply Your Chosen Cleaner: Depending on the level of tarnish, try one of these proven home recipes:
- Lemon Juice and Baking Soda: Squeeze half a lemon into a bowl and mix in 1 teaspoon of baking soda. Rub the mixture onto the brass using a soft cloth, polish, and buff away the grime. Wipe with a wet rag and dry thoroughly.
- Vinegar, Salt, and Flour Paste: Dissolve 1 teaspoon salt in 1/2 cup vinegar, then add about 2 tablespoons of flour to make a thick paste. Rub onto the brass, let it dry for 10 minutes, rinse, and dry with a clean cloth.
- Ketchup: Apply a small amount of ketchup to the brass, let it sit for a few seconds (or up to an hour for heavy tarnish), then wipe clean with a damp cloth and dry.
- Lemon and Salt: Sprinkle salt on the cut side of a lemon half and rub it onto the brass. Wipe with a damp cloth and buff dry.
- Toothpaste (plain, non-gel): Spread a thin layer over the brass, let it rest for a few minutes, then polish with a clean cloth. Rinse with cool water and dry. Only use this method on solid, unlacquered brass—never on plated or lacquered items.
- Work Gently: Use straight, back-and-forth strokes with a soft cloth or natural-bristle brush. Avoid circular motions, which can create visible swirls on the brass surface.
- Rinse Thoroughly: After cleaning, rinse the brass with clean water to remove all residues. This is especially important after using acidic or salty cleaners, which can accelerate future tarnish if left behind.
- Dry Completely: Use a dry microfiber cloth to remove all moisture. Any leftover water can cause spotting or encourage new tarnish.
- Optional—Wax or Oil: For extra protection, apply a thin layer of mineral oil or a specialty wax designed for metals. This helps slow future tarnishing, especially in humid environments (Treehugger).
Commercial Polishes Versus DIY Pastes
If you prefer a ready-made solution, commercial brass polishes are widely available. These products are formulated to remove tarnish and may leave a protective coating to help prevent future discoloration. Always follow the manufacturer’s instructions, especially for plated or lacquered items. Remember: some commercial polishes contain mild abrasives that can wear through thin plating if overused.
DIY pastes, like those made from vinegar, flour, and salt or cleaning brass with lemon juice, are effective, affordable, and avoid harsh chemicals. They’re especially useful for intricate or irregularly shaped items where commercial products may be hard to apply.
Technique for Shine Without Damage
Want to know how to polish tarnished brass for a brilliant finish? The key is patience and a gentle touch. Imagine you’re restoring a delicate piece of jewelry or a cherished family heirloom—less is more. Use soft cloths, avoid steel wool or abrasive pads, and always test cleaners on a small, hidden area first.
- Microfiber cloths (for dusting, cleaning, and drying)
- Natural-bristle brush (for crevices and fine detail)
- Nitrile gloves (to protect both your hands and the brass from skin oils)
- Cotton swabs (for tight spots and edges)
- pH-neutral soap (for basic cleaning)
Caution: Avoid mixing ammonia with bleach or using acids on stone counters.
For those tackling how to remove green oxidation from brass (verdigris), start with gentle mechanical removal—use a wooden pick or soft brush to lift the green crust, then follow with a mild cleaning paste. Never use metal tools or harsh scrubbing, as this can scratch or further damage the brass.
After cleaning, always rinse thoroughly and dry completely. Any leftover cleaner, especially acids or salts, can cause new tarnish to form faster. If you’ve used a commercial polish, wipe away any excess and buff to a shine with a soft cloth. For long-lasting results, handle your brass with clean, dry hands and store it in a dry place.
Now that you know how to clean the brass safely and effectively, the next section will help you diagnose and treat specific tarnish and corrosion problems by appearance—so you can target your care and preserve your brass for the long haul.
Troubleshooting Tarnish And Corrosion By Appearance
Diagnose by Color and Texture
When you spot a change on your brass—maybe a dark film, green crust, or even pink patches—it’s natural to wonder: what does tarnished brass look like, and is it just cosmetic or a sign of deeper trouble? Understanding the visual cues of brass tarnish color and corrosion helps you choose the safest fix and avoid accidental damage.
| Appearance | Likely Cause | Typical Location | Recommended Treatment | What to Avoid |
|---|---|---|---|---|
| Dark brown/black film | Copper sulfides from sulfur exposure (air pollution, rubber, wool) | Back of jewelry, hardware, display items | Non-abrasive polish, thorough rinse, dry well | Abrasive pads, harsh chemicals |
| Powdery green or waxy green crust (brass green corrosion) |
Basic copper carbonates/chlorides (verdigris) from moisture, salts | Outdoor hardware, window sills, garden fixtures | Gently lift with wooden pick or soft brush; use mild acid (like vinegar) only if needed; rinse and dry completely | Metal tools, scraping, strong acids, soaking |
| Pink or salmon patches (brass turning pink) |
Dezincification—zinc leached out, leaving copper | Plumbing, antique hardware, items exposed to chlorides | Consult a professional conservator; structural risk | Any DIY cleaning or abrasive action |
| Sticky or yellowed film | Aged or deteriorating lacquer | Lacquered hardware, decorative pieces | Wash with mild soap and water; consider professional relacquering if needed | Solvents, polish, scrubbing |
| Brown spots or water marks | Mineral or salt deposits from hard water | Kitchen, bath fixtures, frequently handled items | Dampened polishing, immediate drying | Leaving wet, abrasive powders |
| Black spots on brass | Localized copper sulfide or polish residue in crevices | Detailed hardware, jewelry, decorative items | Soft brush, targeted cleaning, neutral rinse | Harsh scrubbing, bleach |
Targeted Fixes for Each Problem
- Dark brown or black film: Often a result of sulfur exposure—common in air pollution, rubber, or wool. Use a non-abrasive polish and rinse thoroughly to restore shine. Avoid harsh abrasives that can scratch the surface.
- Green corrosion on brass (verdigris): This powdery or waxy buildup is usually copper carbonates or chlorides, often found on outdoor pieces or in damp, salty environments. Gently lift the crust with a wooden pick or soft brush. If needed, use a mild acid like diluted vinegar, but always rinse and dry thoroughly to prevent further tarnish.
- Pink or salmon areas: Indicates dezincification—a loss of zinc that leaves behind porous copper. This is a structural issue, not just a surface blemish. If you see brass turning pink, consult a professional. DIY fixes can worsen the problem.
- Sticky or yellowed film: Signals aged lacquer. Clean gently with mild soap and water. If the film persists or peels, consider professional lacquer removal and recoating.
- Brown spots or water marks: Caused by mineral or salt residue from hard water. Polish gently with a damp cloth and dry immediately to prevent spotting.
- Black spots on brass: Often polish residue or localized sulfide formation. Use a soft brush or cotton swab with a neutral soap solution, then rinse and dry.
Green corrosion can undercut metal—gentleness and patience win.
When to Stop and Reassess
If you encounter any of the following, pause your cleaning and reconsider:
- Extensive green crust that won’t lift gently
- Pink, porous, or flaking areas
- Unstable surfaces or suspected antique value
In these cases, consult a conservator. Over-cleaning can cause permanent damage, especially to historic or valuable items. Always use gloves and eye protection when handling strong cleaners or unknown residues, and refer back to safety and finish guidelines for proper PPE.
By learning to read the signs—whether it’s a subtle change in brass tarnish color or more dramatic green corrosion on brass—you’ll know when to clean, when to treat, and when to seek expert help. Next, we’ll focus on conservation strategies for antiques and heirlooms, so you can preserve both the beauty and history of your brass for years to come.
Preserving Antiques And Heirloom Brass
Minimal Intervention for Valuable Pieces
When you inherit a family heirloom or discover an antique brass fixture, your first instinct might be to shine it up. But imagine: every time you polish, you risk removing a layer of history. For antiques and heirlooms, the best brass restoration starts with restraint. The goal is to preserve both the metal and its story, not just its shine.
- Document the current condition with clear photographs from all angles before any cleaning. This record is invaluable for future reference and for professional assessment if needed.
- Test cleaning methods in inconspicuous spots to check for adverse reactions or unexpected changes.
- Start with dusting using a soft, dry cloth or a clean natural-bristle brush. This removes loose dirt without disturbing the surface.
- For surface grime, use distilled water with a drop of pH-neutral soap on a cotton swab. Gently wipe, then dry with a soft cloth.
- Avoid powered buffing or abrasive pads, which can remove patina and fine details.
- Protect adjacent materials (wood, stone, leather) with masking or barriers during cleaning.
Preserving patina is key—this natural surface layer is often valued by collectors and museums as evidence of age and authenticity. Over-cleaning can strip away this character, reducing both aesthetic and market value.
Safe Cleaning for Lacquered Antiques
Many antique brass pieces have a lacquer or clear protective coating. If your item resists tarnish and has a glossy finish, it’s likely lacquered. For these, the safest approach is:
- Clean gently with a soft cloth dampened in mild soapy water. Avoid soaking or submerging the item.
- Never use abrasives, solvents, or polishes on lacquered surfaces. These can cloud, strip, or irreversibly damage the coating (Westland London).
- If the lacquer is sticky, yellowed, or peeling, consult a professional restorer for safe removal and reapplication. DIY solvent removal can lead to patchy or uneven results.
For unlacquered antiques, use non-abrasive polishes sparingly—ideally, only when absolutely necessary to remove badly tarnished brass. Always prioritize gentle cleaning and preservation of the natural finish.
How to Choose a Conservator: When to Seek Professional Help
Sometimes, the safest way to restore brass is to leave it to an expert. Consider professional assessment if you notice:
- Structural corrosion, pitting, or flaking surfaces
- Pink or salmon patches (dezincification)
- Unstable or powdery corrosion that returns after cleaning
- High market or sentimental value, or presence of inscriptions/maker’s marks
Professional conservators use reversible treatments, document every intervention, and can recommend specialized brass protective coatings or microenvironment storage for long-term preservation.
| Conservation Checklist |
|---|
| Document condition with photos |
| Test cleaning in hidden area |
| Use only soft, non-abrasive tools |
| Protect surrounding materials |
| Record all interventions for future caretakers |
For antiques, less is more: gentle cleaning preserves value, while aggressive methods can cause irreversible loss. If you’re unsure how to clean severely tarnished brass or how do you restore brass with historic or sentimental importance, consult a qualified conservator.
By focusing on minimal, reversible interventions and professional guidance when needed, you’ll ensure your antique or heirloom brass remains both beautiful and meaningful for generations to come. In the next section, we’ll explore how routine care and protective coatings can help stop future tarnish before it starts.
How to Keep Brass from Tarnishing
Daily Care and Handling Habits
Ever wondered how to keep brass from tarnishing after all your hard work cleaning? Prevention is the secret. Picture this: you’ve just polished a brass doorknob or a favorite piece of jewelry, and you want that shine to last. The answer lies in small, consistent habits that help stop brass from tarnishing and prevent brass oxidation before it starts.
- Handle with clean, dry hands—skin oils and sweat accelerate tarnish.
- Wipe down after exposure to moisture—always dry brass after cleaning, washing hands, or exposure to humidity.
- Avoid storing near rubber, wool, or sulfur-emitting papers—these materials release compounds that react with brass.
- Use silica gel packs in display cases—they absorb excess humidity, keeping the air dry and helping to prevent brass oxidation.
- Minimize direct contact with cosmetics, lotions, or cleaning agents—these can leave residues that speed up tarnishing.
Imagine how much longer your cabinet handles or jewelry will look bright if you make these simple steps part of your routine. Over time, these habits can significantly slow the rate at which brass tarnish develops.
Sealants, Waxes, and Lacquers: Protective Barriers
If you’re serious about how to protect brass from tarnishing, consider a physical barrier. Protective coatings—like microcrystalline wax or modern clear lacquers—lock out air, moisture, and contaminants. For indoor items such as decorative hardware or collectibles, a thin layer of microcrystalline wax is a classic, museum-approved option. It’s easy to apply, removable, and helps prevent brass oxidation while preserving the metal’s natural look.
For high-touch or outdoor brass, a durable clear coating is more robust. Products like UV-stable clear coats or specialized lacquers are designed to stop brass from tarnishing even in harsh environments. According to expert guidance, the choice of coating depends on the item’s use and setting:
- Microcrystalline wax: Best for indoor, decorative, and low-touch items. Easy to reapply and remove.
- Modern clear coats (lacquers): Ideal for high-use hardware, kitchen fixtures, or outdoor pieces. Look for UV-resistant, non-yellowing formulas.
Always confirm compatibility with your brass finish and ensure coatings are reversible or easily maintained. If you notice scratches or wear in the coating, touch up promptly to avoid exposing bare brass to the elements.
Maintenance Schedules by Environment
How often should you clean or recoat brass? The answer depends on both the finish and where the item lives. Here’s a maintenance planner to help you keep brass from tarnishing in different settings:
| Setting / Finish | Inspection Frequency | Light Cleaning | Protectant Reapplication |
|---|---|---|---|
| Dry indoor / Unlacquered | Every 2–3 months | Dust weekly; polish as needed | Wax every 4–6 months |
| Dry indoor / Lacquered | Every 3–6 months | Wipe with damp cloth monthly | Reapply lacquer when wear is visible (years) |
| Dry indoor / Plated | Every 3–6 months | Gentle wipe monthly | Touch up clear coat if needed (years) |
| Humid indoor / Unlacquered | Monthly | Dust weekly; polish lightly monthly | Wax every 2–3 months |
| Humid indoor / Lacquered | Monthly | Wipe with damp cloth every 2 weeks | Inspect annually; recoat as needed |
| Coastal outdoor / Any finish | Monthly | Rinse and dry monthly; inspect for corrosion | Recoat or wax every 1–3 months; more frequent in salt air |
These intervals are guidelines—if your brass is in a high-touch or high-humidity area, check and clean more often. For example, coastal environments demand more vigilance to prevent brass oxidation and corrosion.
How do you keep brass from tarnishing for the long term? The answer is simple: clean less, protect more, and tailor your routine to your environment. By combining daily habits, the right protective coating, and a sensible schedule, you’ll preserve your brass’s beauty and function for years to come.
Clean less, protect more—prevention preserves metal and time.
Ready to take the next step? In the following section, you’ll learn how to choose the right materials and finishes for new brass projects or restorations—so you can prevent tarnish from day one.
Smart Material And Finish Choices With Pro Support
Choosing Alloys and Finishes to Resist Tarnish
When you’re planning a new project—whether it’s custom door hardware, jewelry, or a restoration—choosing the right material and finish is your first line of defense against tarnish. Sounds complex? It doesn’t have to be. Start by asking: do you want a bright, low-maintenance finish, or are you after the rich character of natural patina? The answer shapes your next steps, from alloy selection to surface protection.
Let’s break down the most common options and their tradeoffs:
- Unlacquered brass: Develops a natural patina over time—some love this look, while others see it as unwanted tarnish. Regular maintenance is required to keep it bright, but it’s easy to restore if you change your mind.
- Lacquered brass: Maintains a shiny, golden finish with minimal upkeep. The lacquer acts as a barrier against air and moisture, but can yellow or wear over time. Recoating may be needed for high-touch items.
- Plated finishes (nickel, chrome, gold): These can be plated with anti tarnish layers to reduce maintenance. For example, gold-plated brass adds a luxe look, but you might wonder: does gold plated brass tarnish? The answer is yes, eventually—especially if the plating wears thin, exposing the brass beneath. Nickel and chrome offer a cooler tone and are more resistant to tarnish, but still require care.
- Alternative metals: If you want to minimize maintenance, consider what metals don't tarnish—stainless steel, titanium, platinum, and ceramic are top choices. Stainless steel tarnishing is rare, making it ideal for high-use or outdoor items (Ben Garelick).
Design for Durability and Easy Upkeep
Imagine you’re designing a kitchen faucet or a set of custom cabinet pulls. You want them to look great for years, not just out of the box. Here are a few practical design tips to keep in mind:
- Specify the finish early and request samples to confirm color and sheen under real-world lighting.
- For outdoor or humid environments, choose lacquered brass or a plated finish with anti-tarnish properties.
- For high-touch or commercial settings, consider stainless steel or chrome-plated brass for maximum durability and minimal tarnish risk.
- Account for maintenance: unlacquered brass will develop patina (and yes, does brass patina is a real consideration), while lacquered or plated finishes may eventually need professional touch-ups.
- Balance aesthetics and practicality—sometimes, a living finish adds charm, but not every application benefits from visible aging.
When Professional Machining and Finishing Help
Need ultra-precise parts or want to prototype a finish before committing? This is where professional CNC machining services shine. For example, XTJ offers advanced 4- and 5-axis machining with tight tolerances, rapid turnaround, and a wide selection of metals—including brass, stainless steel, and more. Their capabilities let you:
- Specify exact brass grades for optimal corrosion resistance or machinability.
- Apply clear coats, platings, or custom finishes to match your maintenance goals.
- Prototype and test finishes (from unlacquered to gold-plated) before full production, ensuring you get the look and durability you want.
- Choose metals that don’t tarnish as readily, like stainless steel or titanium, for parts that see heavy use or harsh environments.
With expert engineering support and ISO-certified quality, services like XTJ help you balance design, performance, and long-term upkeep—so you don’t have to choose between beauty and practicality.
Comparing Common Finishes: Look, Maintenance, and Suitability
| Provider/Finish | Appearance | Maintenance | Suitability | Notes |
|---|---|---|---|---|
| XTJ CNC Machining | Customizable: brass, stainless, gold/nickel/chrome-plated | Tailored to project (choose lacquer, anti-tarnish, or bare) | Prototyping, production, restoration; any industry | Ultra-tight tolerances, fast lead times, engineering support |
| Unlacquered Brass | Warm gold, develops patina | Polish or clean regularly; patina forms over time | Decor, restoration, where aging is desired | Patina can be valued or removed as preference |
| Lacquered Brass | Bright, shiny gold; resists tarnish | Minimal—just gentle cleaning; recoat as needed | High-touch, indoor, or humid settings | Lacquer can yellow or wear; recoating required eventually |
| Gold-Plated Brass | Rich gold, mirror finish | Low, but plating can wear; avoid abrasives | Jewelry, decorative hardware | Does gold plated brass tarnish? Yes, if plating wears off |
| Nickel/Chrome-Plated Brass | Cool silver, highly reflective | Low; wipe clean, avoid harsh cleaners | Modern decor, kitchen/bath hardware | Resistant to tarnish but can pit if damaged |
| Stainless Steel | Bright silver, modern look | Very low; resists tarnish and corrosion | High-use, outdoor, or commercial settings | Stainless steel tarnishing is rare; nearly maintenance-free |
| Titanium, Platinum, Ceramic | Varied—silver, gray, or black | Minimal; does not tarnish | Jewelry, medical, high-performance parts | Metals that don't tarnish; premium price |
Choosing the right alloy and finish up front saves time and effort later—preventing tarnish is always easier than restoring shine.
In summary: Think about function, maintenance, and looks before you build or restore. If you need help specifying materials, prototyping finishes, or selecting metals that don’t tarnish, professional CNC machining services like XTJ offer both expertise and flexibility. By making smart choices from the start, you’ll avoid headaches and enjoy beautiful, durable results for years to come.
Frequently Asked Questions About Brass Tarnishing
1. Does brass jewelry tarnish, and how can I slow it down?
Brass jewelry does tarnish due to copper reacting with air, moisture, and skin oils. To slow tarnishing, avoid exposing your jewelry to water, sweat, and cosmetics. Clean with a soft cloth and store in a dry, airtight container. Applying a thin coat of microcrystalline wax can also help protect the surface.
2. What is the difference between tarnish and rust on brass?
Tarnish on brass is a surface discoloration caused by oxidation, often appearing as brown, black, or green films. Rust, which is iron oxide, only occurs on iron-containing metals. Brass does not rust but will develop tarnish and sometimes green patina if unprotected.
3. How can I tell if my brass item is solid, plated, or lacquered?
Inspect for color changes at edges or worn spots—solid brass is consistent throughout, while brass-plated items may show a different base metal underneath. Use a magnet; brass is non-magnetic. For lacquer, gently rub a hidden area with an acetone-soaked swab—if residue is visible, it's lacquered.
4. What are the safest ways to clean tarnished brass at home?
Start with mild soap and water for regular cleaning. For tarnish, use gentle DIY pastes like lemon juice with baking soda or a mixture of vinegar, salt, and flour. Avoid abrasives on plated or lacquered brass, and always test on a hidden area first to prevent damage.
5. How do I keep brass from tarnishing in the future?
To prevent brass oxidation, handle items with clean, dry hands, wipe them after exposure to moisture, and avoid storing near rubber or wool. Applying microcrystalline wax or a clear lacquer adds a protective barrier. Regular dusting and scheduled maintenance based on your environment also help.
-
Posted in
brass care, brass cleaning, brass maintenance, brass tarnish, preventing tarnish


