
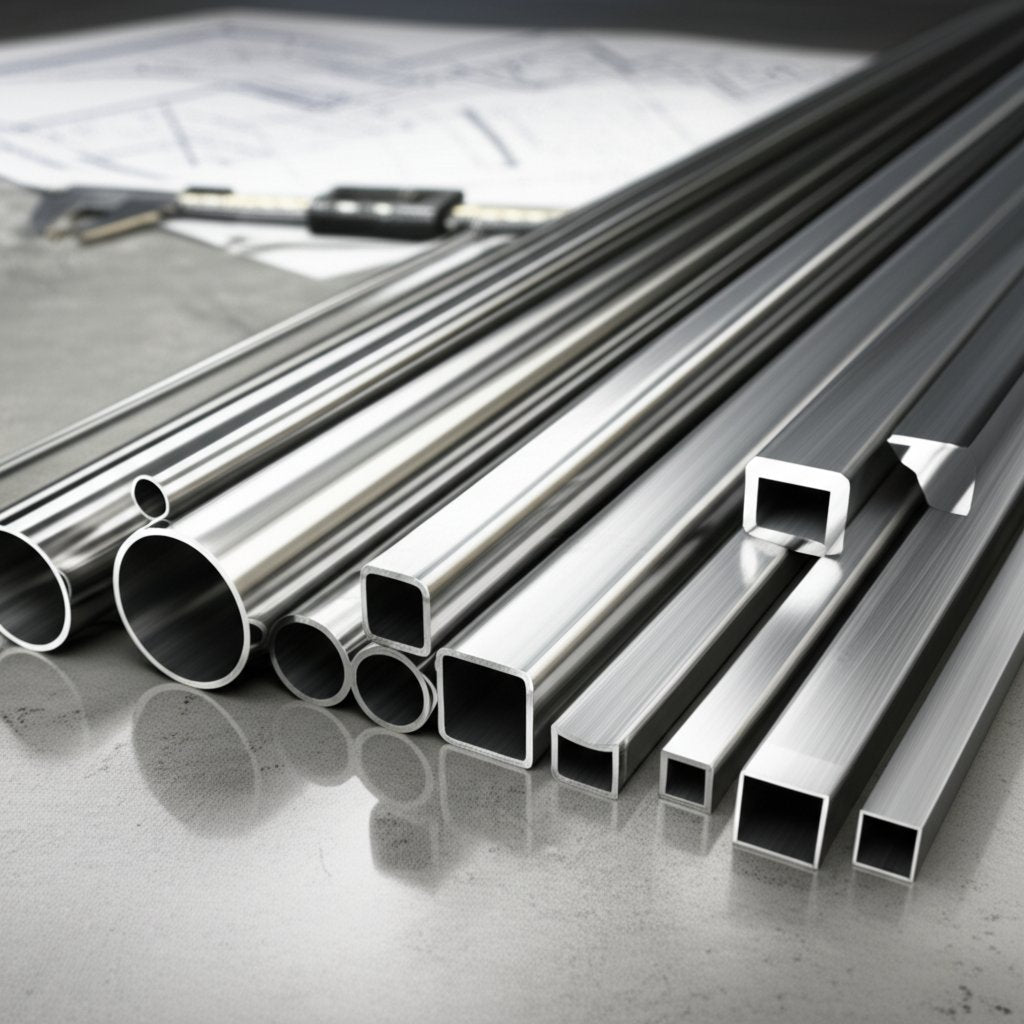
Stainless Steel Tubing: Seamless Vs Welded—Cost And Strength
Stainless steel tubing fundamentals made clear
When you first encounter the world of stainless steel tubing, it’s easy to assume tubes and pipes are interchangeable. Sounds complex? Let’s break it down so you can confidently specify the right product for your project, whether you’re designing a hygienic process line or a structural frame.
Tube vs pipe: what engineers need to know
Stainless steel tubing and stainless steel pipe share a lot in common, but their differences are critical. Tubes are defined by their precise outside diameter (OD) and wall thickness. This makes them ideal for applications where tight tolerances, exact fit, and structural integrity matter—think instrumentation, frames, or heat exchangers. Pipes, on the other hand, are sized by nominal pipe size (NPS) and schedule, which relate to flow capacity and pressure rating. Pipes are the go-to for moving fluids in industrial, plumbing, or process settings where robustness and flow are key.
| Attribute | Stainless Steel Tubing | Stainless Steel Pipe |
|---|---|---|
| Sizing Basis | OD & wall thickness (e.g., 25.4mm x 2mm) | Nominal Pipe Size (NPS) & Schedule (e.g., 1" Sch 40) |
| Common Standards | ASTM A269, ASTM A213 | ASTM A312 |
| Typical Tolerance (per ASTM/EN) | OD: ±0.13–0.25mm, Wall: ±10–15% | OD: +0.40/-0.79mm and up |
| Typical Uses | Instrumentation, frames, heat exchangers, hygienic lines, automotive | Fluid transport, process piping, plumbing, structural columns |
| Shapes Available | Round, square, rectangular | Mostly round |
| Supply Conditions | Welded, seamless, cold-drawn | Welded, seamless |
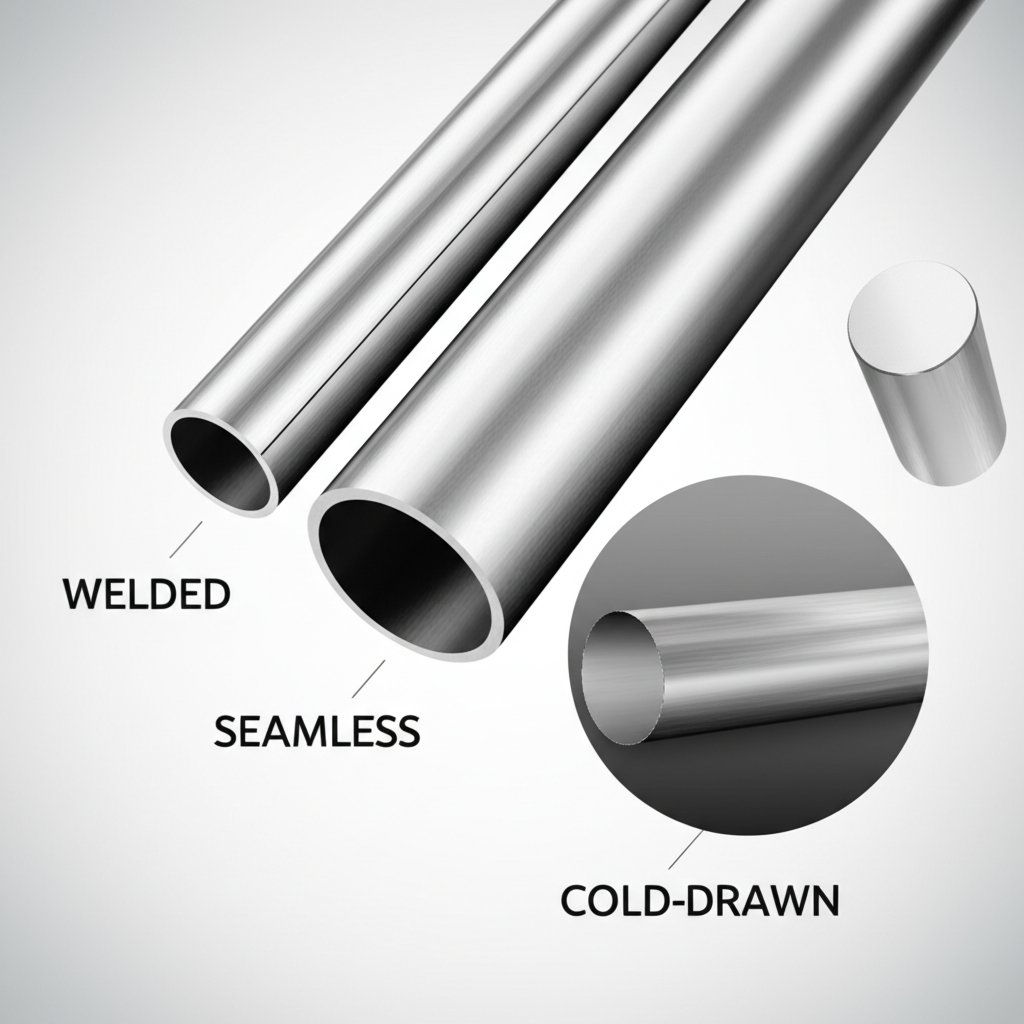
Seamless, welded, and cold-drawn: what do they mean?
Stainless steel tubing comes in several forms. Welded tubing is made by forming and welding a strip of stainless steel, while seamless tubing is produced by extruding or piercing a solid billet, resulting in no weld seam. Cold-drawn tubing undergoes further processing to tighten tolerances and improve surface finish—perfect for demanding applications. These distinctions impact not only performance but also cost and lead time, so choosing the right type is key for your project’s success.
Metric versus inch sizing explained
Ever found yourself puzzling over a drawing that calls out both metric stainless steel tubing and inch-based pipe? You’re not alone. Tubing is often specified in millimeters (for example, 25mm OD x 2mm wall), while pipe uses inches and schedules (like 1" Sch 10). Mixing these systems can create costly errors, especially when dealing with stainless steel mm tubing sizes for global projects. Always confirm which system your standards and suppliers use, and double-check conversions before sending out purchase orders.
- Confusing NPS (Nominal Pipe Size) with actual outside diameter
- Mixing inch and metric callouts on the same drawing
- Ignoring wall thickness tolerances—especially for high-precision or pressure applications
- Assuming tube and pipe are interchangeable in fittings and supports
Where tubing excels: real-world examples
Imagine specifying stainless tubing for a sanitary process skid—tight bends, exact fit, and easy cleaning all matter. Or picture automotive frames, where weight and consistency are critical. Tubing’s tighter tolerances and variety of shapes (round, square, rectangular) let you achieve these design goals. In contrast, stainless steel pipe is your best friend for moving water or chemicals in a plant, where flow and pressure resistance are paramount.
| Standard | Application | Typical Tolerances |
|---|---|---|
| ASTM A269/A213 | Instrumentation, heat exchangers, hygienic lines | OD: ±0.13–0.25mm, Wall: ±10–15% |
| ASTM A312 | Process piping, fluid transport | OD: +0.40/-0.79mm and up |
Reading mill markings and finish codes
When you receive a shipment, you’ll notice mill markings—these include the heat number (for traceability), standard (like ASTM A269 or A312), size, and sometimes the surface finish code. These markings are your assurance that the tubing or pipe meets the required quality and can be traced back to a specific batch or heat of steel, which is crucial for quality control and regulatory compliance.
As you move through this guide, you’ll find selection matrices for corrosion grades, sizing methods, fabrication best practices, and procurement checklists. Stay tuned for deep dives into weight-per-foot calculations, pressure sizing, and how to select the right stainless steel metric tubing or stainless steel mm tubing sizes for your next project. With a clear grasp of these fundamentals, you’ll avoid costly mistakes and ensure your designs are built on a solid foundation.
Choosing grades for corrosion and temperature
When you’re specifying stainless steel tubing, selecting the right grade is about more than just picking a material off a chart. Imagine you’re designing a process skid for a food plant, or piping for a marine dock—each environment demands a tailored approach to corrosion and temperature resistance. Let’s break down how to make an informed choice, so your project stands the test of time and budget.
Grade selection by environment
304 and 316 are the most common austenitic grades used for stainless steel tubing. But what sets them apart?
- 304 stainless steel tubing is the go-to for general-purpose applications. It contains about 18% chromium and 8% nickel, offering solid corrosion resistance, excellent formability, and easy weldability. You’ll see it in food processing, architectural trims, and general industrial uses where exposure to aggressive chemicals or salt is limited.
- 316 stainless steel tubing steps up the game with the addition of 2-3% molybdenum. This boosts its resistance to chlorides, acids, and pitting corrosion—making it ideal for marine, chemical processing, and high-hygiene environments. The upgrade in initial cost for ss 316 tube is often offset by longer service life and lower maintenance in harsh conditions.
But the story doesn’t end there. Ferritic (e.g., 430), martensitic, duplex, and heat-resistant austenitic grades each offer distinct advantages for specialized needs—such as magnetic properties, higher strength, or extreme temperature stability.
| Environment | Recommended Grade(s) | Notes |
|---|---|---|
| Fresh water, mild atmospheres | 304, 304L | Cost-effective, good for most indoor/outdoor use |
| Salted spray, marine | 316, 316L | Superior chloride/pitting resistance; choose for docks, boats, coastal |
| Acidic media, chemical processing | 316, duplex, specialty austenitics | 316 resists many acids; duplex or special alloys for strong acids |
| High temperature | Heat-resistant austenitics, stabilized grades | Look for grades with added silicon or niobium for scaling resistance |
| Clean-room, food & pharma | 304, 316, electropolished | Choose high-purity and smooth finishes for hygiene; 316 preferred for aggressive cleaning |
Food and pharma hygiene considerations
In regulated environments, cleanliness is everything. Both 304 stainless steel tube and 316 are widely accepted for food and pharmaceutical use, but 316’s enhanced resistance to cleaning agents and chlorides gives it an edge where sanitization is frequent and aggressive. Always pair your grade choice with a smooth, passivated finish to minimize crevices that can harbor contaminants.
Marine and chemical processing notes
For marine, coastal, or chemical plant installations, 316 stainless tube is the default. Its molybdenum content fends off pitting and crevice corrosion—two of the biggest threats in chloride-rich environments. In some cases, duplex or higher-alloy austenitics may be necessary for extreme exposures, but for most, 316 or 316L is a robust, reliable answer.
| Grade | Tensile Strength (MPa) | Yield Strength (MPa) | Elongation (%) | Cr (%) | Ni (%) | Mo (%) | C (%) |
|---|---|---|---|---|---|---|---|
| 304 | 515 min | 205 min | 35 min | 18-20 | 8-10.5 | – | 0.08 max |
| 316 | 515 min | 205 min | 35 min | 16-18 | 10-14 | 2-3 | 0.08 max |
| 316L | 485 min | 170 min | 35 min | 16-18 | 10-15 | 2-3 | 0.035 max |
Refer to ASTM A269, A213, or A312, ASME specs, or supplier datasheets for exact values and requirements.
Finishing quality and cleanliness can make a lower-alloy grade outperform a higher-alloy grade in mild service. Don’t overlook weld quality and surface preparation—these factors are as important as grade selection for lifecycle reliability.
Keep in mind: even the best grade can fail if exposed to crevice or pitting corrosion, especially in stagnant or poorly drained spots. Welding and surface finish directly impact corrosion performance—always specify proper weld procedures and post-fabrication cleaning for environments like those handled by 304 stainless steel pipe or 304 stainless pipe systems.
By combining smart grade selection with the right finish and fabrication practices, you’ll maximize the durability, safety, and value of your stainless steel tubing installations. Next, we’ll demystify sizing standards and show you how to calculate weight-per-foot for your project’s needs.
Sizing standards and weight calculations for stainless steel tubing
Ever stared at a spec sheet and wondered how to decode all those numbers—OD, wall, ID, schedule, and even metric callouts? Sounds complex, but once you know what each dimension means, you’ll avoid costly mistakes and ensure your tubing fits perfectly every time. Let’s break down the essentials of stainless steel tube sizes, wall thickness, and how to get weight-per-foot calculations right—whether you’re working in inches or millimeters.
Understanding OD, ID, and wall: The foundation of tube sizing
Stainless steel tubing is specified by three key dimensions:
- Outside Diameter (OD): The measurement across the tube’s exterior.
- Wall Thickness: The thickness of the tube’s wall, measured from the OD inward.
- Inside Diameter (ID): The measurement across the hollow part of the tube—calculated as OD minus twice the wall thickness.
For example, if you’re sourcing 3/8 stainless steel tubing with a 0.035-inch wall, the ID is 0.305 inches (0.375 - 2 × 0.035). This relationship is the backbone of all stainless steel tubing sizes and dimensions.
Schedule numbers and wall thickness: Pipes vs. tubes
Unlike tubing, stainless steel pipe is defined by nominal pipe size (NPS) and schedule—which indicate wall thickness for a given size. This can lead to confusion, especially when converting between tube and pipe or referencing a stainless steel tube sizes chart. Here’s a simplified comparison to help you visualize the differences:
| Type | Sizing Basis | Wall Thickness Reference | Common Use |
|---|---|---|---|
| Stainless Steel Tube | Actual OD & Wall | Directly specified (e.g., 0.065 in) | Instrumentation, structural, heat exchangers |
| Stainless Steel Pipe | NPS & Schedule | Schedule number (e.g., Sch 10, Sch 40) | Fluid transport, pressure piping |
Metric conversions without mistakes
Working on international projects? You’ll notice metric stainless steel tubing is specified by OD x wall in millimeters, such as 12 mm x 1 mm. Metric stainless steel tubing is available in a wide range of sizes, commonly starting from just a few millimeters up to over 100 mm OD, with matching wall and ID values. Always double-check your drawing callouts and supplier specs to avoid mixing inch and metric systems, which can lead to costly errors.
| OD (mm) | ID (mm) | Wall (mm) | OD (inches) | ID (inches) | Wall (inches) |
|---|---|---|---|---|---|
| 10.00 | 8.00 | 1.00 | 0.394 | 0.315 | 0.040 |
| 12.00 | 10.00 | 1.00 | 0.472 | 0.394 | 0.039 |
| 15.00 | 13.00 | 1.00 | 0.591 | 0.512 | 0.040 |
| 20.00 | 18.00 | 1.00 | 0.787 | 0.709 | 0.039 |
Calculating weight-per-foot
Need to estimate the weight for shipping or structural calculations? Here’s a simple approach for round tubing:
Weight per foot (lbs) = 10.69 × (OD – Wall) × Wall
Where OD and Wall are in inches. The constant 10.69 is specifically used for 300-series austenitic stainless steel, as it is based on its typical density.
Example: For 3/8 stainless steel tubing (0.375" OD, 0.035" Wall):
Weight/ft = 10.69 × (0.375 – 0.035) × 0.035 ≈ 0.127 lbs/ft
For metric stainless steel tube dimensions, convert OD and Wall to inches first, or use the appropriate metric formula.
Why tolerances and finish matter
According to ASTM A269/A213, stainless steel tubing tolerances can be as tight as ±0.13 mm on OD and ±10–15% on wall thickness. Cold-drawn tubing often provides even tighter control, which is critical for applications where precise fit or consistent flow is required. When clearance or flow targets are tight, consider custom-drawn walls instead of standard stock sizes.
- Confirm OD and wall thickness match your design or the stainless steel tube diameters in your reference chart
- Check tolerances per ASTM or supplier spec
- Specify surface finish and cleanliness level
- Verify straightness and overall length
- Define end condition: plain, beveled, or deburred
Keeping a stainless steel tube sizes chart handy—and aligning callouts on your drawings with the standard you’re buying—will save you from headaches at receipt inspection.
Now that you know how to size and weigh your tubing, let’s explore how manufacturing methods like seamless, welded, and cold-drawn affect performance and cost in the next section.
How Manufacturing Shapes Tubing Performance
Ever wondered why two pieces of stainless steel tubing—identical in size—can differ so much in price, strength, or finish? The answer lies in how they’re made. Let’s break down the key manufacturing routes—welded, seamless, and cold-drawn—so you can make the best choice for your project’s needs and budget.
When to Choose Seamless Over Welded
Seamless stainless steel tubing is produced by piercing and elongating a solid billet, resulting in a tube with no welded seam. This method delivers a homogenous structure, offering higher strength, superior corrosion resistance, and the ability to handle higher pressures compared to welded tubing. That’s why seamless tubing is the go-to for critical applications—think high-pressure hydraulic lines, heat exchangers, or environments with extreme temperature swings. However, this robust performance comes at a higher cost due to the complex, energy-intensive process involved.
Welded tubing, on the other hand, is formed by roll-forming stainless steel strip or sheet into a tube shape and welding the seam longitudinally. Cold-forming methods yield smoother finishes and tighter tolerances, while hot-forming is used for larger sizes or thicker walls. Welded tubing is generally less expensive, readily available, and suitable for most structural, architectural, or low-to-moderate pressure uses. The seam can be left as-welded or further refined by cold working to improve properties and surface finish. For many projects, welded tubing offers the best balance of performance and value.
Cold Drawing for Precision and Strength
Want even tighter tolerances and a flawless finish? That’s where cold-drawn processes come in. Cold drawing involves pulling tubing through dies at room temperature, gradually reducing the diameter and wall thickness. This process enhances dimensional accuracy, smooths the surface, and increases mechanical strength by aligning the metal’s grain structure. Cold drawing is commonly applied to both seamless and welded tubes, creating what’s often called “precision tubing.” For applications like instrumentation, hydraulic lines, or anywhere fit-up is critical, cold-drawn seamless stainless tube is a top choice.
| Attribute | Welded Tubing | Seamless Tubing | Cold-Drawn Tubing |
|---|---|---|---|
| Manufacturing Method | Roll-formed & longitudinally welded | Pierced & drawn from solid billet | Multiple cold drawing passes (applies to welded or seamless) |
| Typical Tolerances | Good (improved with cold working) | Very good | Excellent (tightest control, can reach ±0.13 mm OD) |
| Surface Finish | Good (can be polished or pickled) | Good to very good | Superior (smooth, defect-free) |
| Pressure Suitability | Low to moderate | High (preferred for critical/pressure) | High (especially after cold drawing) |
| Availability & Lead Time | Widely available, short lead | Available, longer lead for specials | Available, may require extra lead for custom sizes |
| Relative Cost | Lowest | Higher | Highest (due to extra processing) |
NDE and Quality Checks That Matter
How do you ensure your tubing will perform in service? Non-destructive examinations (NDE) are the answer. Here are the most common methods for stainless steel tubing:
- Ultrasonic Testing (UT): Detects internal and external flaws using high-frequency sound waves—essential for seamless tubing in high-pressure or safety-critical applications.
- Eddy Current Testing (ECT): Uses electromagnetic induction to spot surface or near-surface defects—often specified for thin-wall or precision tubes.
- Hydrostatic Testing: Tubes are filled with water and pressurized to check for leaks or weaknesses—standard for both welded and seamless tubing before shipment.
For more detail on these methods, see Steel Industrial: NDT of Steel Pipe.
- Request Material Test Reports (MTRs) for traceability and compliance
- Specify heat number traceability for critical applications
- Ask for pickled and passivated condition to maximize corrosion resistance
- Define cleanliness levels if used for instrumentation, food, or pharma service
In summary, seamless stainless steel tubing is the standard for high-pressure and mission-critical service, while welded tubing offers cost-effective, high-quality solutions for most structural and moderate-pressure uses. Cold-drawn processes deliver the ultimate in precision, strength, and surface finish—ideal for demanding applications, but often at a higher price and with longer lead times. Understanding these manufacturing paths helps you choose the right tubing for your next project, balancing performance, cost, and availability.
Next, we’ll explore how to size your tubing for pressure and structural loads, ensuring your selection meets both safety and performance goals.
Pressure and structural design essentials for stainless steel tubing
When you’re sizing stainless steel round tube for pressure or structural loads, it’s easy to get overwhelmed by formulas, tables, and safety codes. But with a practical approach, you can make confident decisions—without needing a PhD in engineering. Let’s demystify how to choose the right wall thickness and diameter for your application, whether you’re building a high-pressure process line or a lightweight structural frame.
Pressure sizing concepts that hold up
Imagine you’re specifying a stainless steel seamless pipe for a new water system. How do you know if it will withstand your maximum operating pressure? The industry-standard starting point is Barlow’s formula, which estimates the internal pressure a tube or pipe can handle before yielding:
Py = 2 × Sy × t / do
Where:
Py = Internal pressure at minimum yield
Sy = Yield strength of the material
t = Wall thickness
do = Outside diameter
For example, using Barlow’s formula, a designer can quickly estimate the burst pressure of a stainless round tube. But remember: real-world design must incorporate safety factors, joint efficiency, and temperature derating as required by ASME codes. For code-stamped systems, always use the allowable stresses and formula modifications given by the latest ASME B31.3 or B31.1 (reference).
Wall selection for burst margin
Choosing the right wall thickness is about more than just surviving burst pressure. You’ll also want a margin for corrosion, manufacturing tolerance, and any future thinning. Here’s a conceptual way to see how wall thickness affects both pressure capability and weight-per-foot for typical stainless steel pipe sizes:
| Wall Thickness | Indicative Pressure Capability | Weight-per-Foot |
|---|---|---|
| Thin (e.g., Sch 10) | Low | Light |
| Medium (e.g., Sch 40) | Medium | Medium |
| Thick (e.g., Sch 160) | High | Heavy |
For instance, a 2 inch stainless steel pipe in Sch 40 may handle typical process pressures, but if you need extra margin for cyclic loads or corrosion, consider Sch 80 or Sch 160. The same logic applies for 3 inch stainless steel pipe in water or chemical service—heavier walls boost pressure rating but increase weight and cost (reference).
Structural loads, buckling, and deflection
What about structural applications—like a frame built from stainless steel round tube? Here, the focus shifts to bending, axial, and buckling loads. While detailed calculations depend on your exact geometry and loading, the basic stress equations look like this:
Axial stress (σ) = F / A
Bending stress (σ) = M × y / I
Where:
F = Applied force
A = Cross-sectional area
M = Bending moment
y = Distance from neutral axis
I = Moment of inertia
For long, slender tubes, check for buckling—especially in compression. Thicker walls and larger diameters improve buckling resistance, but always review with your structural or mechanical engineer for critical load paths.
| Joint/End Condition | Pressure Capability Impact |
|---|---|
| Welded joint | High (if properly specified and tested) |
| Compression fitting | Medium (depends on fitting rating) |
| Flared end | Medium (depends on flare quality and connection) |
| Threaded end | Lower (potential leak path; derate pressure) |
- Always check temperature derating factors—allowable pressure drops at elevated temperatures
- Account for corrosion allowance if the stainless steel water pipe will see aggressive media
- Consider cyclic fatigue if the system will see frequent pressure swings
Before finalizing your design, verify all assumptions against the product’s actual spec—ASTM A269, A213, or A312—and request Material Test Reports (MTRs) from your supplier for traceability. For mission-critical pressure applications, confirm test results match your requirements and that the tubing or pipe is suitable for your chosen joints and end connections.
Next, we’ll look at hands-on fabrication tips—like welding, bending, and machining—to ensure your stainless steel tubing performs as designed in the field.
Welding, Bending, and Machining Best Practices for Stainless Steel Tubing
When you’re working with stainless steel tubing—whether it’s 1/2 stainless steel tubing for instrumentation, 1 inch stainless tubing for process lines, or 3/4 stainless steel tubing for frames—fabrication quality is what determines long-term performance. Sounds complex? Let’s break down the essential steps to keep your tubing corrosion-resistant, dimensionally accurate, and ready for service in even the most demanding environments.
TIG and Orbital Welding Practices
Welding is at the heart of most tubing assemblies. The right technique makes all the difference—especially for applications where hygiene or pressure integrity is critical. TIG (GTAW) welding is the gold standard for clean, high-quality welds on stainless steel tubing. It uses a non-consumable tungsten electrode and an inert gas shield, making it ideal for thin-wall and small-diameter tubes, such as 1 1 2 stainless steel tubing or 1 inch stainless tube. For production runs or pharmaceutical lines, orbital welding automates the process for repeatability and minimal contamination.
- Clean joints thoroughly: Remove oils, dirt, and oxides before welding. Contaminants can cause weld defects and compromise corrosion resistance.
- Maintain interpass temperature: Keep the workpiece cool between passes to avoid excessive heat input, which can lead to grain growth and reduced corrosion resistance.
- Choose the right filler: Match filler metal to the base alloy and service environment—especially important for 1 4 stainless steel tubing and other thin-wall assemblies.
- Back purge with inert gas: Shield the inside of the tube with argon to protect the root of the weld from oxidation, which is crucial for sanitary and high-purity lines.
Back Purging and Heat Tint Removal
Ever noticed rainbow-colored discoloration near a weld? That’s heat tint—an oxide layer that forms at high temperatures. While it might look harmless, it’s a red flag for reduced corrosion resistance. After welding, remove heat tint using pickling (acid treatment) or mechanical methods, then follow up with passivation to restore the chromium-rich passive layer. This is especially important when fabricating 1 1 2 stainless steel tubing or any tubing destined for chloride-rich or hygienic environments.
- Pickling: Use an approved acid solution to dissolve oxides and restore a uniform surface.
- Mechanical removal: Light grinding or brushing can eliminate discoloration, but always finish with passivation.
- Passivation: Apply a nitric or citric acid bath to rebuild the chromium oxide layer, maximizing corrosion resistance.
Bending, Forming, and Machining Notes
Bending stainless steel tubing opens up a world of design possibilities—but it also brings challenges like wrinkling, thinning, and springback. Here’s how to get it right:
- Minimum centerline radius (CLR): For most stainless steel tubing, aim for a CLR at least twice the tube’s OD (e.g., a 2-inch CLR for 1 inch stainless tube). Tighter bends increase risk of kinks and require specialized tooling.
- Mandrel support: Use a mandrel when bending thin-wall tubes to prevent collapse or wrinkling, especially on 1/2 stainless steel tubing or 1 4 stainless steel tubing.
- Springback planning: Stainless steel tends to spring back after bending. Over-bend slightly to achieve the desired final angle.
- Standard sizes: Stick to common tube sizes and bend radii to minimize tooling costs and lead times.
When it comes to machining, stainless steel’s hardness and tendency to work harden require extra care:
- Sharp tooling: Always use sharp, well-maintained tools to reduce heat and prevent work hardening.
- Coolant and lubrication: Apply plenty of coolant or lubricant to keep temperatures down and flush away chips.
- Controlled feeds and speeds: Avoid high-speed dry machining—slower, steady feeds help maintain tool life and surface finish.
- Check for work hardening: If you notice tools wearing out quickly or the material getting tougher mid-process, adjust your parameters and consider using carbide tooling.
Inspection and Quality Checks
Once fabrication is complete, inspect your work to ensure long-term reliability:
- Visual inspection: Look for uniform weld bead, minimal discoloration, and smooth surface finish.
- Weld profile: Ensure the weld is flush and free of undercut or excessive reinforcement.
- Surface finish: Confirm surface roughness meets your application’s hygiene or flow requirements.
- Non-destructive evaluation (NDE): For critical joints, consider dye penetrant or ultrasonic testing to catch hidden defects.
Pro Tip: In austenitic grades, avoid sensitization (loss of corrosion resistance due to chromium carbide precipitation) by using low-carbon variants (like 304L/316L) and controlling heat input. This is especially important for extensive welding on 1 inch stainless tubing or larger assemblies.
By following these best practices, you’ll ensure your stainless steel tubing—whether it’s bent, welded, or machined—delivers top-tier corrosion resistance and dimensional accuracy. Up next, we’ll explore how finish and maintenance routines extend tubing life, especially in demanding or hygienic environments.
Finishes, Cleaning, and Maintenance for Long Life in Stainless Steel Tubing
When you specify or install stainless steel tubing, have you ever wondered why some systems stay bright and clean for years while others show staining or corrosion? The secret often comes down to finish selection and a smart maintenance routine. Let’s break down which finishes work best for your application, how to keep them looking—and performing—their best, and how to spot and fix common corrosion issues before they become costly problems.
Finish Selection for Hygiene and Aesthetics
Choosing the right surface finish isn’t just about looks—it directly impacts how easy your stainless tubes are to clean, how well they resist corrosion, and how long they last. Imagine a food processing plant or a pharmaceutical line: you need a finish that’s not only attractive but also easy to sanitize and resistant to fouling. Here’s a quick comparison of common finishes and their best-fit applications:
| Finish Type | Typical Applications | Surface Roughness (Ra) | Maintenance Notes |
|---|---|---|---|
| Mill (No. 1, 2D) | Industrial, structural, chemical equipment | 0.2–0.5 μm (relatively rough) | Durable; regular cleaning needed to prevent buildup |
| Pickled & Passivated | Process piping, food service, stainless steel plumbing pipe |
0.2–0.3 μm | Improved corrosion resistance; rinse after cleaning |
| Brushed (No. 4, Satin) | Architectural, kitchen, handrails | ~0.2 μm | Attractive; shows fingerprints, clean along grain |
| Polished (No. 7/8, Mirror) | Pharma, high-purity, decorative, polished ss tubing |
0.1–0.2 μm (very smooth) | Easy to clean; avoid abrasive cleaners |
| Electropolished | Ultra-hygienic, biotech, stainless polished tube |
≤0.1 μm (exceptionally smooth) | Best for cleanability; periodic inspection recommended |
The smoother and more reflective the finish, the easier it is to clean and the lower the risk of fouling or biofilm buildup. For polished stainless steel tube in food or pharmaceutical service, electropolished or mirror finishes are often specified to meet strict hygiene standards.
Cleaning Routines That Preserve Passivity
Keeping stainless tubes clean isn’t just about appearance—it preserves the passive chromium-oxide layer that gives stainless steel its legendary corrosion resistance. But what’s the best way to clean these surfaces?
- Use mild detergents or ammonia-based cleaners with warm water for routine cleaning.
- For stubborn spots or fingerprints, apply approved stainless steel cleaners with a soft cloth, always rubbing in the direction of the grain for brushed finishes (Nickel Institute).
- Rinse thoroughly with clean water to remove all residues.
- Dry surfaces completely to avoid water spots or scale.
- Avoid chloride-containing cleaners and never use steel wool or carbon steel brushes—these can introduce rust-causing contamination.
- For periodic deep cleaning, alkaline or solvent degreasing may be used, followed by a passivation step if required.
Tip: For regulated industries, document your cleaning procedures and verify surface condition after fabrication or cleaning—simple water break tests or surface roughness measurements can be used for validation.
Recognizing Corrosion Types in Service
Even the best stainless tubes can face challenges if exposed to harsh conditions, poor drainage, or contamination. Here’s how to spot and address the most common issues:
- Tea staining: Brown discoloration, often in coastal or humid environments. Improve drainage, clean regularly, and consider a smoother or electropolished finish.
- Pitting corrosion: Small, deep pits—usually from chlorides or iron contamination. Prevent by avoiding chloride cleaners, using only stainless-compatible tools, and passivating after fabrication.
- Crevice corrosion: Occurs in tight spots or under gaskets. Design for easy drainage, inspect seals, and select finishes with low surface roughness.
Mitigation steps include prompt cleaning, passivation, and, if needed, upgrading to a higher-alloy tube or finish. Regular inspection is key—catching these early can prevent major failures.
Maintenance Intervals and Best Practices
How often should you clean your stainless steel tubing? It depends on the environment:
- Food, pharma, biotech: Clean daily or after each batch; inspect weekly.
- Architectural, decorative: Clean monthly; inspect quarterly.
- Industrial or outdoor: Clean and inspect every 3–6 months, or more often in corrosive or coastal locations.
Always adjust your maintenance schedule if you spot early signs of fouling or corrosion. For stainless steel plumbing pipe in aggressive environments, more frequent cleaning and inspection are recommended.
Smoother, cleaner surfaces reduce fouling, biofilm, and localized corrosion risk, extending service life.
By selecting the right finish for your application, using approved cleaning routines, and maintaining a regular inspection schedule, you’ll ensure your stainless tubes deliver long-lasting performance and visual appeal. Up next, we’ll cover procurement and quality control tips to help you specify and source tubing that meets both your technical and operational requirements.
Procurement Specifications and Quality Control for Stainless Steel Tubing
When you’re ready to source stainless steel tubing for your next project, the buying process can seem like a maze of technical requirements, supplier claims, and documentation. Sounds complex? Let’s simplify it. Whether you’re working with stainless steel tube suppliers for food-grade lines or structural applications, a clear procurement roadmap ensures you get the right material, on time, and with quality you can trust.
What to Put on Your Purchase Specification
Imagine you’ve found a promising stainless supplier, but your purchase order is missing key details. That’s a recipe for delays or costly rework. Here’s a checklist to help you specify exactly what you need:
- Material grade and standard: Specify ASTM A269, A213, or A312 as appropriate for your application (Pro QC).
- Dimensions: Clearly call out OD, wall thickness, and length—double-check units (mm vs. inch).
- Tolerance class: State required tolerances for OD and wall, referencing the relevant standard.
- Manufacturing route: Indicate welded, seamless, or cold-drawn, as needed for your service conditions.
- Surface finish and cleanliness: Note if pickled, passivated, polished, or electropolished is required.
- Heat treatment: Specify if solution annealed or other treatments are needed.
- NDE/testing requirements: List required tests (e.g., hydrotest, eddy current, ultrasonic) and acceptance criteria.
- Certification: Request Material Test Reports (MTRs) or Certificates of Compliance for traceability.
- Packaging: Define packaging to prevent transit damage and contamination.
Getting these details right upfront helps your stainless tube suppliers deliver exactly what your project demands.
How to Evaluate Stainless Tube Suppliers
Not all stainless steel tubing suppliers are created equal. When comparing options, ask yourself:
- Are they ISO 9001 certified? This signals robust quality management.
- Do they provide full traceability? Heat and lot numbers should be traceable back to the original melt.
- Can they supply documentation? Look for consistent MTRs, inspection records, and compliance certificates.
- Do they offer process controls? Documented procedures for welding, heat treatment, and finishing are a must for critical applications.
- What’s their track record? Check references, especially for similar projects or industries.
Top-tier stainless distributors often provide technical support, custom fabrication options, and responsive customer service. Building a relationship with a trusted stainless supplier pays off in fewer surprises and smoother deliveries.
Common Standards, Applications, and Testing Expectations
| Standard | Typical Application | Key Testing Requirements |
|---|---|---|
| ASTM A269 | Instrumentation, general service, heat exchangers | Hydrotest, eddy current, visual/dimensional |
| ASTM A213 | Boiler, superheater, heat exchanger tubing | Hydrotest, ultrasonic, chemical analysis |
| ASTM A312 | Process piping, pressure lines | Hydrotest, visual/dimensional, chemical analysis |
| ASME B36.19M | Stainless steel pipe dimensions (reference only) | Dimensional verification |
Lead Time Drivers and Special Requirements
- Custom wall thicknesses or diameters: May require new tooling or mill runs.
- Special finishes (polished, electropolished): Add production steps and inspection.
- Secondary operations: Cut-to-length, deburring, or bending can extend lead times.
- Documentation and testing: Extra NDE or third-party inspection increases delivery time and cost.
Communicate your project schedule and critical requirements early with your stainless steel tube manufacturers to avoid surprises.
Inspection and Documentation at Receipt
When your order arrives, don’t just sign off. Here’s how to structure a thorough acceptance inspection:
- Count and verify quantity against the packing list.
- Check markings and labels for heat number, size, and spec—these are key for traceability.
- Measure OD, wall, and length at multiple points using calibrated tools.
- Visually inspect for defects: dents, scratches, weld seam irregularities, or corrosion.
- Review all MTRs and certificates for compliance with your order and standards.
- Examine packaging for damage or contamination risk.
- Request heat/lot consolidation if consistency across your order is critical.
"A rigorous quality control process—covering quantity, dimensions, material certification, and visual inspection—minimizes the risk of defects and ensures your project’s safety and reliability."
By following these procurement and inspection best practices, you’ll ensure your stainless steel tubing meets both technical and operational needs. Next, we’ll explore how rapid prototyping can accelerate your stainless tubing projects and help you qualify designs before full-scale production.
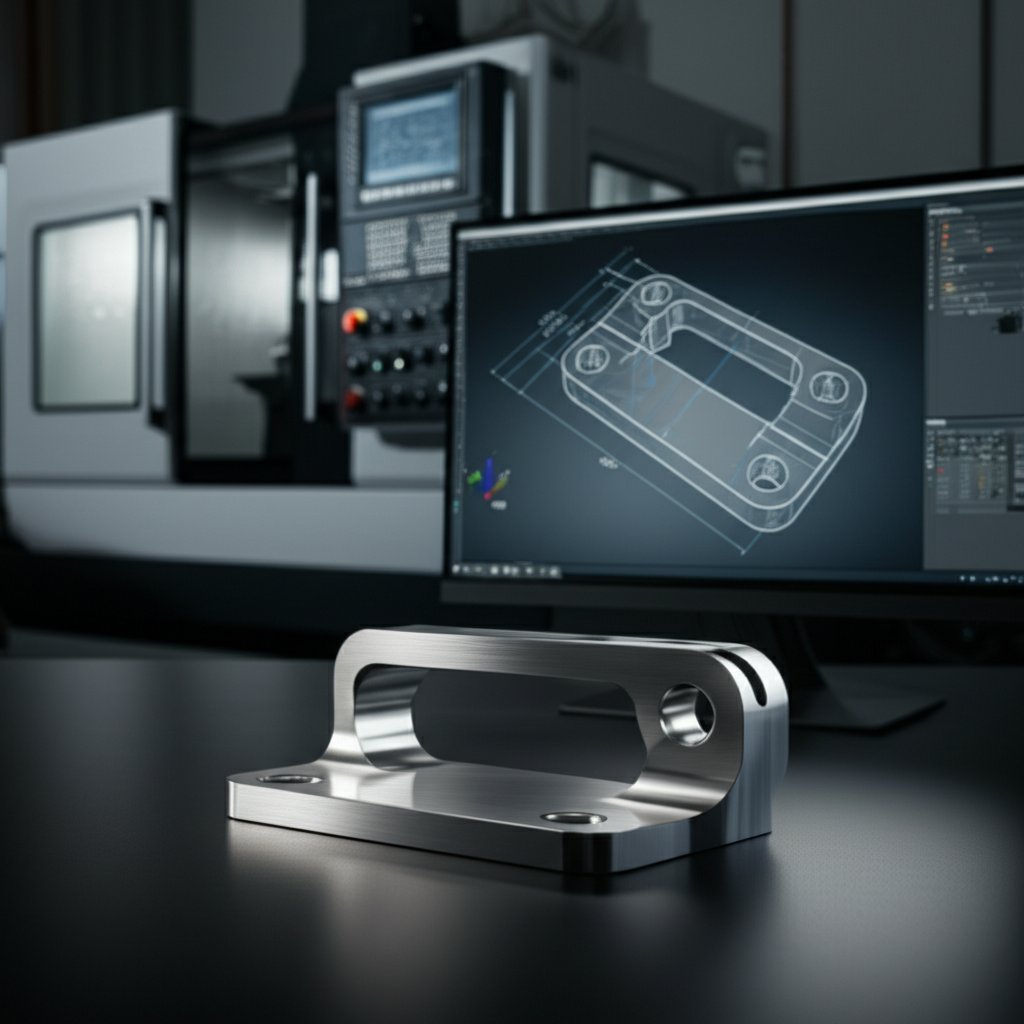
Rapid Prototyping for Stainless Tubing Parts
Ever found yourself waiting weeks for a stainless steel tubing bracket or manifold, only to discover it doesn’t quite fit? Imagine if you could hold a precision stainless steel tubing fixture in your hands within days, check the fit, and move forward with confidence—no costly rework or delays. That’s the power of rapid prototyping in today’s stainless tubing projects.
When Rapid Prototyping De-Risks Your Tubing Design
Designing components that interface with stainless steel tubing—like custom manifolds, brackets, or housings—means every millimeter counts. A minor mismatch can throw off alignment, cause leaks, or complicate assembly. Rapid prototyping lets you quickly turn CAD models into real parts, so you can:
- Verify fit-up and clearances before committing to full production
- Test assembly with actual tubing—catching design flaws early
- Iterate on designs for optimal performance and cost
- Accelerate development cycles for new fixtures, instrumentation, or process assemblies
Whether you’re developing a new process skid, medical device, or industrial frame, rapid prototyping is especially valuable for precision stainless steel tubing assemblies, where tolerances and surface finish are critical.
Bridging from Prototype to Low-Volume Production
Once your prototype passes fit and function checks, the next step is moving to low-volume or pilot production. Here’s where a robust workflow pays off. A typical prototype-to-production process for stainless tubing components includes:
- CAD Review & DFM (Design for Manufacturability): Engineers review your model and suggest tweaks for easier fabrication—catching potential issues before they become expensive mistakes.
- Material Selection: Choose from a range of stainless alloys, matching tubing grades and finishes for compatibility and corrosion resistance.
- Machining or Forming Strategy: Decide between CNC machining, tube bending, or forming, based on geometry and batch size. For complex brackets or housings, CNC machining delivers tight tolerances and repeatability.
- Finishing & Passivation: Ensure all surfaces are smooth, deburred, and passivated for corrosion resistance—especially where parts contact stainless steel tubing.
- Inspection & Documentation: Measure critical features, document findings, and align inspection records with tubing specs for traceability.
This workflow minimizes surprises and ensures that when you buy stainless steel tube or accessories, everything comes together seamlessly.
Integrating DFM Early for Cost and Performance
Integrating Design for Manufacturability (DFM) feedback early in your process pays big dividends. For example, tweaking a bracket’s slot width to match standard stainless steel tubing for sale can save on machining time and material waste. Or, choosing a radius that’s compatible with common tube bending fixtures can reduce tooling costs and lead times.
Services like XTJ Rapid Prototyping stand out by offering complimentary DFM reviews, ISO 9001:2015 certified quality, and a broad material selection—including stainless and aluminum alloys. Their CNC machining and forming capabilities are particularly suited for custom brackets, manifolds, and housings that must integrate with stainless online tubing systems. Quick-turn feedback and rapid iteration help you qualify designs before investing in full-scale tooling or committing to large orders.
| Provider | Lead Time | Process Breadth | Material Options | Quality Controls | DFM Support |
|---|---|---|---|---|---|
| XTJ Rapid Prototyping | 1–7 days (depending on part complexity) | CNC machining, injection molding, die casting, tube forming | 50+ metals & plastics (including stainless, aluminum, engineering polymers) | ISO 9001:2015 certified, full inspection, traceable documentation | Complimentary DFM review by experienced engineers |
| In-House Prototyping | Variable—often 1–3 weeks; depends on equipment & workload | Limited to available shop tools (manual/CNC, benders) | Restricted to stocked materials | Shop-level checks; documentation varies | Dependent on internal expertise |
| General External Vendor | 1–4 weeks (varies by queue and process) | Machining, sometimes forming; may outsource specialty ops | Common alloys; specialty grades may require extra sourcing | May offer inspection; certification on request | DFM support varies; often limited or fee-based |
By comparing vendors on lead time, process breadth, material selection, and quality controls, you can choose the best fit for your stainless steel tubing project—whether you need a single prototype or a short production run. For teams looking to buy stainless steel pipe accessories or custom fixtures online, prioritizing rapid feedback and robust quality documentation helps ensure your parts arrive ready to perform.
In summary, rapid prototyping isn’t just about speed—it’s about reducing risk, improving design quality, and getting your stainless steel tubing assemblies into service faster. By leveraging modern prototyping services and integrating DFM early, you’ll shorten design loops, control costs, and set your project up for long-term success.
Frequently Asked Questions about Stainless Steel Tubing
1. What is the difference between 304 and 316 stainless steel tubing?
304 stainless steel tubing is ideal for general applications due to its good corrosion resistance and formability, while 316 tubing includes molybdenum for enhanced resistance in chloride-rich or harsh environments such as marine or chemical processing. Choosing between them depends on the specific exposure and cleaning requirements of your project.
2. What is the difference between stainless steel pipe and stainless steel tubing?
Stainless steel tubing is defined by its precise outside diameter and wall thickness, making it suitable for structural, instrumentation, or hygienic uses. Stainless steel pipe, however, is sized by nominal pipe size and schedule, focusing on fluid flow capacity and pressure rating, and is commonly used for transporting fluids.
3. Is stainless steel completely rust proof?
Stainless steel is highly resistant to rust due to its chromium content, but it is not entirely rust proof. Factors like exposure to chlorides, poor drainage, or improper maintenance can lead to corrosion or staining. Selecting the right grade and finish, along with regular cleaning, helps maximize corrosion resistance.
4. How do I choose the right stainless steel tubing size for my application?
To select the correct tubing size, confirm the required outside diameter, wall thickness, and length based on your design and application. Use a stainless steel tube sizes chart for accurate conversions between metric and inch systems, and ensure tolerances, finishes, and end conditions match your project's needs.
5. What are the best practices for welding and maintaining stainless steel tubing?
Use TIG or orbital welding for clean, high-quality joints, ensure thorough cleaning before and after welding, and apply passivation to restore corrosion resistance. For maintenance, use approved cleaning agents, avoid chloride cleaners, and follow a regular inspection schedule to prevent and address corrosion early.
-
Posted in
stainless steel pipe, stainless steel tubing, tubing fabrication, tubing grades, tubing procurement


